Awesome
Powerlevel10k
- THE PROJECT HAS VERY LIMITED SUPPORT
- NO NEW FEATURES ARE IN THE WORKS
- MOST BUGS WILL GO UNFIXED
- HELP REQUESTS WILL BE IGNORED
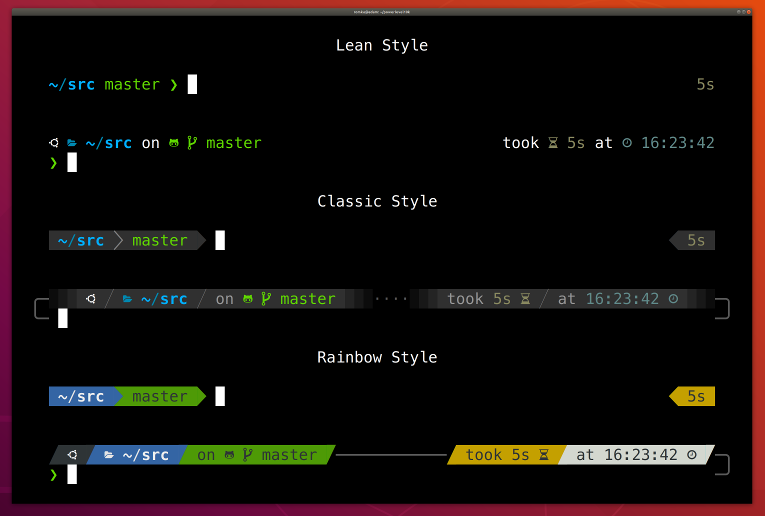
Powerlevel10k is a theme for Zsh. It emphasizes speed, flexibility and out-of-the-box experience.
- Getting started
- Features
- Installation
- Configuration
- Fonts
- Try it in Docker
- License
- FAQ
- Troubleshooting
Getting started
- Install the recommended font. Optional but highly recommended.
- Install Powerlevel10k itself.
- Restart Zsh with
exec zsh. - Type
p10k configureif the configuration wizard doesn't start automatically.
Features
- Configuration wizard
- Uncompromising performance
- Powerlevel9k compatibility
- Pure compatibility
- Instant prompt
- Show on command
- Transient prompt
- Current directory that just works
- Extremely customizable
- Batteries included
- Extensible
Configuration wizard
Type p10k configure to access the builtin configuration wizard right from your terminal.
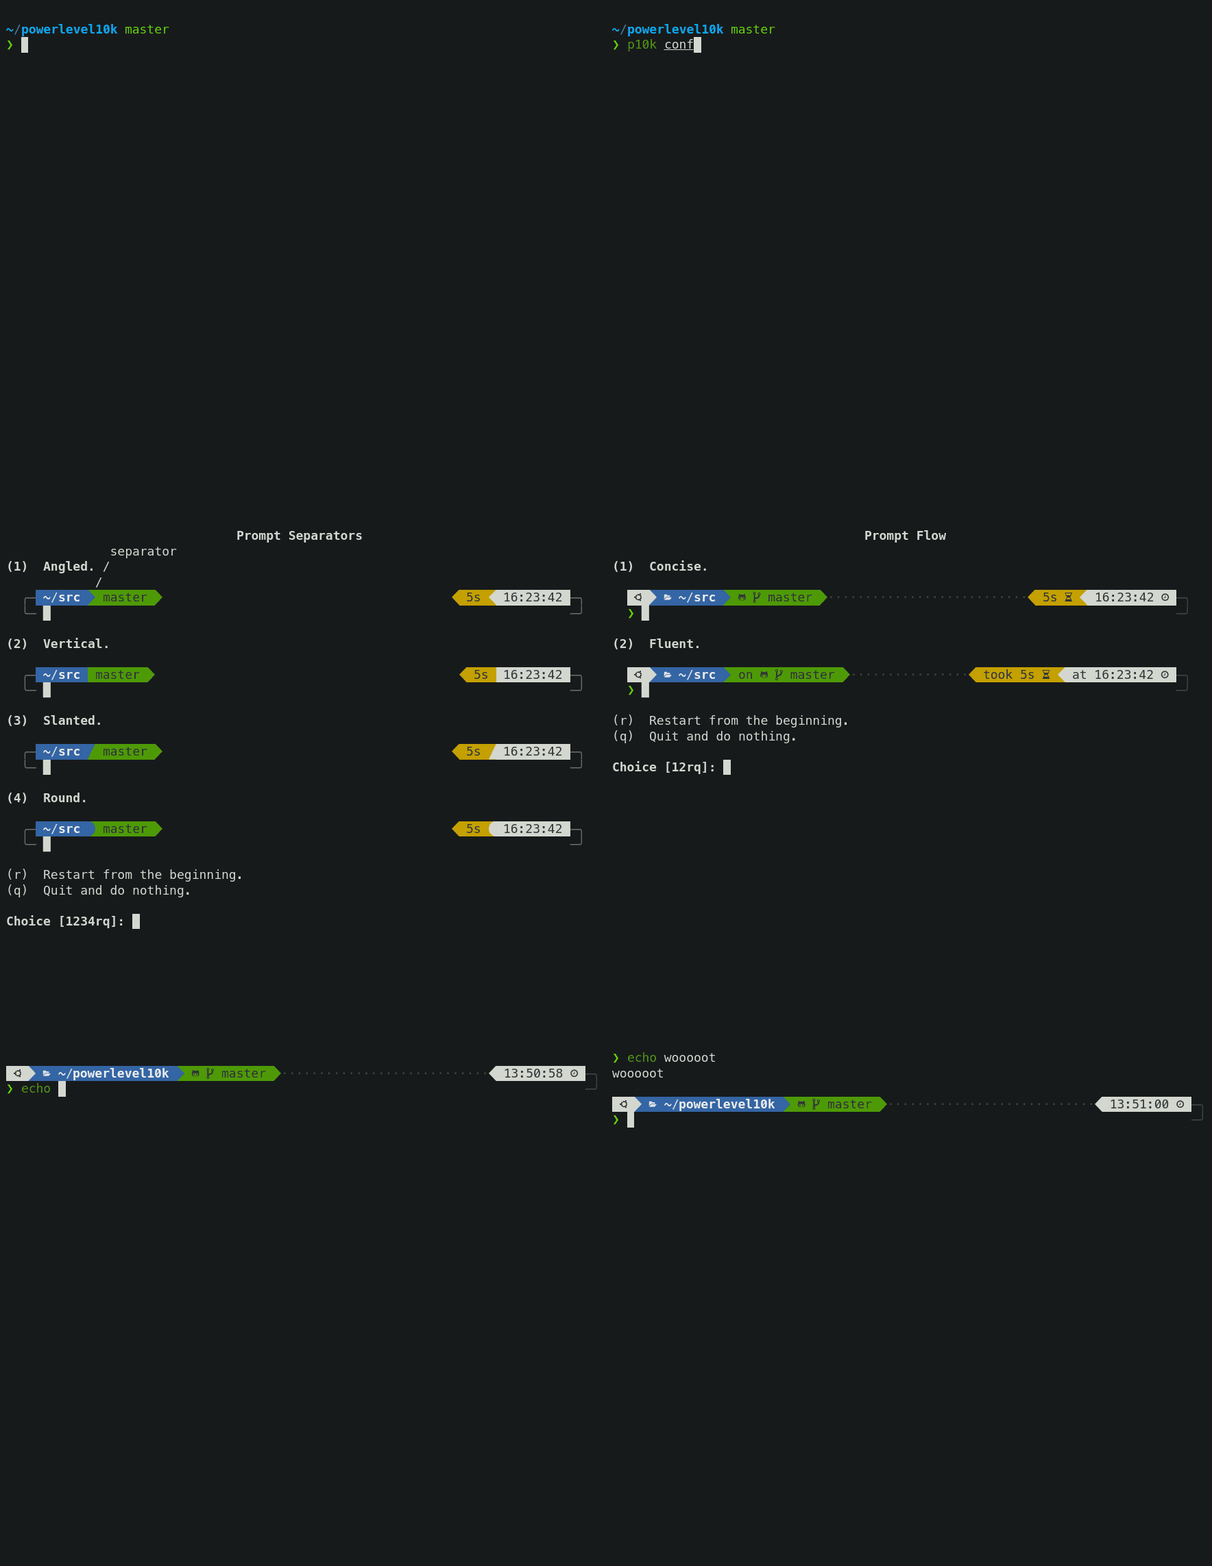
All styles except Pure are functionally equivalent. They display the same information and differ only in presentation.
Configuration wizard creates ~/.p10k.zsh based on your preferences. Additional prompt
customization can be done by editing this file. It has plenty of comments to help you navigate
through configuration options.
Tip: Install the recommended font before
running p10k configure to unlock all prompt styles.
FAQ:
- What is the best prompt style in the configuration wizard?
- What do different symbols in Git status mean?
- How do I change prompt colors?
Troubleshooting:
- Some prompt styles are missing from the configuration wizard.
- Question mark in prompt.
- Icons, glyphs or powerline symbols don't render.
- Sub-pixel imperfections around powerline symbols.
- Directory is difficult to see in prompt when using Rainbow style.
Uncompromising performance
When you hit ENTER, the next prompt appears instantly. With Powerlevel10k there is no prompt lag.
If you install Cygwin on Raspberry Pi, cd into a Linux Git repository and activate enough prompt
segments to fill four prompt lines on both sides of the screen... wait, that's just crazy and no
one ever does that. Probably impossible, too. The point is, Powerlevel10k prompt is always fast, no
matter what you do!

Note how the effect of every command is instantly reflected by the very next prompt.
| Command | Prompt Indicator | Meaning |
|---|---|---|
timew start hack linux | ⌚ hack linux | time tracking enabled in timewarrior |
touch x y | ?2 | 2 untracked files in the Git repo |
rm COPYING | !1 | 1 unstaged change in the Git repo |
echo 3.7.3 >.python-version | 🐍 3.7.3 | the current python version in pyenv |
Other Zsh themes capable of displaying the same information either produce prompt lag or print prompt that doesn't reflect the current state of the system and then refresh it later. With Powerlevel10k you get fast prompt and up-to-date information.
FAQ: Is it really fast?
Powerlevel9k compatibility
Powerlevel10k understands all Powerlevel9k configuration parameters.
<details> <summary>Screen recording</summary>
Migration from Powerlevel9k to Powerlevel10k is a straightforward process. All
your POWERLEVEL9K configuration parameters will still work. Prompt will look the same as before
(almost)
but it will be much faster (certainly).
FAQ:
- I'm using Powerlevel9k with Oh My Zsh. How do I migrate?
- Does Powerlevel10k always render exactly the same prompt as Powerlevel9k given the same config?
- What is the relationship between Powerlevel9k and Powerlevel10k?
Pure compatibility
Powerlevel10k can produce the same prompt as Pure. Type
p10k configure and select Pure style.
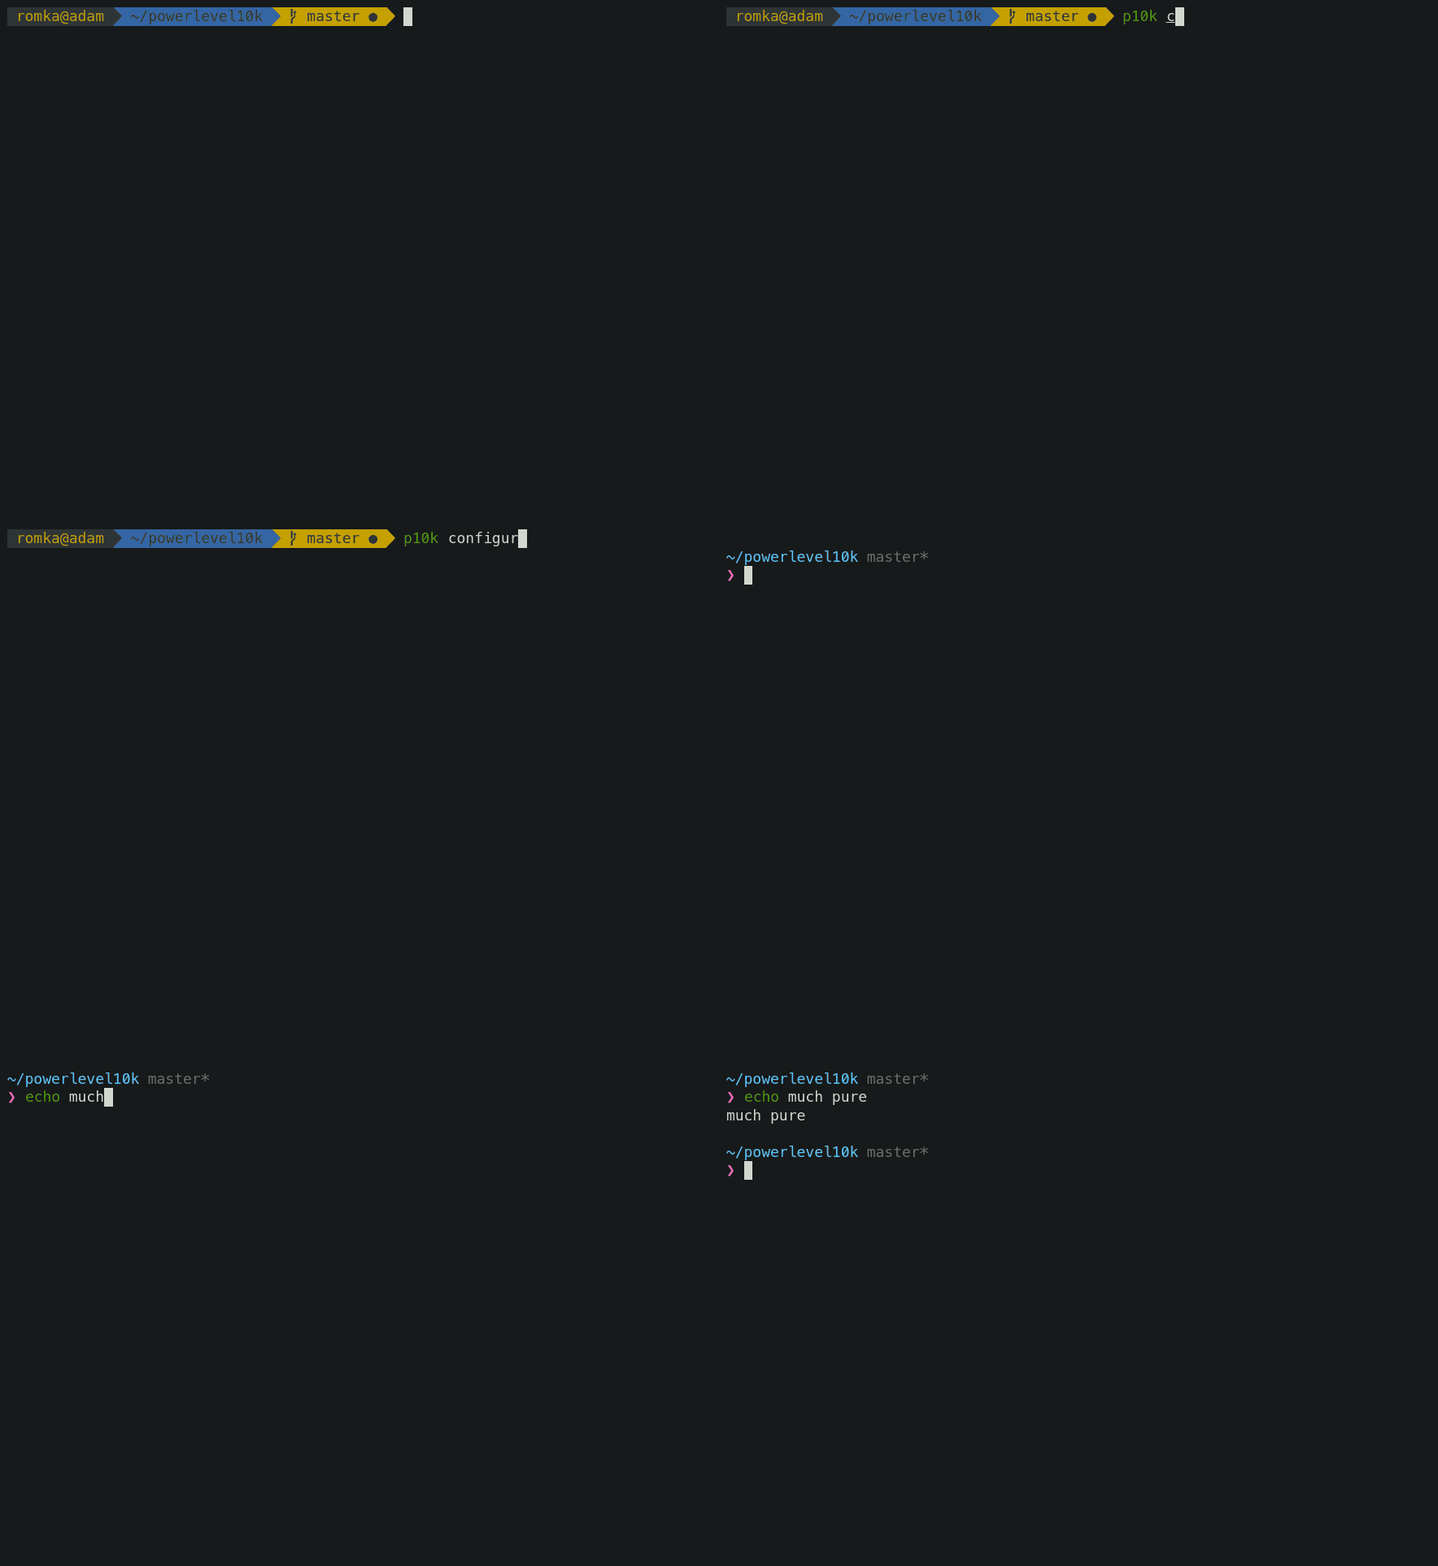
You can still use Powerlevel10k features such as transient prompt or instant prompt when sporting Pure style.
To customize prompt, edit ~/.p10k.zsh. Powerlevel10k doesn't recognize Pure configuration
parameters, so you'll need to use POWERLEVEL9K_COMMAND_EXECUTION_TIME_THRESHOLD=3 instead of
PURE_CMD_MAX_EXEC_TIME=3, etc. All relevant parameters are in ~/.p10k.zsh. This file has
plenty of comments to help you navigate through it.
FAQ: What is the best prompt style in the configuration wizard?
<a name='what-is-instant-prompt'></a>Instant prompt
If your ~/.zshrc loads many plugins, or perhaps just a few slow ones
(for example, pyenv or nvm), you
may have noticed that it takes some time for Zsh to start.

Powerlevel10k can remove Zsh startup lag even if it's not caused by a theme.
<details> <summary>Screen recording</summary>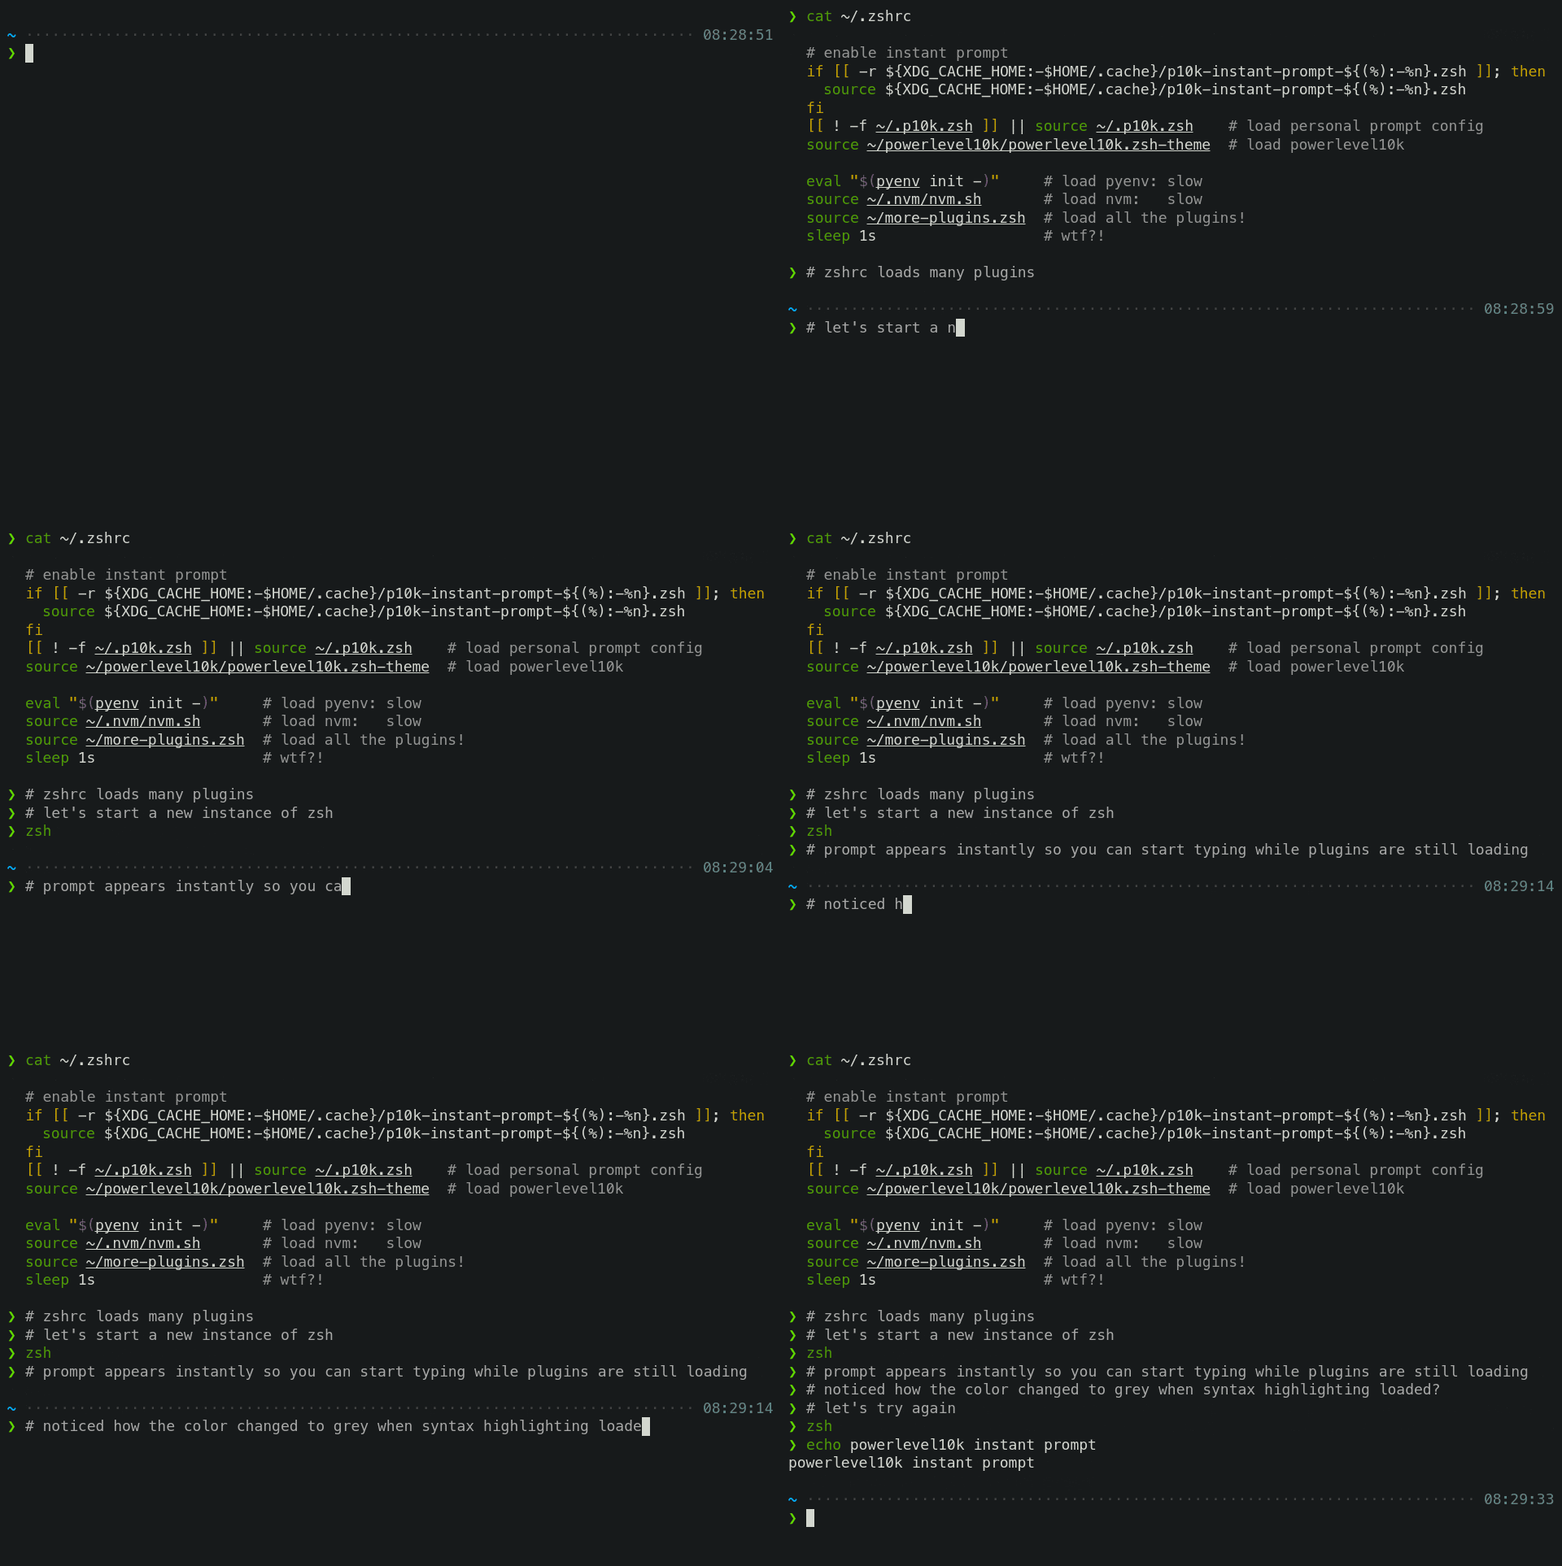
This feature is called Instant Prompt. You need to explicitly enable it through p10k configure
or manually. It does what it says on the tin -- prints prompt
instantly upon Zsh startup allowing you to start typing while plugins are still loading.
Other themes increase Zsh startup lag -- some by a lot, others by a just a little. Powerlevel10k removes it outright.
If you are curious about how Instant Prompt works, see this section in zsh-bench.
FAQ: How do I configure instant prompt?
Show on command
The behavior of some commands depends on global environment. For example, kubectl run ... runs an
image on the cluster defined by the current kubernetes context. If you frequently change context
between "prod" and "testing", you might want to display the current context in Zsh prompt. If you do
likewise for AWS, Azure and Google Cloud credentials, prompt will get pretty crowded.
Enter Show On Command. This feature makes prompt segments appear only when they are relevant to the command you are currently typing.
<details> <summary>Screen recording</summary>
Configs created by p10k configure enable show on command for several prompt segments by default.
Here's the relevant parameter for kubernetes context:
# Show prompt segment "kubecontext" only when the command you are typing invokes one of these tools.
typeset -g POWERLEVEL9K_KUBECONTEXT_SHOW_ON_COMMAND='kubectl|helm|kubens'
To customize when different prompt segments are shown, open ~/.p10k.zsh, search for
SHOW_ON_COMMAND and either remove these parameters to display affected segments unconditionally,
or change their values.
Transient prompt
When Transient Prompt is enabled through p10k configure, Powerlevel10k will trim down every
prompt when accepting a command line.
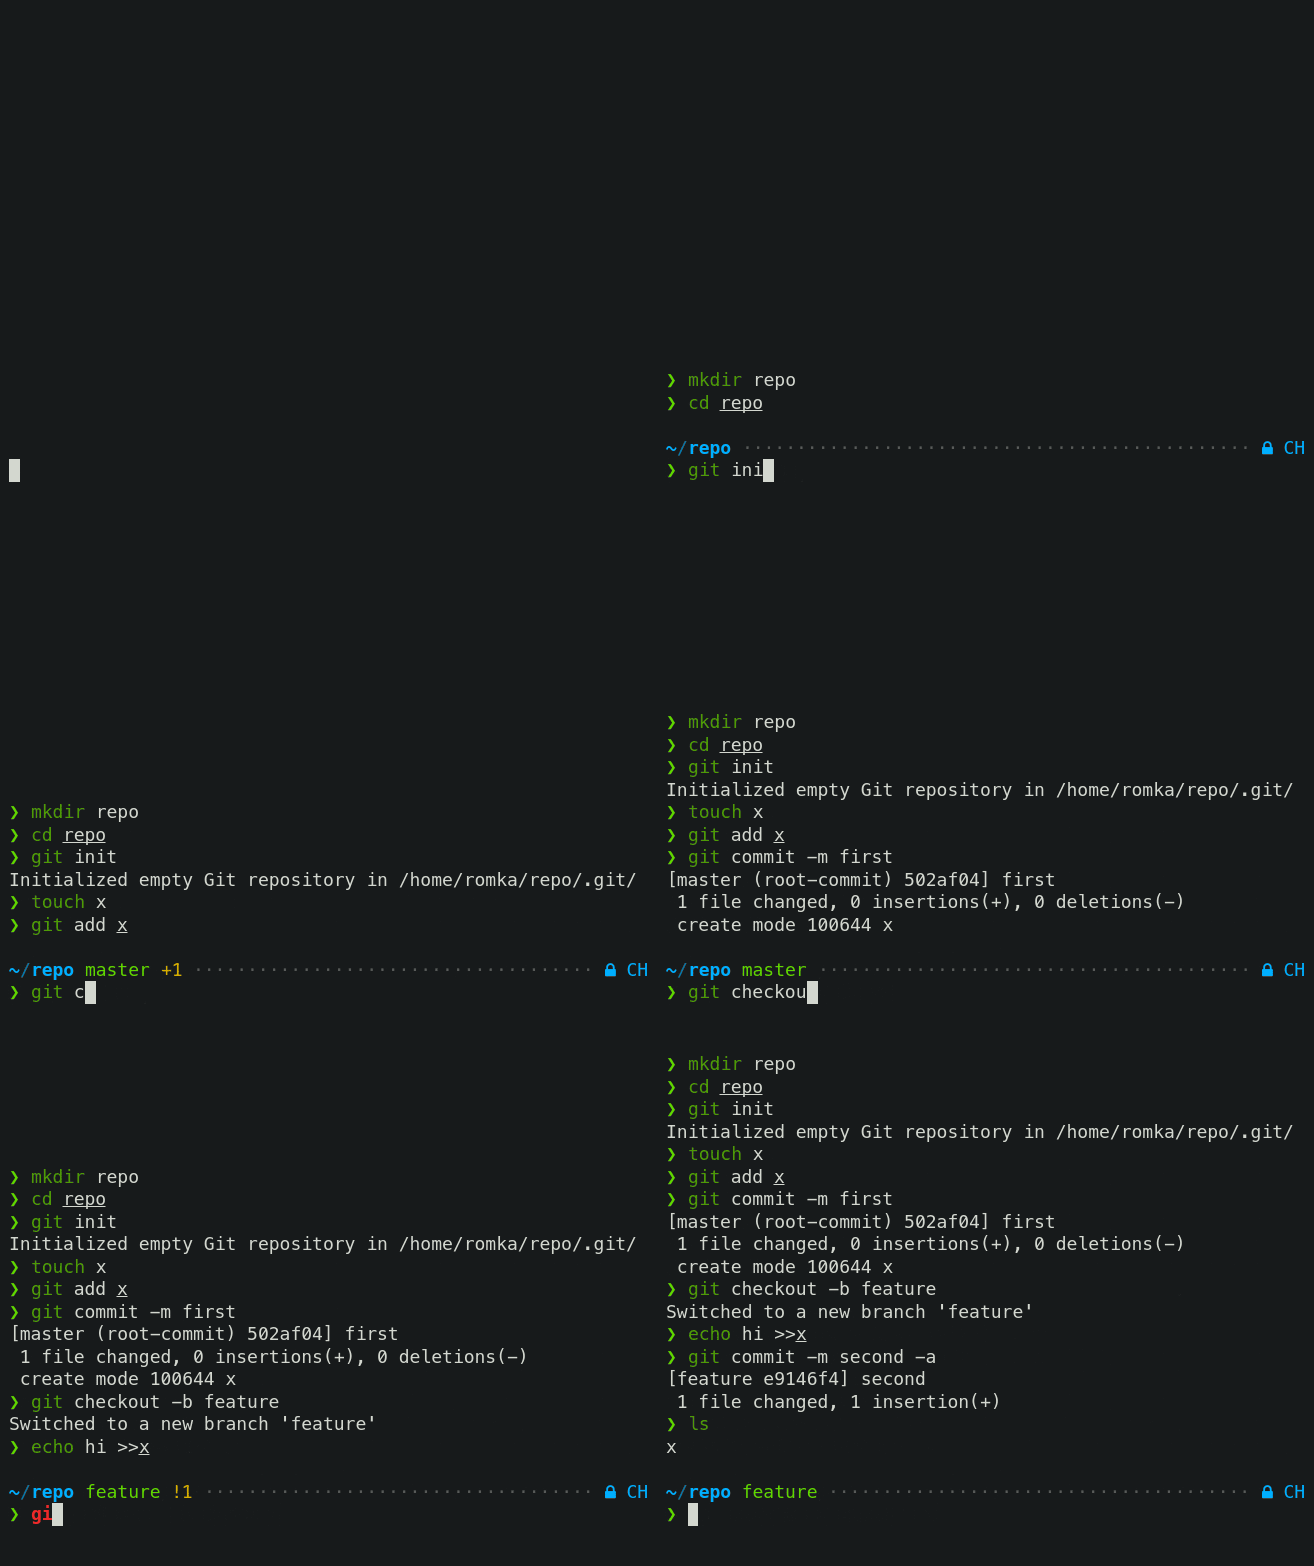
Transient prompt makes it much easier to copy-paste series of commands from the terminal scrollback.
Tip: If you enable transient prompt, take advantage of two-line prompt. You'll get the benefit of extra space for typing commands without the usual drawback of reduced scrollback density. Sparse prompt (with an empty line before prompt) also works great in combination with transient prompt.
Current directory that just works
The current working directory is perhaps the most important prompt segment. Powerlevel10k goes to great length to highlight its important parts and to truncate it with the least loss of information when horizontal space gets scarce.
<details> <summary>Screen recording</summary>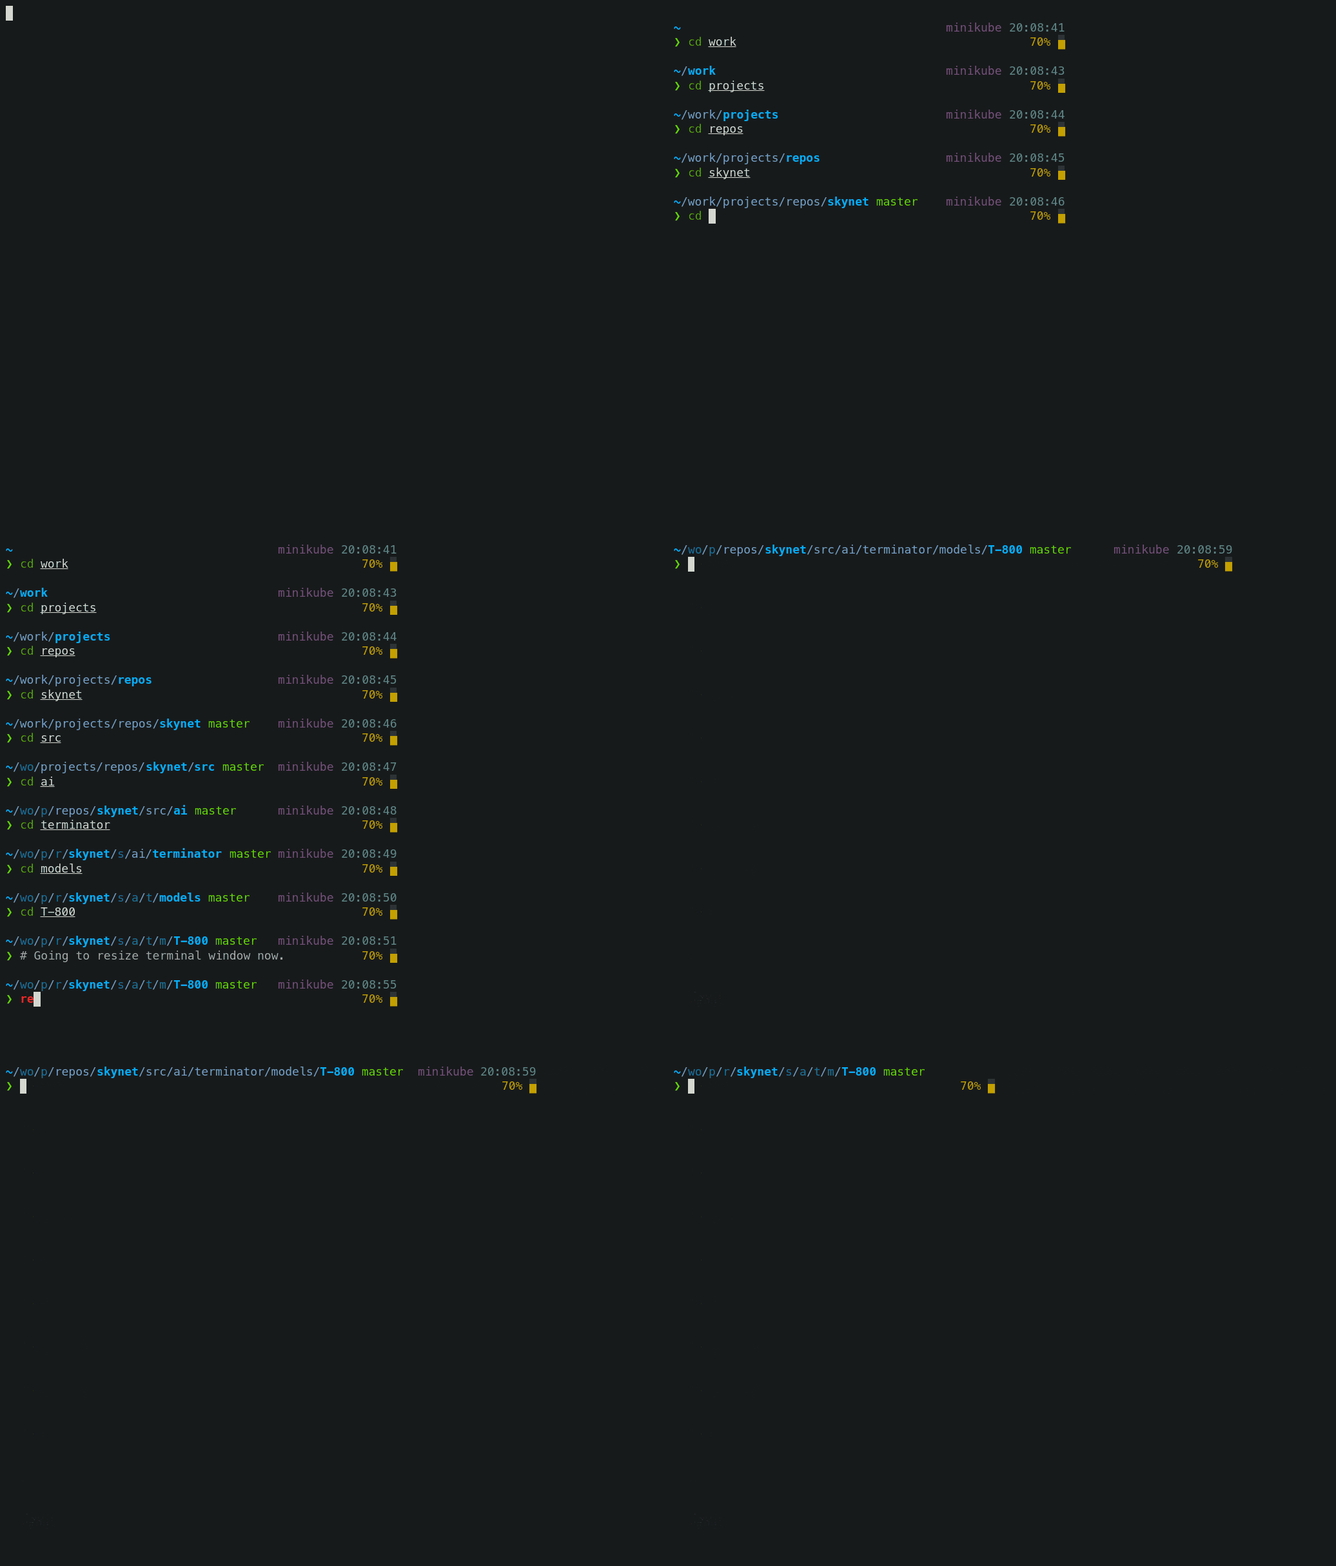
When the full directory doesn't fit, the leftmost segment gets truncated to its shortest unique
prefix. In the screencast, ~/work becomes ~/wo. It couldn't be truncated to ~/w because it
would be ambiguous (there was ~/wireguard when the session was recorded). The next segment --
projects -- turns into p as there was nothing else that started with p in ~/work/.
Directory segments are shown in one of three colors:
- Truncated segments are bleak.
- Important segments are bright and never truncated. These include the first and the last segment, roots of Git repositories, etc.
- Regular segments (not truncated but can be) use in-between color.
Tip: If you copy-paste a truncated directory and hit TAB, it'll complete to the original.
Troubleshooting: Directory is difficult to see in prompt when using Rainbow style.
Extremely customizable
Powerlevel10k can be configured to look like any other Zsh theme out there.
<details> <summary>Screen recording</summary>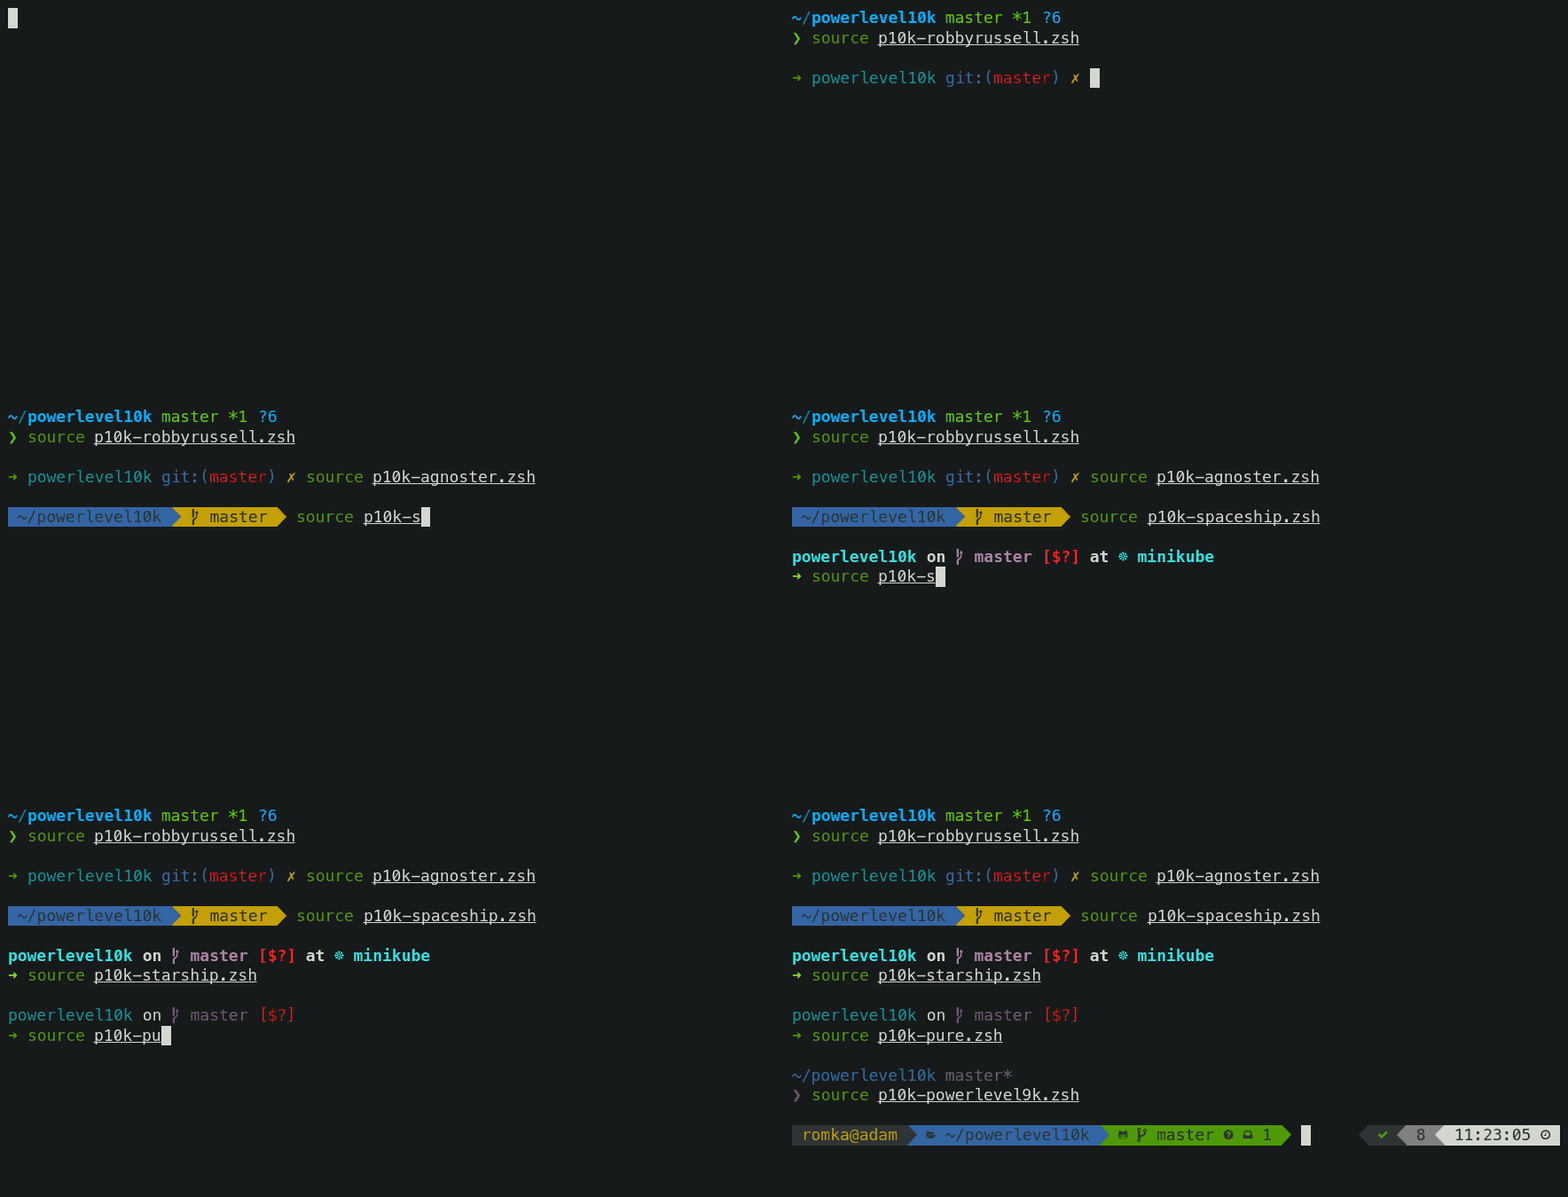
Pure, Powerlevel9k and robbyrussell emulations are built-in.
To emulate the appearance of other themes, you'll need to write a suitable configuration file. The
best way to go about it is to run p10k configure, select the style that is the closest to your
goal and then edit ~/.p10k.zsh.
The full range of Powerlevel10k appearance spans from spartan:

To ridiculous extravagant:

Batteries included
Powerlevel10k comes with dozens of built-in high quality prompt segments that can display
information from a variety of sources. When you run p10k configure and choose any style
except Pure, many of these segments get enabled by
default while others can be manually enabled by opening ~/.p10k.zsh and uncommenting them.
You can enable as many segments as you like. It won't slow down your prompt or Zsh startup.
| Segment | Meaning |
|---|---|
anaconda | virtual environment from conda |
asdf | tool versions from asdf |
aws | aws profile |
aws_eb_env | aws elastic beanstalk environment |
azure | azure account name |
background_jobs | presence of background jobs |
battery | internal battery state and charge level (yep, batteries literally included) |
command_execution_time | duration (wall time) of the last command |
context | user@hostname |
cpu_arch | CPU architecture |
dir | current working directory |
direnv | direnv status |
disk_usage | disk usage |
dotnet_version | dotnet version |
fvm | flutter environment from fvm |
gcloud | google cloud cli account and project |
goenv | go environment from goenv |
google_app_cred | google application credentials |
go_version | go version |
haskell_stack | haskell version from stack |
ip | IP address and bandwidth usage for a specified network interface |
java_version | java version |
jenv | java environment from jenv |
kubecontext | current kubernetes context |
laravel_version | laravel php framework version |
load | CPU load |
luaenv | lua environment from luaenv |
midnight_commander | midnight commander shell |
nix_shell | nix shell indicator |
nnn | nnn shell |
lf | lf shell |
chezmoi_shell | chezmoi shell |
nodeenv | node.js environment from nodeenv |
nodenv | node.js environment from nodenv |
node_version | node.js version |
nordvpn | nordvpn connection status |
nvm | node.js environment from nvm |
os_icon | your OS logo (apple for macOS, swirl for debian, etc.) |
package | name@version from package.json |
per_directory_history | Oh My Zsh per-directory-history local/global indicator |
perlbrew | perl version from perlbrew |
phpenv | php environment from phpenv |
php_version | php version |
plenv | perl environment from plenv |
prompt_char | multi-functional prompt symbol; changes depending on vi mode: ❯, ❮, V, ▶ for insert, command, visual and replace mode respectively; turns red on error |
proxy | system-wide http/https/ftp proxy |
public_ip | public IP address |
pyenv | python environment from pyenv |
ram | free RAM |
ranger | ranger shell |
yazi | yazi shell |
rbenv | ruby environment from rbenv |
rust_version | rustc version |
rvm | ruby environment from rvm |
scalaenv | scala version from scalaenv |
status | exit code of the last command |
swap | used swap |
taskwarrior | taskwarrior task count |
terraform | terraform workspace |
terraform_version | terraform version |
time | current time |
timewarrior | timewarrior tracking status |
todo | todo items |
toolbox | toolbox name |
vcs | Git repository status |
vim_shell | vim shell (:sh) |
virtualenv | python environment from venv |
vi_mode | vi mode (you don't need this if you've enabled prompt_char) |
vpn_ip | virtual private network indicator |
wifi | WiFi speed |
xplr | xplr shell |
Extensible
If there is no prompt segment that does what you need, implement your own. Powerlevel10k provides public API for defining segments that are as fast and as flexible as built-in ones.
<details> <summary>Screen recording</summary>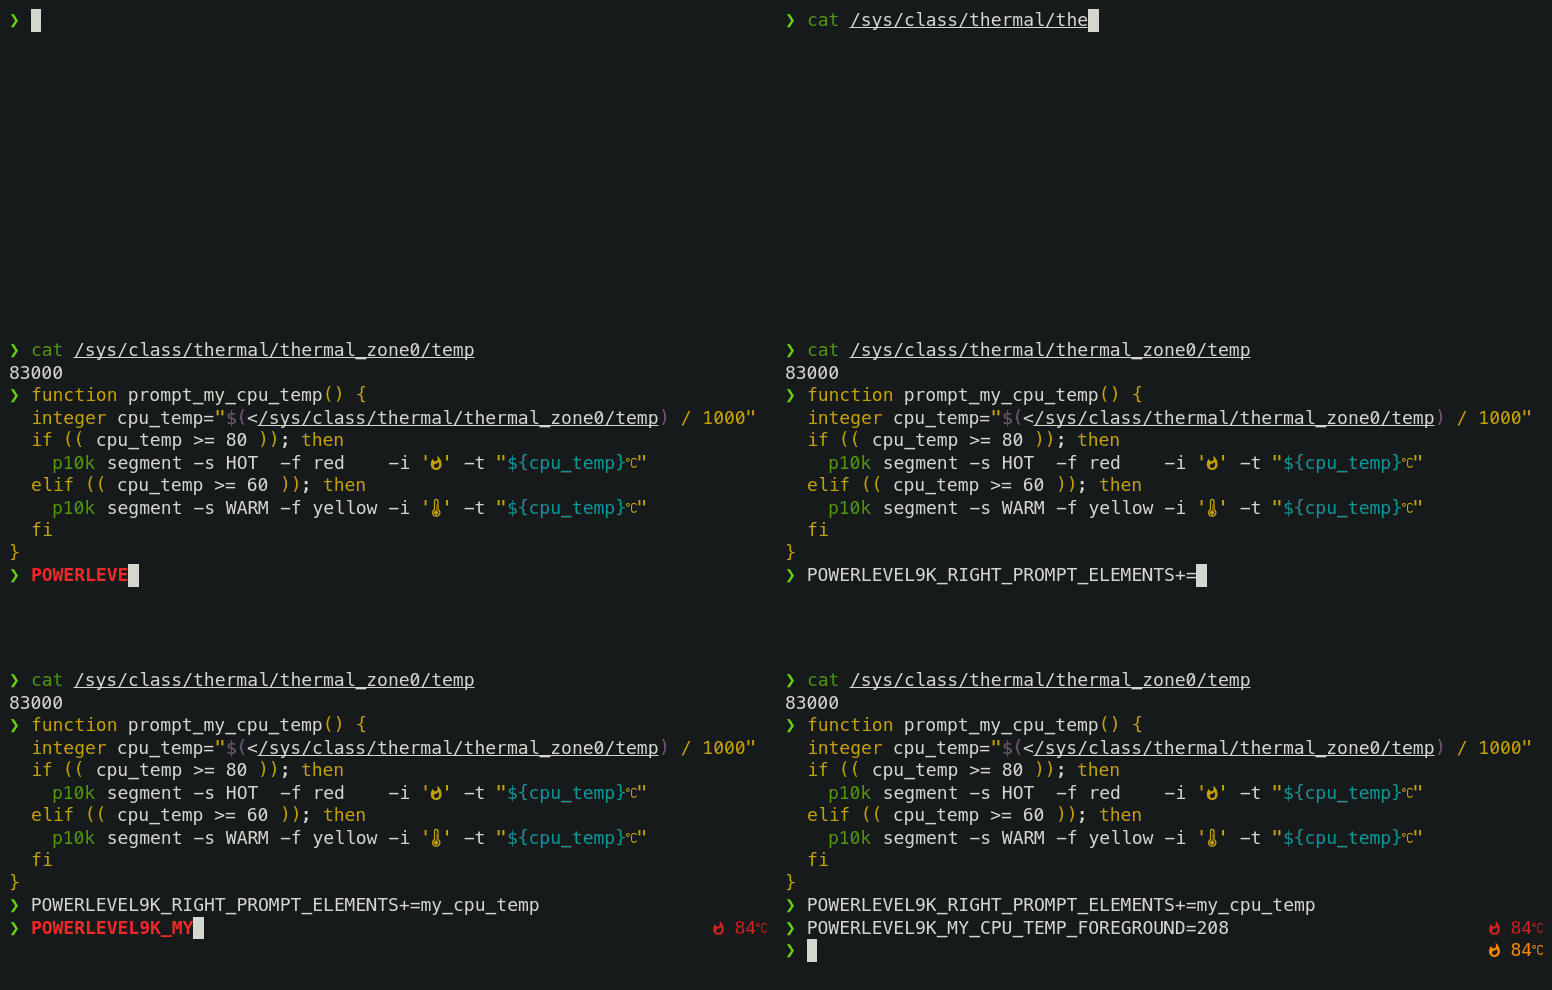
On Linux you can fetch current CPU temperature by reading /sys/class/thermal/thermal_zone0/temp.
The screencast shows how to define a prompt segment to display this value. Once the segment is
defined, you can use it like any other segment. All standard customization parameters will work for
it out of the box.
Type p10k help segment for reference.
Note: If you modify POWERLEVEL9K_* parameters in an already initialized interactive shell (as
opposed to editing ~/.p10k.zsh), the changes might not be immediately effective. To apply the
modifications, invoke p10k reload. Setting POWERLEVEL9K_DISABLE_HOT_RELOAD=false eliminates the
necessity for p10k reload but results in a marginally slower prompt.
Tip: Prefix names of your own segments with my_ to avoid clashes with future versions of
Powerlevel10k.
Installation
- Manual 👈 choose this if confused or uncertain
- Oh My Zsh
- Prezto
- Zim
- Antibody
- Antidote
- Antigen
- Zplug
- Zgen
- Zplugin
- Zinit
- Zi
- Zap
- Homebrew
- Arch Linux
- Alpine Linux
- Fig
Manual
git clone --depth=1 https://github.com/romkatv/powerlevel10k.git ~/powerlevel10k
echo 'source ~/powerlevel10k/powerlevel10k.zsh-theme' >>~/.zshrc
Users in China can use the official mirror on gitee.com for faster download.<br> 中国用户可以使用 gitee.com 上的官方镜像加速下载.
git clone --depth=1 https://gitee.com/romkatv/powerlevel10k.git ~/powerlevel10k
echo 'source ~/powerlevel10k/powerlevel10k.zsh-theme' >>~/.zshrc
This is the simplest kind of installation and it works even if you are using a plugin manager. Just make sure to disable the current theme in your plugin manager. See troubleshooting for help.
Oh My Zsh
-
Clone the repository:
git clone --depth=1 https://github.com/romkatv/powerlevel10k.git ${ZSH_CUSTOM:-$HOME/.oh-my-zsh/custom}/themes/powerlevel10kUsers in China can use the official mirror on gitee.com for faster download.<br> 中国用户可以使用 gitee.com 上的官方镜像加速下载.
git clone --depth=1 https://gitee.com/romkatv/powerlevel10k.git ${ZSH_CUSTOM:-$HOME/.oh-my-zsh/custom}/themes/powerlevel10k -
Open
~/.zshrc, find the line that setsZSH_THEME, and change its value to"powerlevel10k/powerlevel10k".
Prezto
Add zstyle :prezto:module:prompt theme powerlevel10k to ~/.zpreztorc.
Zim
Add zmodule romkatv/powerlevel10k --use degit to ~/.zimrc and run zimfw install.
Antibody
Add antibody bundle romkatv/powerlevel10k to ~/.zshrc.
Antidote
Add romkatv/powerlevel10k to ~/.zsh_plugins.txt.
Antigen
Add antigen theme romkatv/powerlevel10k to ~/.zshrc. Make sure you have antigen apply
somewhere after it.
Zplug
Add zplug romkatv/powerlevel10k, as:theme, depth:1 to ~/.zshrc.
Zgen
Add zgen load romkatv/powerlevel10k powerlevel10k to ~/.zshrc.
Zplugin
Add zplugin ice depth=1; zplugin light romkatv/powerlevel10k to ~/.zshrc.
The use of depth=1 ice is optional. Other types of ice are neither recommended nor officially
supported by Powerlevel10k.
Zinit
Add zinit ice depth=1; zinit light romkatv/powerlevel10k to ~/.zshrc.
The use of depth=1 ice is optional. Other types of ice are neither recommended nor officially
supported by Powerlevel10k.
Zi
Add zi ice depth=1; zi light romkatv/powerlevel10k to ~/.zshrc.
The use of depth=1 ice is optional. Other types of ice are neither recommended nor officially
supported by Powerlevel10k.
Zap
Add plug "romkatv/powerlevel10k" to ~/.zshrc.
Homebrew
brew install powerlevel10k
echo "source $(brew --prefix)/share/powerlevel10k/powerlevel10k.zsh-theme" >>~/.zshrc
Arch Linux
yay -S --noconfirm zsh-theme-powerlevel10k-git
echo 'source /usr/share/zsh-theme-powerlevel10k/powerlevel10k.zsh-theme' >>~/.zshrc
zsh-theme-powerlevel10k-git referenced above is the official Powerlevel10k package.
Alpine Linux
apk add zsh zsh-theme-powerlevel10k
mkdir -p ~/.local/share/zsh/plugins
ln -s /usr/share/zsh/plugins/powerlevel10k ~/.local/share/zsh/plugins/
Fig
Follow the instructions on this page.
Configuration
For new users
On the first run, Powerlevel10k configuration wizard will ask you a few
questions and configure your prompt. If it doesn't trigger automatically, type p10k configure.
Configuration wizard creates ~/.p10k.zsh based on your preferences. Additional prompt
customization can be done by editing this file. It has plenty of comments to help you navigate
through configuration options.
FAQ:
- What is the best prompt style in the configuration wizard?
- What do different symbols in Git status mean?
- How do I change the format of Git status?
- How do I add username and/or hostname to prompt?
- How do I change prompt colors?
- Why some prompt segments appear and disappear as I'm typing?
Troubleshooting:
- Question mark in prompt.
- Icons, glyphs or powerline symbols don't render.
- Sub-pixel imperfections around powerline symbols.
- Directory is difficult to see in prompt when using Rainbow style.
For Powerlevel9k users
If you've been using Powerlevel9k before, do not remove the configuration options. Powerlevel10k will pick them up and provide you with the same prompt UI you are used to. See Powerlevel9k compatibility.
FAQ:
- I'm using Powerlevel9k with Oh My Zsh. How do I migrate?
- What is the relationship between Powerlevel9k and Powerlevel10k?
- Does Powerlevel10k always render exactly the same prompt as Powerlevel9k given the same config?
Troubleshooting: Extra or missing spaces in prompt compared to Powerlevel9k.
Fonts
Powerlevel10k doesn't require custom fonts but can take advantage of them if they are available. It works well with Nerd Fonts, Source Code Pro, Font Awesome, Powerline, and even the default system fonts. The full choice of style options is available only when using Nerd Fonts.
👇 Recommended font: Meslo Nerd Font patched for Powerlevel10k. 👇
<a name='recommended-meslo-nerd-font-patched-for-powerlevel10k'></a><a name='font'></a>Meslo Nerd Font patched for Powerlevel10k
Gorgeous monospace font designed by Jim Lyles for Bitstream, customized by the same for Apple, further customized by André Berg, and finally patched by yours truly with customized scripts originally developed by Ryan L McIntyre of Nerd Fonts. Contains all glyphs and symbols that Powerlevel10k may need. Battle-tested in dozens of different terminals on all major operating systems.
FAQ: How was the recommended font created?
Automatic font installation
If you are using iTerm2 or Termux, p10k configure can install the recommended font for you.
Simply answer Yes when asked whether to install Meslo Nerd Font.
If you are using a different terminal, proceed with manual font installation. 👇
Manual font installation
- Download these four ttf files:
- Double-click on each file and click "Install". This will make
MesloLGS NFfont available to all applications on your system. - Configure your terminal to use this font:
- iTerm2: Type
p10k configureand answerYeswhen asked whether to install Meslo Nerd Font. Alternatively, open iTerm2 → Preferences → Profiles → Text and set Font toMesloLGS NF. - Apple Terminal: Open Terminal → Preferences → Profiles → Text, click Change under Font
and select
MesloLGS NFfamily. - Hyper: Open Hyper → Edit → Preferences and change the value of
fontFamilyundermodule.exports.configtoMesloLGS NF. - Visual Studio Code: Open File → Preferences → Settings (PC) or
Code → Preferences → Settings (Mac), enter
terminal.integrated.fontFamilyin the search box at the top of Settings tab and set the value below toMesloLGS NF. Consult this screenshot to see how it should look like or see this issue for extra information. - GNOME Terminal (the default Ubuntu terminal): Open Terminal → Preferences and click on the
selected profile under Profiles. Check Custom font under Text Appearance and select
MesloLGS NF Regular. - Konsole: Open Settings → Edit Current Profile → Appearance, click Select Font and select
MesloLGS NF Regular. - Tilix: Open Tilix → Preferences and click on the selected profile under Profiles. Check
Custom font under Text Appearance and select
MesloLGS NF Regular. - Windows Console Host (the old thing): Click the icon in the top left corner, then
Properties → Font and set Font to
MesloLGS NF. - Windows Terminal by Microsoft (the new thing): Open Settings (<kbd>Ctrl+,</kbd>), click
either on the selected profile under Profiles or on Defaults, click Appearance and set
Font face to
MesloLGS NF. - Conemu: Open Setup → General → Fonts and set Main console font to
MesloLGS NF. - IntelliJ (and other IDEs by Jet Brains): Open IDE → Edit → Preferences → Editor →
Color Scheme → Console Font. Select Use console font instead of the default and set the font
name to
MesloLGS NF. - Termux: Type
p10k configureand answerYeswhen asked whether to install Meslo Nerd Font. - Blink: Type
config, go to Appearance, tap Add a new font, tap Open Gallery, select MesloLGS NF.css, tap import and typeexitin the home view to reload the font. - Tabby (formerly Terminus): Open Settings → Appearance and set Font to
MesloLGS NF. - Terminator: Open Preferences using the context menu. Under Profiles select the General
tab (should be selected already), uncheck Use the system fixed width font (if not already)
and select
MesloLGS NF Regular. Exit the Preferences dialog by clicking Close. - Guake: Right Click on an open terminal and open Preferences. Under Appearance
tab, uncheck Use the system fixed width font (if not already) and select
MesloLGS NF Regular. Exit the Preferences dialog by clicking Close. - MobaXterm: Open Settings → Configuration → Terminal → (under Terminal look and feel)
and change Font to
MesloLGS NF. If you have sessions, you need to change the font in each of them through Settings → right click on an individual session → Edit Session → Terminal Settings → Font settings. - Asbrú Connection Manager: Open Preferences → Local Shell Options → Look and Feel, enable
Use these personal options and change Font: under Terminal UI to
MesloLGS NF Regular. To change the font for the remote host connections, go to Preferences → Terminal Options → Look and Feel and change Font: under Terminal UI toMesloLGS NF Regular. - Warp: Open Warp and Navigate to Settings then Appearance. Scroll down to Text Section
and under "Terminal Font", select the
MesloLGS NFfont. - WSLtty: Right click on an open terminal and then on Options. In the Text section, under
Font, click "Select..." and set Font to
MesloLGS NF Regular. - Yakuake: Click ≡ → Manage Profiles → New → Appearance. Click Choose next to the
Font dropdown, select
MesloLGS NFand click OK. Click OK to save the profile. Select the new profile and click Set as Default. - Alacritty: Create or open
~/.config/alacritty/alacritty.tomland add the following section to it:[font.normal] family = "MesloLGS NF" - foot: Create or open
~/.config/foot/foot.iniand add the following section to it:font=MesloLGS NF:size=12 - kitty: Create or open
~/.config/kitty/kitty.confand add the following line to it:
Restart kitty by closing all sessions and opening a new session.font_family MesloLGS NF - puTTY: Set Window → Appearance → Font to
MesloLGS NF. Requires puTTY version >= 0.75. - WezTerm: Create or open
$HOME/.config/wezterm/wezterm.luaand add the following:
If the file already exists, only add the line with the font to the existing return. Also add the first line if it is not already present.local wezterm = require 'wezterm'; return { font = wezterm.font("MesloLGS NF"), } - urxvt: Create or open
~/.Xresourcesand add the following line to it:
You can adjust the font size to your preference. After changing the config runURxvt.font: xft:MesloLGS NF:size=11xrdb ~/.Xresourcesto reload it. The new config is applied to all new terminals. - xterm: Create or open
~/.Xresourcesand add the following line to it:
After changing the config runxterm*faceName: MesloLGS NFxrdb ~/.Xresourcesto reload it. The new config is applied to all new terminals. - Zed: Open
~/.config/zed/settings.jsonand setterminal.font_familyto"MesloLGS NF".{ "terminal": { "font_family": "MesloLGS NF" }, // Other settings. } - Crostini (Linux on Chrome OS): Open
chrome-untrusted://terminal/html/nassh_preferences_editor.html, set Text font family to
'MesloLGS NF'(including the quotes) and Custom CSS (inline text) to the following:
CAVEAT: If you open the normal terminal preferences these settings will be overwritten.@font-face { font-family: "MesloLGS NF"; src: url("https://raw.githubusercontent.com/romkatv/powerlevel10k-media/master/MesloLGS%20NF%20Regular.ttf"); font-weight: normal; font-style: normal; } @font-face { font-family: "MesloLGS NF"; src: url("https://raw.githubusercontent.com/romkatv/powerlevel10k-media/master/MesloLGS%20NF%20Bold.ttf"); font-weight: bold; font-style: normal; } @font-face { font-family: "MesloLGS NF"; src: url("https://raw.githubusercontent.com/romkatv/powerlevel10k-media/master/MesloLGS%20NF%20Italic.ttf"); font-weight: normal; font-style: italic; } @font-face { font-family: "MesloLGS NF"; src: url("https://raw.githubusercontent.com/romkatv/powerlevel10k-media/master/MesloLGS%20NF%20Bold%20Italic.ttf"); font-weight: bold; font-style: italic; } - Deepin Terminal: Create or open
~/.config/deepin/deepin-terminal/config.confand add the following section to it:[basic.interface.font] value = "MesloLGS NF"
- iTerm2: Type
- Run
p10k configureto generate a new~/.p10k.zsh. The old config may work incorrectly with the new font.
Using a different terminal and know how to set the font for it? Share your knowledge by sending a PR to expand the list!
Try it in Docker
Try Powerlevel10k in Docker. You can safely make any changes to the file system while trying out the theme. Once you exit Zsh, the container is deleted.
docker run -e TERM -e COLORTERM -e LC_ALL=C.UTF-8 -it --rm alpine sh -uec '
  apk add git zsh nano vim
  git clone --depth=1 https://github.com/romkatv/powerlevel10k.git ~/powerlevel10k
  echo "source ~/powerlevel10k/powerlevel10k.zsh-theme" >>~/.zshrc
  cd ~/powerlevel10k
  exec zsh'
Tip: Install the recommended font before running the Docker command to get access to all prompt styles.
Tip: Run p10k configure while in Docker to try a different prompt style.
License
Powerlevel10k is released under the MIT license.
FAQ
- How do I update Powerlevel10k?
- How do I uninstall Powerlevel10k?
- How do I install Powerlevel10k on a machine without Internet access?
- Where can I ask for help and report bugs?
- Which aspects of shell and terminal does Powerlevel10k affect?
- I'm using Powerlevel9k with Oh My Zsh. How do I migrate?
- Is it really fast?
- How do I configure instant prompt?
- How do I initialize direnv when using instant prompt?
- How do I export GPG_TTY when using instant prompt?
- What do different symbols in Git status mean?
- How do I change the format of Git status?
- Why is Git status from
$HOME/.gitnot displayed in prompt? - Why does Git status sometimes appear grey and then gets colored after a short period of time?
- How do I add username and/or hostname to prompt?
- Why some prompt segments appear and disappear as I'm typing?
- How do I change prompt colors?
- Why does Powerlevel10k spawn extra processes?
- Are there configuration options that make Powerlevel10k slow?
- Is Powerlevel10k fast to load?
- What is the relationship between Powerlevel9k and Powerlevel10k?
- Does Powerlevel10k always render exactly the same prompt as Powerlevel9k given the same config?
- What is the best prompt style in the configuration wizard?
- How to make Powerlevel10k look like robbyrussell Oh My Zsh theme?
- Can prompts for completed commands display error status for those commands instead of the commands preceding them?
- What is the minimum supported Zsh version?
- How were these screenshots and animated gifs created?
- How was the recommended font created?
- How to package Powerlevel10k for distribution?
How do I update Powerlevel10k?
The command to update Powerlevel10k depends on how it was installed.
| Installation | Update command |
|---|---|
| Manual | git -C ~/powerlevel10k pull |
| Oh My Zsh | git -C ${ZSH_CUSTOM:-$HOME/.oh-my-zsh/custom}/themes/powerlevel10k pull |
| Prezto | zprezto-update |
| Zim | zimfw update |
| Antigen | antigen update |
| Antidote | antidote update |
| Zplug | zplug update |
| Zgen | zgen update |
| Zplugin | zplugin update |
| Zinit | zinit update |
| Zi | zi update |
| Zap | zap update |
| Homebrew | brew update && brew upgrade |
| Arch Linux | yay -S --noconfirm zsh-theme-powerlevel10k-git |
| Alpine Linux | apk update && apk upgrade |
IMPORTANT: Restart Zsh after updating Powerlevel10k. Do not use source ~/.zshrc.
How do I uninstall Powerlevel10k?
-
Remove all references to "p10k" from
~/.zshrc. You might have this snippet at the top:if [[ -r "${XDG_CACHE_HOME:-$HOME/.cache}/p10k-instant-prompt-${(%):-%n}.zsh" ]]; then source "${XDG_CACHE_HOME:-$HOME/.cache}/p10k-instant-prompt-${(%):-%n}.zsh" fiAnd this at the bottom:
[[ ! -f ~/.p10k.zsh ]] || source ~/.p10k.zshThese are added by the configuration wizard. Remove them.
-
Remove all references to "powerlevel10k" from
~/.zshrc,~/.zpreztorcand~/.zimrc(some of these files may be missing -- this is normal). These references have been added manually by yourself when installing Powerlevel10k. Refer to the installation instructions if you need a reminder. -
Verify that all references to "p10k" and "powerlevel10k" are gone from
~/.zshrc,~/.zpreztorcand~/.zimrc.grep -E 'p10k|powerlevel10k' ~/.zshrc ~/.zpreztorc ~/.zimrc 2>/dev/nullIf this command produces output, there are still references to "p10k" or "powerlevel10k". You need to remove them.
-
Delete Powerlevel10k configuration file. This file is created by the configuration wizard and may contain manual edits by yourself.
rm -f ~/.p10k.zsh -
Delete Powerlevel10k source files. These files have been downloaded when you've installed Powerlevel10k. The command to delete them depends on which installation method you'd chosen. Refer to the installation instructions if you need a reminder.
Installation Uninstall command Manual rm -rf ~/powerlevel10kOh My Zsh rm -rf -- ${ZSH_CUSTOM:-$HOME/.oh-my-zsh/custom}/themes/powerlevel10kPrezto n/a Zim zimfw uninstallAntigen antigen purge romkatv/powerlevel10kAntidote antidote purge romkatv/powerlevel10kZplug zplug cleanZgen zgen resetZplugin zplugin delete romkatv/powerlevel10kZinit zinit delete romkatv/powerlevel10kZi zi delete romkatv/powerlevel10kZap zsh -ic 'zap clean'Homebrew brew uninstall powerlevel10kArch Linux yay -R --noconfirm zsh-theme-powerlevel10k-gitAlpine Linux apk del zsh-theme-powerlevel10k -
Restart Zsh. Do not use
source ~/.zshrc. -
Delete Powerlevel10k cache files.
rm -rf -- "${XDG_CACHE_HOME:-$HOME/.cache}"/p10k-*(N) "${XDG_CACHE_HOME:-$HOME/.cache}"/gitstatus
How do I install Powerlevel10k on a machine without Internet access?
- Run this command on the machine without Internet access:
uname -sm | tr '[A-Z]' '[a-z]' - Run these commands on a machine connected to the Internet after replacing the value of
target_unamewith the output of the previous command:target_uname="replace this with the output of the previous command" git clone --depth=1 https://github.com/romkatv/powerlevel10k.git ~/powerlevel10k GITSTATUS_CACHE_DIR="$HOME"/powerlevel10k/gitstatus/usrbin ~/powerlevel10k/gitstatus/install -f -s "${target_uname% *}" -m "${target_uname#* }" - Copy
~/powerlevel10kfrom the machine connected to the Internet to the one without Internet access. - Add
source ~/powerlevel10k/powerlevel10k.zsh-themeto~/.zshrcon the machine without Internet access:echo 'source ~/powerlevel10k/powerlevel10k.zsh-theme' >>~/.zshrc - If
~/.zshrcon the machine without Internet access setsZSH_THEME, remove that line.sed -i.bak '/^ZSH_THEME=/d' ~/.zshrc
To update, remove ~/powerlevel10k on both machines and repeat steps 1-3.
Where can I ask for help and report bugs?
The best way to ask for help and to report bugs is to open an issue.
Gitter is another option.
If all else fails, email roman.perepelitsa@gmail.com.
If necessary, encrypt your communication with this PGP key.
Which aspects of shell and terminal does Powerlevel10k affect?
Powerlevel10k defines prompt and nothing else. It sets prompt-related options, and parameters PS1 and RPS1.

Everything within the highlighted areas on the screenshot is produced by Powerlevel10k. Powerlevel10k has no control over the terminal content or colors outside these areas.
Powerlevel10k does not affect:
- Terminal window/tab title.
- Colors used by
ls. - The behavior of
gitcommand. - The content and style of <kbd>Tab</kbd> completions.
- Command line colors (syntax highlighting, autosuggestions, etc.).
- Key bindings.
- Aliases.
- Prompt parameters other than
PS1andRPS1. - Zsh options other than those related to prompt.
- The set of available commands. Powerlevel10k does not install any new commands
with the only exception of
p10k.
I'm using Powerlevel9k with Oh My Zsh. How do I migrate?
- Run this command:
# Add powerlevel10k to the list of Oh My Zsh themes.
git clone --depth=1 https://github.com/romkatv/powerlevel10k.git $ZSH_CUSTOM/themes/powerlevel10k
# Replace ZSH_THEME="powerlevel9k/powerlevel9k" with ZSH_THEME="powerlevel10k/powerlevel10k".
sed -i.bak 's/powerlevel9k/powerlevel10k/g' ~/.zshrc
# Restart Zsh.
exec zsh
- Optional but highly recommended:
- Install the recommended font.
- Type
p10k configureand choose your favorite prompt style.
Related:
- Powerlevel9k compatibility.
- Does Powerlevel10k always render exactly the same prompt as Powerlevel9k given the same config?
- Extra or missing spaces in prompt compared to Powerlevel9k.
- Configuration wizard.
Is it really fast?
Yes. See zsh-bench or a direct comparison with Powerlevel9k and Spaceship.
<a name='how-do-i-enable-instant-prompt'></a>How do I configure instant prompt?
See instant prompt to learn about instant prompt. This section explains how you can enable and configure it and lists caveats that you should be aware of.
Instant prompt can be enabled either through p10k configure or by manually adding the following
code snippet at the top of ~/.zshrc:
# Enable Powerlevel10k instant prompt. Should stay close to the top of ~/.zshrc.
# Initialization code that may require console input (password prompts, [y/n]
# confirmations, etc.) must go above this block; everything else may go below.
if [[ -r "${XDG_CACHE_HOME:-$HOME/.cache}/p10k-instant-prompt-${(%):-%n}.zsh" ]]; then
  source "${XDG_CACHE_HOME:-$HOME/.cache}/p10k-instant-prompt-${(%):-%n}.zsh"
fi
It's important that you copy the lines verbatim. Don't replace source with something else, don't
call zcompile, don't redirect output, etc.
When instant prompt is enabled, for the duration of Zsh initialization standard input is redirected
to /dev/null and standard output with standard error are redirected to a temporary file. Once Zsh
is fully initialized, standard file descriptors are restored and the content of the temporary file
is printed out.
When using instant prompt, you should carefully check any output that appears on Zsh startup as it
may indicate that initialization has been altered, or perhaps even broken, by instant prompt.
Initialization code that may require console input, such as asking for a keyring password or for a
[y/n] confirmation, must be moved above the instant prompt preamble in ~/.zshrc. Initialization
code that merely prints to console but never reads from it will work correctly with instant prompt,
although output that normally has colors may appear uncolored. You can either leave it be, suppress
the output, or move it above the instant prompt preamble.
Here's an example of ~/.zshrc that breaks when instant prompt is enabled:
if [[ -r "${XDG_CACHE_HOME:-$HOME/.cache}/p10k-instant-prompt-${(%):-%n}.zsh" ]]; then
  source "${XDG_CACHE_HOME:-$HOME/.cache}/p10k-instant-prompt-${(%):-%n}.zsh"
fi

keychain id_rsa --agents ssh  # asks for password
chatty-script                 # spams to stdout even when everything is fine
# ...
Fixed version:
keychain id_rsa --agents ssh  # moved before instant prompt

# OK to perform console I/O before this point.
if [[ -r "${XDG_CACHE_HOME:-$HOME/.cache}/p10k-instant-prompt-${(%):-%n}.zsh" ]]; then
  source "${XDG_CACHE_HOME:-$HOME/.cache}/p10k-instant-prompt-${(%):-%n}.zsh"
fi
# From this point on, until zsh is fully initialized, console input won't work and
# console output may appear uncolored.

chatty-script >/dev/null      # spam output suppressed
# ...
If POWERLEVEL9K_INSTANT_PROMPT is unset or set to verbose, Powerlevel10k will print a warning
when it detects console output during initialization to bring attention to potential issues. You can
silence this warning (without suppressing console output) with POWERLEVEL9K_INSTANT_PROMPT=quiet.
This is recommended if some initialization code in ~/.zshrc prints to console and it's infeasible
to move it above the instant prompt preamble or to suppress its output. You can completely disable
instant prompt with POWERLEVEL9K_INSTANT_PROMPT=off. Do this if instant prompt breaks Zsh
initialization and you don't know how to fix it.
The value of POWERLEVEL9K_INSTANT_PROMPT can be changed by running p10k configure and selecting
the appropriate option on the Instant Prompt screen. Alternatively, you can search for
POWERLEVEL9K_INSTANT_PROMPT in the existing ~/.p10k.zsh and change its value there.
Note: Instant prompt requires Zsh >= 5.4. It's OK to enable it even when using an older version of Zsh but it won't do anything.
FAQ:
- How do I initialize direnv when using instant prompt?
- How do I export GPG_TTY when using instant prompt?
How do I initialize direnv when using instant prompt?
If you've enabled instant prompt, you should have these lines at the top of
~/.zshrc:
if [[ -r "${XDG_CACHE_HOME:-$HOME/.cache}/p10k-instant-prompt-${(%):-%n}.zsh" ]]; then
  source "${XDG_CACHE_HOME:-$HOME/.cache}/p10k-instant-prompt-${(%):-%n}.zsh"
fi
To initialize direnv you need to add one line above that block and one line below it.
(( ${+commands[direnv]} )) && emulate zsh -c "$(direnv export zsh)"

if [[ -r "${XDG_CACHE_HOME:-$HOME/.cache}/p10k-instant-prompt-${(%):-%n}.zsh" ]]; then
  source "${XDG_CACHE_HOME:-$HOME/.cache}/p10k-instant-prompt-${(%):-%n}.zsh"
fi

(( ${+commands[direnv]} )) && emulate zsh -c "$(direnv hook zsh)"
Related: How do I export GPG_TTY when using instant prompt?
How do I export GPG_TTY when using instant prompt?
You can export GPG_TTY like this anywhere in ~/.zshrc:
export GPG_TTY=$TTY
This works whether you are using instant prompt or not. It works even if you
aren't using powerlevel10k. As an extra bonus, it's much faster than the commonly used
export GPG_TTY=$(tty).
Related: How do I initialize direnv when using instant prompt?
What do different symbols in Git status mean?
When using Lean, Classic or Rainbow style, Git status may look like this:
feature:master wip ⇣42⇡42 ⇠42⇢42 *42 merge ~42 +42 !42 ?42
| Symbol | Meaning | Source |
|---|---|---|
feature | current branch; replaced with #tag or @commit if not on a branch | git status --ignore-submodules=dirty |
master | remote tracking branch; only shown if different from local branch | git rev-parse --abbrev-ref --symbolic-full-name @{upstream} |
wip | the latest commit's summary contains "wip" or "WIP" | git show --pretty=%s --no-patch HEAD |
= | up to date with the remote (neither ahead nor behind) | git rev-list --count HEAD...@{upstream} |
⇣42 | this many commits behind the remote | git rev-list --right-only --count HEAD...@{upstream} |
⇡42 | this many commits ahead of the remote | git rev-list --left-only --count HEAD...@{upstream} |
⇠42 | this many commits behind the push remote | git rev-list --right-only --count HEAD...@{push} |
⇢42 | this many commits ahead of the push remote | git rev-list --left-only --count HEAD...@{push} |
*42 | this many stashes | git stash list |
merge | repository state | git status --ignore-submodules=dirty |
~42 | this many merge conflicts | git status --ignore-submodules=dirty |
+42 | this many staged changes | git status --ignore-submodules=dirty |
!42 | this many unstaged changes | git status --ignore-submodules=dirty |
?42 | this many untracked files | git status --ignore-submodules=dirty |
─ | the number of staged, unstaged or untracked files is unknown | echo $POWERLEVEL9K_VCS_MAX_INDEX_SIZE_DIRTY or git config --get bash.showDirtyState |
Related: How do I change the format of Git status?
How do I change the format of Git status?
To change the format of Git status, open ~/.p10k.zsh, search for my_git_formatter and edit its
source code.
Related: What do different symbols in Git status mean?
Why is Git status from $HOME/.git not displayed in prompt?
When using Lean, Classic or Rainbow style, ~/.p10k.zsh contains the following parameter:
# Don't show Git status in prompt for repositories whose workdir matches this pattern.
# For example, if set to '~', the Git repository at $HOME/.git will be ignored.
# Multiple patterns can be combined with '|': '~(|/foo)|/bar/baz/*'.
typeset -g POWERLEVEL9K_VCS_DISABLED_WORKDIR_PATTERN='~'
To see Git status for $HOME/.git in prompt, open ~/.p10k.zsh and remove
POWERLEVEL9K_VCS_DISABLED_WORKDIR_PATTERN.
Why does Git status sometimes appear grey and then gets colored after a short period of time?
tl;dr: When Git status in prompt is greyed out, it means Powerlevel10k is currently computing up-to-date Git status in the background. Prompt will get automatically refreshed when this computation completes.
When your current directory is within a Git repository, Powerlevel10k computes up-to-date Git
status after every command. If the repository is large, or the machine is slow, this computation
can take quite a bit of time. If it takes longer than 10 milliseconds (configurable via
POWERLEVEL9K_VCS_MAX_SYNC_LATENCY_SECONDS), Powerlevel10k displays the last known Git status in
grey and continues to compute up-to-date Git status in the background. When the computation
completes, Powerlevel10k refreshes prompt with new information, this time with colored Git status.
When using Rainbow style, Git status is displayed as black on grey while it's still being
computed. Depending on the terminal color palette, this may be difficult to read. In this case you
might want to change the background color to something lighter for more contrast. To do that, open
~/.p10k.zsh, search for POWERLEVEL9K_VCS_LOADING_BACKGROUND, uncomment it if it's commented out,
and change the value.
typeset -g POWERLEVEL9K_VCS_LOADING_BACKGROUND=244
Type source ~/.p10k.zsh to apply your changes to the current Zsh session.
Related: How do I change prompt colors?
How do I add username and/or hostname to prompt?
When using Lean, Classic or Rainbow style, prompt shows username@hostname when you are logged in
as root or via SSH. There is little value in showing username or hostname when you are logged in
to your local machine as a normal user. So the absence of username@hostname in your prompt is an
indication that you are working locally and that you aren't root. You can change it, however.
Open ~/.p10k.zsh. Close to the top you can see the most important parameters that define which
segments are shown in your prompt. All generally useful prompt segments are listed in there. Some of
them are enabled, others are commented out. One of them is of interest to you.
typeset -g POWERLEVEL9K_RIGHT_PROMPT_ELEMENTS=(
  ...
  context  # user@hostname
  ...
)
Search for context to find the section in the config that lists parameters specific to this prompt
segment. You should see the following lines:
# Don't show context unless running with privileges or in SSH.
# Tip: Remove the next line to always show context.
typeset -g POWERLEVEL9K_CONTEXT_{DEFAULT,SUDO}_{CONTENT,VISUAL_IDENTIFIER}_EXPANSION=
If you follow the tip and remove (or comment out) the last line, you'll always see
username@hostname in prompt. You can change the format to just username, or change the color, by
adjusting the values of parameters nearby. There are plenty of comments to help you navigate.
You can also move context to a different position in POWERLEVEL9K_RIGHT_PROMPT_ELEMENTS or even
to POWERLEVEL9K_LEFT_PROMPT_ELEMENTS.
Why some prompt segments appear and disappear as I'm typing?
Prompt segments can be configured to be shown only when the current command you are typing invokes a relevant tool.
# Show prompt segment "kubecontext" only when the command you are typing invokes
# invokes kubectl, helm, or kubens.
typeset -g POWERLEVEL9K_KUBECONTEXT_SHOW_ON_COMMAND='kubectl|helm|kubens'
Configs created by p10k configure may contain parameters of this kind. To customize when different
prompt segments are shown, open ~/.p10k.zsh, search for SHOW_ON_COMMAND and either remove these
parameters or change their values.
You can also define a function in ~/.zshrc to toggle the display of a prompt segment between
always and on command. This is similar to kubeon/kubeoff from
kube-ps1.
function kube-toggle() {
  if (( ${+POWERLEVEL9K_KUBECONTEXT_SHOW_ON_COMMAND} )); then
    unset POWERLEVEL9K_KUBECONTEXT_SHOW_ON_COMMAND
  else
    POWERLEVEL9K_KUBECONTEXT_SHOW_ON_COMMAND='kubectl|helm|kubens'
  fi
  p10k reload
  if zle; then
    zle push-input
    zle accept-line
  fi
}
Invoke this function by typing kube-toggle. You can also bind it to a key by adding two more lines
to ~/.zshrc:
zle -N kube-toggle
bindkey '^]' kube-toggle  # ctrl-] to toggle kubecontext in powerlevel10k prompt
How do I change prompt colors?
You can either change the color palette used by your terminal or set colors through Powerlevel10k configuration parameters.
Change the color palette used by your terminal
How exactly you change the terminal color palette (a.k.a. color scheme, or theme) depends on the kind of terminal you are using. Look around in terminal's settings/preferences or consult documentation.
When you change the terminal color palette, it usually affects only the first 16 colors, numbered
from 0 to 15. In order to see any effect on Powerlevel10k prompt, you need to use prompt style that
utilizes these low-numbered colors. Type p10k configure and select Rainbow, Lean → 8 colors
or Pure → Original. Other styles use higher-numbered colors, so they look the same in any
terminal color palette.
Set colors through Powerlevel10k configuration parameters
Open ~/.p10k.zsh, search for "color", "foreground" and "background" and change values of
appropriate parameters. For example, here's how you can set the foreground of time prompt segment
to bright red:
typeset -g POWERLEVEL9K_TIME_FOREGROUND=160
Colors are specified using numbers from 0 to 255. Colors from 0 to 15 look differently in different terminals. Many terminals also support customization of these colors through color palettes (a.k.a. color schemes, or themes). Colors from 16 to 255 always look the same.
Type source ~/.p10k.zsh to apply your changes to the current Zsh session.
To see how different numbered colors look in your terminal, run the following command:
for i in {0..255}; do print -Pn "%K{$i} %k%F{$i}${(l:3::0:)i}%f " ${${(M)$((i%6)):#3}:+$'\n'}; done
If your terminal supports truecolor, you can use 24-bit colors in the #RRGGBB format in addition
to the numbered colors.
typeset -g POWERLEVEL9K_TIME_FOREGROUND='#FF0000'
Related:
- Directory is difficult to see in prompt when using Rainbow style.
- Incorrect foreground color in VSCode Terminal.
By default, VSCode Terminal may arbitrarily replace the foreground color of your choice with a different color. This behavior can be turned off in VSCode settings.
Why does Powerlevel10k spawn extra processes?
Powerlevel10k uses gitstatus as the backend behind vcs
prompt; gitstatus spawns gitstatusd and zsh. See
gitstatus for details. Powerlevel10k may also spawn zsh
to perform computation without blocking prompt. To avoid security hazard, these background processes
aren't shared by different interactive shells. They terminate automatically when the parent zsh
process terminates or runs exec(3).
Are there configuration options that make Powerlevel10k slow?
No, Powerlevel10k is always fast, with any configuration you throw at it. If you have noticeable prompt latency when using Powerlevel10k, please open an issue.
Is Powerlevel10k fast to load?
Yes. See zsh-bench.
What is the relationship between Powerlevel9k and Powerlevel10k?
Powerlevel10k was forked from Powerlevel9k in March 2019 after a week-long discussion in powerlevel9k#1170. Powerlevel9k was already a mature project with a large user base and a release cycle measured in months. Powerlevel10k was spun off to iterate on performance improvements and new features at much higher pace.
Powerlevel9k and Powerlevel10k are independent projects. When using one, you shouldn't install the other. Issues should be filed against the project that you actually use. There are no individuals that have commit rights in both repositories. All bug fixes and new features committed to Powerlevel9k repository get ported to Powerlevel10k.
Over time, virtually all code in Powerlevel10k has been rewritten. There is currently no meaningful overlap between the implementations of Powerlevel9k and Powerlevel10k.
Powerlevel10k is committed to maintaining backward compatibility with all configs indefinitely. This
commitment covers all configuration parameters recognized by Powerlevel9k (see
Powerlevel9k compatibility) and additional parameters that only
Powerlevel10k understands. Names of all parameters in Powerlevel10k start with POWERLEVEL9K_ for
consistency.
Does Powerlevel10k always render exactly the same prompt as Powerlevel9k given the same config?
Almost. There are a few differences.
- By default only
gitvcs backend is enabled in Powerlevel10k. If you needsvnandhg, add them toPOWERLEVEL9K_VCS_BACKENDS. These backends aren't yet optimized in Powerlevel10k, so enabling them will make prompt very slow. - Powerlevel10k doesn't support
POWERLEVEL9K_VCS_SHOW_SUBMODULE_DIRTY=true. - Powerlevel10k strives to be bug-compatible with Powerlevel9k but not when it comes to egregious
bugs. If you accidentally rely on these bugs, your prompt will differ between Powerlevel9k and
Powerlevel10k. Some examples:
- Powerlevel9k ignores some options that are set after the theme is sourced while Powerlevel10k
respects all options. If you see different icons in Powerlevel9k and Powerlevel10k, you've
probably defined
POWERLEVEL9K_MODEbefore sourcing the theme. This parameter gets ignored by Powerlevel9k but honored by Powerlevel10k. If you want your prompt to look in Powerlevel10k the same as in Powerlevel9k, removePOWERLEVEL9K_MODE. - Powerlevel9k doesn't respect
ZLE_RPROMPT_INDENT. As a result, right prompt in Powerlevel10k can have an extra space at the end compared to Powerlevel9k. SetZLE_RPROMPT_INDENT=0if you don't want that space. More details in troubleshooting. - Powerlevel9k has inconsistent spacing around icons. This was fixed in Powerlevel10k. Set
POWERLEVEL9K_LEGACY_ICON_SPACING=trueto get the same spacing as in Powerlevel9k. More details in troubleshooting. - There are dozens more bugs in Powerlevel9k that don't exist in Powerlevel10k.
- Powerlevel9k ignores some options that are set after the theme is sourced while Powerlevel10k
respects all options. If you see different icons in Powerlevel9k and Powerlevel10k, you've
probably defined
If you notice any other changes in prompt appearance when switching from Powerlevel9k to Powerlevel10k, please open an issue.
What is the best prompt style in the configuration wizard?
There are as many opinions on what constitutes the best prompt as there are people. It mostly comes down to personal preference. There are, however, a few hidden implications of different choices.
Pure style is an exact replication of Pure Zsh theme. It exists to ease the migration for users of this theme. Unless you are one of them, choose Lean style over Pure.
If you want to confine prompt colors to the selected terminal color palette (say, Solarized Dark), use Rainbow, Lean → 8 colors or Pure → Original. Other styles use fixed colors and thus look the same in any terminal color palette.
All styles except Pure have an option to use ASCII charset. Prompt will look less pretty but will render correctly with all fonts and in all locales.
If you enable transient prompt, take advantage of two-line prompt. You'll get the benefit of extra space for typing commands without the usual drawback of reduced scrollback density. Having all commands start from the same offset is also nice.
Similarly, if you enable transient prompt, sparse prompt (with an empty line before prompt) is a great choice.
If you are using vi keymap, choose prompt with prompt_char in it (shown as green ❯ in the
wizard). This symbol changes depending on vi mode: ❯, ❮, V, ▶ for insert, command, visual
and replace mode respectively. When a command fails, the symbol turns red. Lean style always has
prompt_char in it. Rainbow and Classic styles have it only in the two-line configuration
without left frame.
If you value horizontal space or prefer minimalist aesthetics:
- Use a monospace font, such as the recommended font. Non-monospace fonts require extra space after icons that are larger than a single column.
- Use Lean style. Compared to Classic and Rainbow, it saves two characters per prompt segment.
- Disable current time and frame.
- Use few icons. The extra icons enabled by the many icons option primarily serve decorative function. Informative icons, such as background job indicator, will be shown either way.
Note: You can run configuration wizard as many times as you like. Type p10k configure to try new
prompt style.
How to make Powerlevel10k look like robbyrussell Oh My Zsh theme?
Use this config.
You can either download it, save as ~/.p10k.zsh and source ~/.p10k.zsh from ~/.zshrc, or
source p10k-robbyrussell.zsh directly from your cloned powerlevel10k repository.
Can prompts for completed commands display error status for those commands instead of the commands preceding them?
No. When you hit ENTER and the command you've typed starts running, its error status isn't yet known, so it cannot be shown in prompt. When the command completes, the error status gets known but it's no longer possible to update prompt for that command. This is why the error status for every command is reflected in the next prompt.
For details, see this post on /r/zsh.
What is the minimum supported Zsh version?
Zsh 5.3 or newer should work. Fast startup requires Zsh >= 5.4.
How were these screenshots and animated gifs created?
All screenshots and animated gifs were recorded in GNOME Terminal with
the recommended font and Tango Dark color palette with
custom background color (#171A1B instead of #2E3436 -- twice as dark).
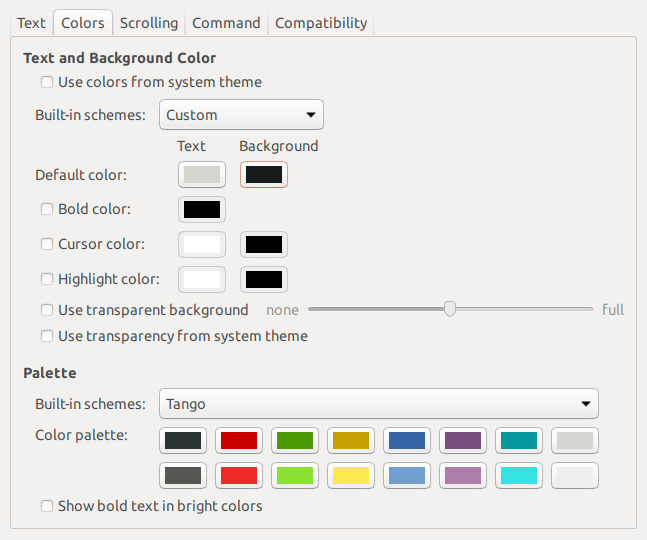
Syntax highlighting, where present, was provided by zsh-syntax-highlighting.
How was the recommended font created?
The recommended font is the product of many individuals. Its origin is Bitstream Vera Sans Mono, which has given birth to Menlo, which in turn has spawned Meslo. Finally, extra glyphs have been added to Meslo with scripts forked from Nerd Fonts. The final font is released under the terms of Apache License.
MesloLGS NF font can be recreated with the following command (requires git and docker):
git clone --depth=1 https://github.com/romkatv/nerd-fonts.git
cd nerd-fonts
./build 'Meslo/S/*'
If everything goes well, four ttf files will appear in ./out.
How to package Powerlevel10k for distribution?
It's currently neither easy nor recommended to package and distribute Powerlevel10k. There are no instructions you can follow that would allow you to easily update your package when new versions of Powerlevel10k are released. This may change in the future but not soon.
Troubleshooting
[oh-my-zsh] theme 'powerlevel10k/powerlevel10k' not found- Question mark in prompt
- Icons, glyphs or powerline symbols don't render
- Sub-pixel imperfections around powerline symbols
- Error: character not in range
- Cursor is in the wrong place
- Prompt wrapping around in a weird way
- Right prompt is in the wrong place
- Configuration wizard runs automatically every time Zsh is started
- Some prompt styles are missing from the configuration wizard
- Cannot install the recommended font
- Extra or missing spaces in prompt compared to Powerlevel9k
- Weird things happen after typing
source ~/.zshrc - Transient prompt stops working after some time
- Cannot make Powerlevel10k work with my plugin manager
- Directory is difficult to see in prompt when using Rainbow style
- Incorrect foreground color in VSCode Terminal.
- Horrific mess when resizing terminal window
- Icons cut off in Konsole
- Arch Linux logo has a dot in the bottom right corner
- Incorrect git status in prompt
[oh-my-zsh] theme 'powerlevel10k/powerlevel10k' not found
When opening a terminal, or starting zsh manually, you may encounter this error message:
[oh-my-zsh] theme 'powerlevel10k/powerlevel10k' not found
- First, run
typeset -p P9K_VERSIONto check whether Powerlevel10k has been loaded.- If
typeset -p P9K_VERSIONsucceeds and prints something liketypeset P9K_VERSION=1.19.14(the version could be different), remove the following line from~/.zshrc:ZSH_THEME="powerlevel10k/powerlevel10k" - If
typeset -p P9K_VERSIONfails with the errortypeset: no such variable: P9K_VERSION, run the following command:git clone --depth=1 https://github.com/romkatv/powerlevel10k.git ${ZSH_CUSTOM:-$HOME/.oh-my-zsh/custom}/themes/powerlevel10k
- If
- Restart Zsh with
exec zsh.
Question mark in prompt
If it looks like a regular ?, that's normal. It means you have untracked files in the current Git
repository. Type git status to see these files. You can change this symbol or disable the display
of untracked files altogether. Search for untracked files in ~/.p10k.zsh.
FAQ: What do different symbols in Git status mean?
You can also get a weird-looking question mark in your prompt if your terminal's font is missing some glyphs. See icons, glyphs or powerline symbols don't render.
Icons, glyphs or powerline symbols don't render
Restart your terminal, install the recommended font
and run p10k configure.
Sub-pixel imperfections around powerline symbols

There are three imperfections on the screenshot. From left to right:
- A thin blue line (a sub-pixel gap) between the content of a prompt segment and the following powerline connection.
- Incorrect alignment of a powerline connection and the following prompt segment. The connection appears shifted to the right.
- A thin red line below a powerline connection. The connection appears shifted up.
Zsh themes don't have down-to-pixel control over the terminal content. Everything you see on the screen is made of monospace characters. A white powerline prompt segment is made of text on white background followed by U+E0B0 (a right-pointing triangle).

If Powerlevel10k prompt has imperfections around powerline symbols, you'll see exactly the same imperfections with all powerline themes (Agnoster, Powerlevel9k, Powerline, etc.)
There are several things you can try to deal with these imperfections:
- Try the recommended font. If you are already using it, switching to another font may help but is unlikely.
- Change terminal font size one point up or down. For example, in iTerm2 powerline prompt looks perfect at font sizes 11 and 13 but breaks down at 12.
- Enable builtin powerline glyphs in terminal settings if your terminal supports it (iTerm2 does).
- Change font hinting and/or anti-aliasing mode in the terminal settings.
- Shift all text one pixel up/down/left/right if your terminal has an option to do so.
- Try a different terminal.
A more radical solution is to switch to prompt style without background. Type p10k configure and
select Lean. This style has a modern lightweight look. As a bonus, it doesn't suffer from
rendering imperfections that afflict powerline-style prompt.
Error: character not in range
Type echo '\u276F'. If you get an error saying "zsh: character not in range", your locale
doesn't support UTF-8. You need to fix it. If you are running Zsh over SSH, see
this. If you are
running Zsh locally, Google "set UTF-8 locale in your OS".
Cursor is in the wrong place
Type echo '\u276F'. If you get an error saying "zsh: character not in range", see the
previous section.
If the echo command prints ❯ but the cursor is still in the wrong place, install
the recommended font and run
p10k configure.
If this doesn't help, add unset ZLE_RPROMPT_INDENT at the bottom of ~/.zshrc.
Still having issues? Run the following command to diagnose the problem:
() {
  emulate -L zsh
  setopt err_return no_unset
  local text
  print -rl -- 'Select a part of your prompt from the terminal window and paste it below.' ''
  read -r '?Prompt: ' text
  local -i len=${(m)#text}
  local frame="+-${(pl.$len..-.):-}-+"
  print -lr -- $frame "| $text |" $frame
}
If the prompt line aligns with the frame
+------------------------------+
| romka@adam ✓ ~/powerlevel10k |
+------------------------------+
If the output of the command is aligned for every part of your prompt (left and right), this indicates a bug in the theme or your config. Use this command to diagnose it:
print -rl -- ${(eq+)PROMPT} ${(eq+)RPROMPT}
Look for %{...%} and backslash escapes in the output. If there are any, they are the likely
culprits. Open an issue if you get stuck.
If the prompt line is longer than the frame
+-----------------------------+
| romka@adam ✓ ~/powerlevel10k |
+-----------------------------+
This is usually caused by a terminal bug or misconfiguration that makes it print ambiguous-width characters as double-width instead of single width. For example, this issue.
If the prompt line is shorter than the frame and is mangled
+------------------------------+
| romka@adam ✓~/powerlevel10k |
+------------------------------+
Note that this prompt is different from the original as it's missing a space after the check mark.
This can be caused by a low-level bug in macOS. See this issue.
This can also happen if prompt contains glyphs designated as "wide" in the Unicode standard and your terminal incorrectly displays them as non-wide. Terminals suffering from this limitation include Konsole, Hyper and the integrated VSCode Terminal. The solution is to use a different terminal or remove all wide glyphs from prompt.
If the prompt line is shorter than the frame and is not mangled
+--------------------------------+
| romka@adam ✓ ~/powerlevel10k |
+--------------------------------+
This can be caused by misconfigured locale. See this issue.
Prompt wrapping around in a weird way
See cursor is in the wrong place.
Right prompt is in the wrong place
See cursor is in the wrong place.
Configuration wizard runs automatically every time Zsh is started
When Powerlevel10k starts, it automatically runs p10k configure if no POWERLEVEL9K_*
parameters are defined. Based on your prompt style choices, the configuration wizard creates
~/.p10k.zsh with a bunch of POWERLEVEL9K_* parameters in it and adds a line to ~/.zshrc to
source this file. The next time you start Zsh, the configuration wizard shouldn't run automatically.
If it does, this means the evaluation of ~/.zshrc terminates prematurely before it reaches the
line that sources ~/.p10k.zsh. This most often happens due to syntax errors in ~/.zshrc. These
errors get hidden by the configuration wizard screen, so you don't notice them. When you exit
configuration wizard, look for error messages. You can also use
POWERLEVEL9K_DISABLE_CONFIGURATION_WIZARD=true zsh to start Zsh without automatically running the
configuration wizard. Once you can see the errors, fix ~/.zshrc to get rid of them.
Some prompt styles are missing from the configuration wizard
If Zsh version is below 5.7.1 or COLORTERM environment variable is neither 24bit nor
truecolor, configuration wizard won't offer Pure style with Snazzy color scheme. Fix: Install
Zsh >= 5.7.1 and use a terminal with truecolor support. Verify with print -P '%F{#ff0000}red%f'.
If the terminal can display fewer than 256 colors, configuration wizard preselects Lean style with
8 colors. All other styles require at least 256 colors. Fix: Use a terminal with 256 color support
and make sure that TERM environment variable is set correctly. Verify with
print $terminfo[colors].
If there is no UTF-8 locale on the system, configuration wizard won't offer prompt styles that use
Unicode characters. Fix: Install a UTF-8 locale. Verify with locale -a.
Another case in which configuration wizard may not offer Unicode prompt styles is when the
MULTIBYTE shell option is disabled. Fix: Enable the MULTIBYTE option, or rather don't disable
it (this option is enabled in Zsh by default). Verify with print -r -- ${options[MULTIBYTE]}.
When MULTIBYTE is enabled and a UTF-8 locale is available, the first few questions asked by the
configuration wizard assess capabilities of the terminal font. If your answers indicate that some
glyphs don't render correctly, configuration wizard won't offer prompt styles that use them. Fix:
Restart your terminal and install
the recommended font. Verify by running
p10k configure and checking that all glyphs render correctly.
Cannot install the recommended font
Once you download the recommended font, you can install it just like any other font. Google "how to install fonts on your OS".
Extra or missing spaces in prompt compared to Powerlevel9k
tl;dr: Add ZLE_RPROMPT_INDENT=0 and POWERLEVEL9K_LEGACY_ICON_SPACING=true to ~/.zshrc to get
the same prompt spacing as in Powerlevel9k.
When using Powerlevel10k with a Powerlevel9k config, you might get additional spaces in prompt here and there. These come in two flavors.
Extra space without background on the right side of right prompt
tl;dr: Add ZLE_RPROMPT_INDENT=0 to ~/.zshrc to get rid of that space.
From Zsh documentation:
ZLE_RPROMPT_INDENT <S>If set, used to give the indentation between the right hand side of the right prompt in the line editor as given by
RPS1orRPROMPTand the right hand side of the screen. If not set, the value1is used.Typically this will be used to set the value to
0so that the prompt appears flush with the right hand side of the screen.
Powerlevel10k respects this parameter. If you set ZLE_RPROMPT_INDENT=1 (or leave it unset, which
is the same thing as setting it to 1), you'll get an empty space to the right of right prompt. If
you set ZLE_RPROMPT_INDENT=0, your prompt will go to the edge of the terminal. This is how it
works in every theme except Powerlevel9k.
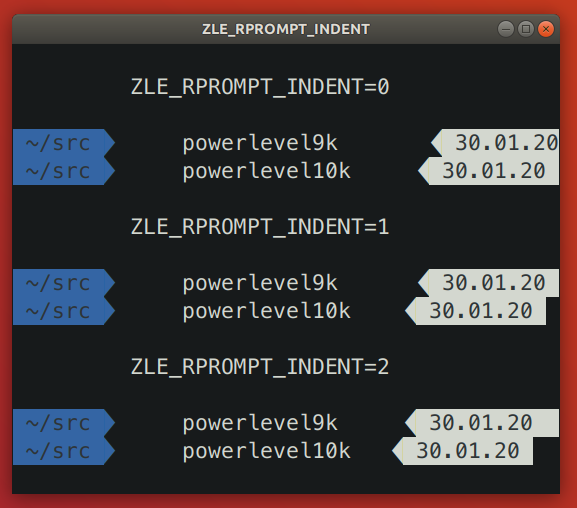
Powerlevel9k issue: powerlevel9k#1292.
It's been fixed in the development branch of Powerlevel9k but the fix hasn't yet made it to
master.
Add ZLE_RPROMPT_INDENT=0 to ~/.zshrc to get the same spacing on the right edge of prompt as in
Powerlevel9k.
Note: Several versions of Zsh have bugs that get triggered when you set ZLE_RPROMPT_INDENT=0.
Powerlevel10k can work around these bugs when using powerline prompt style. If you notice visual
artifacts in prompt, or wrong cursor position, try removing ZLE_RPROMPT_INDENT from ~/.zshrc.
Extra or missing spaces around icons
tl;dr: Add POWERLEVEL9K_LEGACY_ICON_SPACING=true to ~/.zshrc to get the same spacing around
icons as in Powerlevel9k.
Spacing around icons in Powerlevel9k is inconsistent.
![]()
This inconsistency is a constant source of annoyance, so it was fixed in Powerlevel10k. You can add
POWERLEVEL9K_LEGACY_ICON_SPACING=true to ~/.zshrc to get the same spacing around icons as in
Powerlevel9k.
Note: It's not a good idea to define POWERLEVEL9K_LEGACY_ICON_SPACING when using
p10k configure.
Weird things happen after typing source ~/.zshrc
It's almost always a bad idea to run source ~/.zshrc, whether you are using Powerlevel10k or not.
This command may result in random errors, misbehaving code and progressive slowdown of Zsh.
If you've made changes to ~/.zshrc or to files sourced by it, restart Zsh to apply them. The most
reliable way to do this is to type exit and then start a new Zsh session. You can also use
exec zsh. While not exactly equivalent to complete Zsh restart, this command is much more reliable
than source ~/.zshrc.
Transient prompt stops working after some time
See weird things happen after typing source ~/.zshrc.
Cannot make Powerlevel10k work with my plugin manager
If the installation instructions didn't work for you, try disabling your current theme (so that you end up with no theme) and then installing Powerlevel10k manually.
- Disable the current theme in your framework / plugin manager.
- oh-my-zsh: Open
~/.zshrcand remove the line that setsZSH_THEME. It might look like this:ZSH_THEME="powerlevel9k/powerlevel9k". - zplug: Open
~/.zshrcand remove thezplugcommand that refers to your current theme. For example, if you are currently using Powerlevel9k, look forzplug bhilburn/powerlevel9k, use:powerlevel9k.zsh-theme. - prezto: Open
~/.zpreztorcand putzstyle :prezto:module:prompt theme offin it. Remove any other command that setsthemesuch aszstyle :prezto:module:prompt theme powerlevel9k. - antigen: Open
~/.zshrcand remove the line that setsantigen theme. It might look like this:antigen theme powerlevel9k/powerlevel9k.
- Install Powerlevel10k manually.
git clone --depth=1 https://github.com/romkatv/powerlevel10k.git ~/powerlevel10k
echo 'source ~/powerlevel10k/powerlevel10k.zsh-theme' >>~/.zshrc
This method of installation won't make anything slower or otherwise sub-par.
Directory is difficult to see in prompt when using Rainbow style
In Rainbow style the current working directory is shown with bright white text on blue background. The white is fixed and always looks the same but the appearance of "blue" is defined by your terminal color palette. If it's very light, it may be difficult to see white text on it.
There are several ways to fix this.
- Type
p10k configureand choose a more readable prompt style. - Change terminal color palette. Try Tango Dark or Solarized Dark, or change just the "blue" color.
- Change directory background and/or foreground color.
The parameters you are looking for are called
POWERLEVEL9K_DIR_BACKGROUND,POWERLEVEL9K_DIR_FOREGROUND,POWERLEVEL9K_DIR_SHORTENED_FOREGROUND,POWERLEVEL9K_DIR_ANCHOR_FOREGROUNDandPOWERLEVEL9K_DIR_ANCHOR_BOLD. You can find them in~/.p10k.zsh.
Related: Incorrect foreground color in VSCode Terminal.
Incorrect foreground color in VSCode Terminal
By default, VSCode Terminal may arbitrarily replace the foreground color of your choice with a different color. This behavior can be turned off in VSCode settings.
Horrific mess when resizing terminal window
When you resize a terminal window horizontally back and forth a few times, you might see this ugly picture.
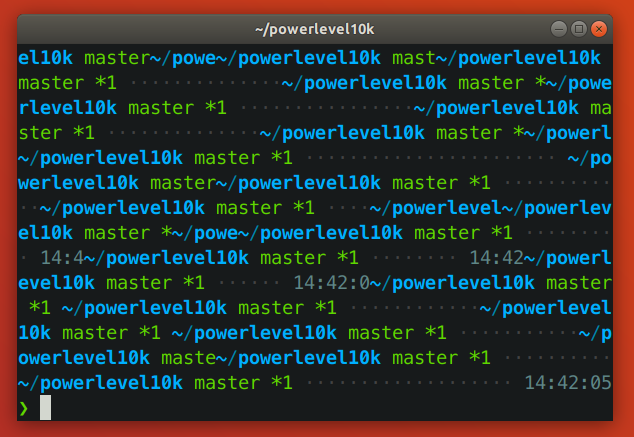
tl;dr: This issue arises when a terminal reflows Zsh prompt upon resizing. It isn't specific to Powerlevel10k. See mitigation.
Note: This section used to say that the problem is caused by a bug in Zsh. While it's true that it's possible to avoid the problem in many circumstances by modifying Zsh, it cannot be completely resolved this way. Thus it's unfair to pin the blame on Zsh.
The anatomy of the problem
The issue is manifested when the vertical distance between the start of the current prompt and the
cursor (henceforth VD) changes when the terminal window is resized.
When a terminal window gets shrunk horizontally, there are two ways for a terminal to handle long lines that no longer fit: reflow or truncate.
Terminal content before shrinking:
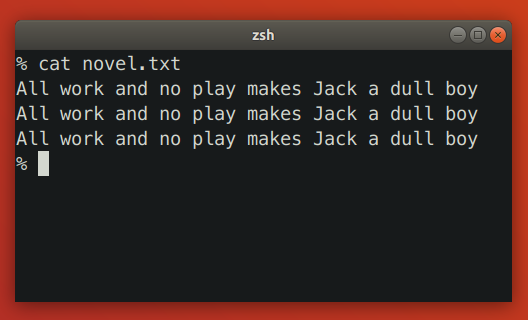
Terminal reflows text when shrinking:
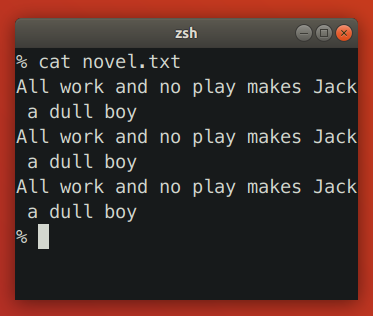
Terminal truncates text when shrinking:
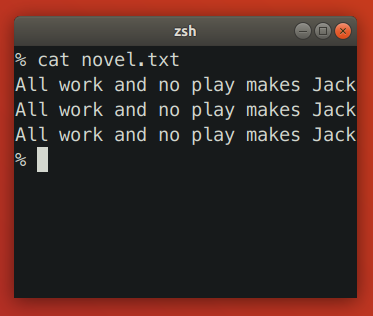
Reflowing strategy can change the height of terminal content. If such content happens to be between the start of the current prompt and the cursor, Zsh will print prompt on the wrong line. Truncation strategy never changes the height of terminal content, so it doesn't trigger this issue.
Let's see how the issue plays out in slow motion. We'll start by launching zsh -f and pasting
the following code:
function pause() { read -s }
functions -M pause 0

reset
print -l {1..3}
setopt prompt_subst
PROMPT=$'${$((pause()))+}left>${(pl.$((COLUMNS-12))..-.)}<right\n> '
When PROMPT gets expanded, it calls pause to let us observe the state of the terminal. Here's
the initial state:
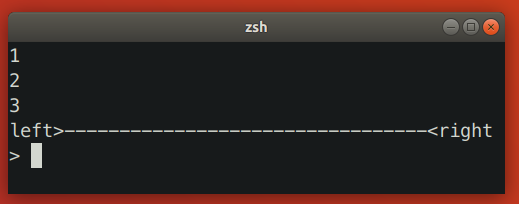
Zsh keeps track of the cursor position relative to the start of the current prompt. In this case it knows that the cursor is one line below. When we shrink the terminal window, it looks like this:
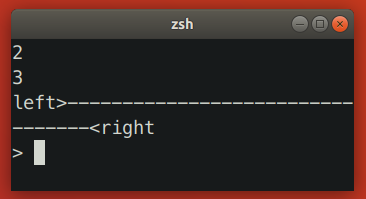
At this point the terminal sends SIGWINCH to Zsh to notify it about changes in the terminal
dimensions. Note that this signal is sent after the content of the terminal has been reflown.
When Zsh receives SIGWINCH, it attempts to erase the current prompt and print it anew. It goes to
the position where it thinks the current prompt is -- one line above the cursor (!) -- erases all
terminal content that follows and prints reexpanded prompt there. However, after resizing prompt is
no longer one line above the cursor. It's two lines above! Zsh ends up printing new prompt one line
too low.
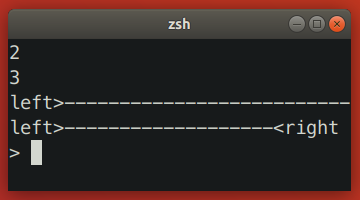
In this case we ended up with unwanted junk content because VD has increased. When you make
terminal window wider, VD can also decrease, which would result in the new prompt being printed
higher than intended, potentially erasing useful content in the process.
Here are a few more examples where shrinking terminal window increased VD.
- Simple one-line left prompt with right prompt. No
prompt_subst. Note that the cursor is below the prompt line (hit ESC-ENTER to get it there).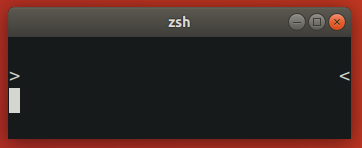
- Simple one-line left prompt. No
prompt_subst, no right prompt. HereVDis bound to increase upon terminal shrinking due to the command line wrapping around.
Zsh patch
This Zsh patch fixes the issue on some
terminals. The idea behind the patch is to use sc (save cursor) terminal capability before
printing prompt and rc (restore cursor) to move cursor back to the original position when prompt
needs to be refreshed.
The patch works only on terminals that reflow saved cursor position together with text when the terminal window is resized. The patch has no observable effect on terminals that don't reflow text on resize (both patched and unpatched Zsh behave correctly) and on terminals that reflow text but not the saved cursor position (both patched and unpatched Zsh redraw prompt at the same incorrect position). In other words, the patch fixes the resizing issue on some terminals while keeping the behavior unchanged on others.
There are two alternative approaches to patching Zsh that may seem to work at first glance but in fact don't:
- Instead of
sc, useu7terminal capability to query the current cursor position and thencupto go back to it. This doesn't work because the absolute position of the start of the current prompt changes when text gets reflown. - Recompute
VDbased on new terminal dimensions before attempting to refresh prompt. This doesn't work because Zsh doesn't know whether terminal reflows text or truncates it. If Zsh could somehow know that the terminal reflows text, this approach still wouldn't work on terminals that continuously reflow text and rapid-fireSIGWINCHwhen the window is being resized. In such environment real terminal dimensions go out of sync with what Zsh thinks the dimensions are.
There is no ETA for the patch making its way into upstream Zsh. See discussion.
Mitigation
There are a few mitigation options for this issue.
- Use kitty terminal version >= 0.24.0 and enable terminal-shell
integration in Powerlevel10k by defining
POWERLEVEL9K_TERM_SHELL_INTEGRATION=truein~/.p10k.zsh. - Apply the patch and rebuild Zsh from source. It won't help if you are using Alacritty, kitty or some other terminal that reflows text on resize but doesn't reflow saved cursor position. On such terminals the patch will have no visible effect.
- Disable text reflowing on window resize in terminal settings. If your terminal doesn't have this setting, try a different terminal.
- Avoid long lines between the start of prompt and cursor.
- Disable ruler with
POWERLEVEL9K_SHOW_RULER=false. - Disable prompt connection with
POWERLEVEL9K_MULTILINE_FIRST_PROMPT_GAP_CHAR=' '. - Disable right frame with
POWERLEVEL9K_MULTILINE_FIRST_PROMPT_SUFFIX='',POWERLEVEL9K_MULTILINE_NEWLINE_PROMPT_SUFFIX=''andPOWERLEVEL9K_MULTILINE_LAST_PROMPT_SUFFIX=''. - Set
POWERLEVEL9K_RIGHT_PROMPT_ELEMENTS=(). Right prompt on the last prompt line will cause resizing issues only when the cursor is below it. This isn't very common, so you might want to keep some elements inPOWERLEVEL9K_RIGHT_PROMPT_ELEMENTSprovided that none of them are succeeded bynewline.
- Disable ruler with
Icons cut off in Konsole
When using Konsole with a non-monospace font, icons may be cut off on the right side. Here "non-monospace" refers to any font with glyphs wider than a single column, or wider than two columns for glyphs designated as "wide" in the Unicode standard.

The last line on the screenshot shows a cut off Arch Linux logo.
There are several mitigation options for this issue.
- Use a different terminal. Konsole is the only terminal that exhibits this behavior.
- Use a monospace font.
- Manually add an extra space after the icon that gets cut off. For example, if the content of
os_iconprompt segment gets cut off, open~/.p10k.zsh, search forPOWERLEVEL9K_OS_ICON_CONTENT_EXPANSIONand change it as follows:
typeset -g POWERLEVEL9K_OS_ICON_CONTENT_EXPANSION='${P9K_CONTENT} ' # extra space at the end
- Use a different icon that is monospace. For example, if Arch Linux logo gets cut off, add
the following parameter to
~/.p10k.zsh:
typeset -g POWERLEVEL9K_LINUX_ARCH_ICON='Arch' # plain "Arch" in place of a logo
- Disable the display of the icon that gets cut off. For example, if the content of
os_iconprompt segment gets cut off, open~/.p10k.zshand removeos_iconfromPOWERLEVEL9K_LEFT_PROMPT_ELEMENTSandPOWERLEVEL9K_RIGHT_PROMPT_ELEMENTS.
Note: Non-monospace fonts are not officially supported by Konsole.
Arch Linux logo has a dot in the bottom right corner
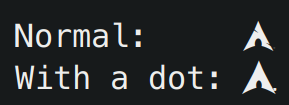
Some fonts have this incorrect dotted icon in bold typeface. There are two ways to fix this issue.
- Use a font with a correct Arch Linux logo in bold typeface. For example, the recommended Powerlevel10k font.
- Display the icon in regular (non-bold) typeface. To do this, open
~/.p10k.zsh, search forPOWERLEVEL9K_OS_ICON_CONTENT_EXPANSIONand remove%Bfrom its value.
typeset -g POWERLEVEL9K_OS_ICON_CONTENT_EXPANSION='${P9K_CONTENT}' # not bold
Incorrect git status in prompt
Powerlevel10k uses gitstatusd to inspect the state of git
repositories. The project relies on the libgit2 library, which
has some gaps in its implementation. Under some conditions, this may result in discrepancies between
the real state of a git repository (reflected by git status) and what gets shown in the
Powerlevel10k prompt.
Most notably, libgit2 does not support skipHash.
If you see incorrect git status in prompt, run git config -l and check whether skipHash is
enabled. If it is, consider disabling it. Keep in mind that skipHash may be implicitly enabled
when activating certain git features, such as manyFiles.