Awesome
Obsidian Execute Code Plugin
<div align='right'>


This plugin allows you to execute code snippets in code blocks in your notes. The plugin adds a 'run' button for code blocks in supported languages. Clicking them results in the code of the block being executed locally. After the execution the result of the execution is showed. An interactive input element is created when your code snippets reads expects user input.
The result is shown only after the execution is finished. It is not possible to enter text on the command line into the executed program now.

<hr></div>[!NOTE] Advertisement on my behalf: I am working on my master's thesis and looking for a PhD position in AI (especially explainable AI or foundations of machine learning) - if you have or know about an open position in that field, I would love to hear about it 😄
The following languages are supported: C, CPP, Dart, Golang, Groovy, Kotlin, Java, JavaScript, TypeScript, Lean, Lua, CSharp, Prolog, Rust, Python, R, Ruby, Wolfram Mathematica, Haskell, Scala, Racket, F#, Batch, Shell & Powershell, Octave, Maxima, Zig and OCaml.
If you are new to MarkDown or Obsidian.md, you can go to the Quickstart Guide or take a look in to some blogs and videos that feature this plugin
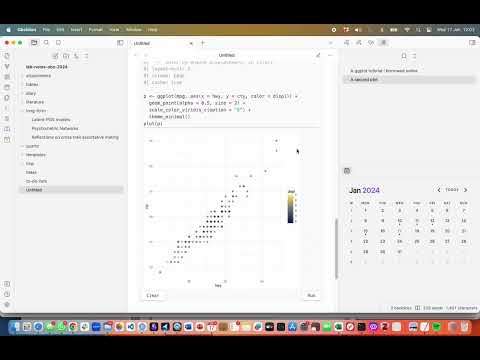
Python, Rust, and Octave support embedded plots. All languages support "magic" commands that help you to access paths in obsidian or show images in your notes.
You can create code blocks that are executed before or after each code block of the same language and define global code injections.
New: You can enable persistent output to store the output of a code block in the note and export it to PDF.
Take a look at the changelog to see what has changed in recent versions.
Here you can find some other tools and plugins that are compatible with this plugin and might be useful for you.
<br> <div align='center'>If you like this plugin and use it a lot, please consider supporting me in continuing the development of this plugin. You can also sponsor a new feature or language integration directly, if you want to speed-up the development for a specific feature you need.
Featured In
 |  |  |  |
|---|---|---|---|
| "Escape ChatGPT. Make your own Code Interpreter EASY" by I Versus AI | "Obsidian & quarto integration" by Michel's Science Speedrun | "Write SQL Queries in...Obsidian?" by GlareDB | "인생 노트앱...드디어 찾았습니다..!" by 노마드 코더 Nomad Coders |
In blogs:
- "Why and how you should switch to Obsidian." by Connero
- "Using Obsidian: Coding Notes" by Kera Cudmore
- "Obsidian and Jupyter Notebooks" by Brian Carey
<small>Are you featuring this plugin in your content? Let me know and I will add it here.</small>
Supported programming languages 💻
<details> <summary>JavaScript</summary>- Requirements: Node.js is installed and the correct path is set in the settings.
function hello(name) {
	console.log(`Hello ${name}!`);
}

hello("Bob")
- By default, Javascript runs in Notebook Mode. You can turn this off in the settings.
- Requirements: Node.js installed then run in command line
npm install typescript -gandnpm install ts-node -g. (-gmeans global install) - Problems: If you use your global node.js installation and it doesn't work try to set your
ts-nodepath in the settings tonpx ts-nodeinstead ofts-node.
let message: string = 'Hello, World!';
console.log(message);
- Requirements: install dotnet core sdk and run in command line
dotnet tool install -g dotnet-script, then config dotnet-script fullpath.
Console.WriteLine("Hello, World!");
- Requirements: dart sdk is installed and the correct path is set in the settings.
void main() {
  print("Hello World");
}
- Requirements: Python is installed and the correct path is set in the settings.
def hello(name):
	print("Hello", name)

if __name__ == "__main__":
	hello("Eve")
- By default, Python runs in Notebook Mode. You can turn this off in the settings.
- Plots with matplotlib/seaborn are embedded in the note by default. You can turn this off in the settings.
import seaborn as sns
import matplotlib.pyplot as plt
sns.set_style("darkgrid")
iris = sns.load_dataset('iris')
sns.FacetGrid(iris, hue ="species", height = 5)
		.map(plt.scatter, 'sepal_length', 'petal_length')
		.add_legend()

plt.show()

- Requirements: R is installed and the correct path is set in the settings.
- For cool additional features for R try out the Ridian plugin
hello <- function(name){
	print(paste("Hello", name, sep = " "))
}

hello("Bob")
- Plots can be embedded in the note by default. You can turn this off in the settings.
y = c(12, 15, 28, 17, 18)
x = 1:length(y)
plot(x, y, type="l")
- Requirements: Java 11 or higher is installed and the correct path is set in the settings.
public class HelloWorld {
	public static void main(String[] args) {
		System.out.println("Hello World!");
	}
}
- Requirements: install lua and config lua path.
print('Hello, World!')
- Requirements: install lean and config lean path.
def main : IO Unit :=
  IO.println s!"Hello, World!"

#eval main
- Requirements: Cling is installed and correct path is set in the settings.
- Code will be executed line-by-line without needing a main function.
#include <iostream>
#include <string>

using namespace std;

void hello(string name) {
	cout << "Hello " << name << "!\n";
}

hello("Alice);
- Main functions can be used as an entrypoint by toggling the option in settings.
#include <iostream>

void main() {
	std::cout << "Hello, World!" << std::endl;
}
- Requirements: Cling is installed and correct path is set in the settings.
- Code will be executed line-by-line without needing a main function.
#include <stdio.h>

printf("Hello, World!");
- Main functions can be used as an entrypoint by toggling the option in settings.
#include <stdio.h>

int main() {
	printf("Hello, World!");
	return 0;
}
- Requirements: Set the path to your preferred shell in the settings. Default is Bash. (Only on Linux and macOS)
echo "Hello World!"
ls -la
- Requirements: Used to execute shell commands on Windows. Default is Powershell but can be set to your preferred shell in the settings.
- On MacOS: You probably need to change the command to use from
powershelltopwshin the plugin settings. Make sure you set the right path.
echo "Hello World!"
- If you prefer batch: change the path settings in the menu for powershell

- Requirements: Used to execute batch commands on Windows (also known as BAT or CMD). Default is command prompt, but can be set to your preferred shell in the settings.
- Important: <br> The percent sign is used in batch files to represent command line parameters: e.g. %1, %2, ... <br> Two percent signs in a batch file are treated like a single percent sign in a command: e.g. %%f <br> When using variables in execute code, use 2 percent signs. More info here<br>
ECHO Hello World!
- Requirements: NO requirements, works with Tau-Prolog.
- Important: Add your queries after a line "
% query" in the code block like in the following
likes(john, pizza).
likes(john, cheese).
likes(jane, beer).

% query
likes(john, X).
- Requirements: Groovy is installed and the correct path is set in the settings.
def hello(name){
	println "Hello ${name}!"
}

def helloClosure = {
	println "Hello ${it}!"
}

hello("Bob")

helloClosure "Bob"
- Requirements: Golang is installed and correct path is set in the settings(
gobinary is available). - Every code block must contain package declaration and a main function.
package main

import "fmt"

func main() {
	fmt.Println("Hello World")
}
- Requirements: Cargo is installed and correct path is set in the settings(
cargobinary is available). cargo-evalis installed. Install usingcargo install cargo-eval.- Import statements and external crates is supported by
cargo-eval. Read their documentation. - Every code block must have a main function.
fn main() {
	println!("Hello World");
}
- Requirements: Kotlin is installed and correct path is set in the settings.
hello(name: String) {
	println("Hello $name!")
}

hello("Bob")
- Requirements: Mathematica is installed and correct path is set in the settings.
- You can add
-cloudas argument in the settings to use the Wolfram Cloud instead of the local installation.
- You can either use <strong>runghc</strong> (compiler) or <strong>ghci</strong> (interpreter) to run your code.
- <strong>runghc</strong> requirements:
- runghc and ghc are installed and correct paths are set in the settings.
- Every code block must contain a main function.
- <strong>ghci</strong> requirements:
- ghci is installed and correct path is set in the settings.
- If you have a main function you have to manually call it.
- <strong>runghc</strong> requirements:
mySum:: Num a => a -> a -> a
mySum a b = a+b
- Requirements: Scala is installed and the correct path is set in the settings.
println("Hello, World!")
- Requirements: Racket is installed and the correct path is set in the settings.
"Hello, world!"
- Requirements: Ruby is installed and the correct path is set in the settings.
puts "Hello, World!"
- Requirements: PHP is installed and the correct path is set in the settings.
<?php
echo "Hello, World!";
?>
- Requirements: Octave is installed and the correct path is set in the settings.
exp(i*pi)

x = -10:0.1:10;
plot (x, sin(x));
(Thanks to Michael M. Tung for the code example.)
- Figures are set to invisible by default. They are store in a file and directly embedded in the note.
- Requirements: Maxima is installed and the correct path is set in the settings.
integrate(x,x);
plot2d(sin(x), [x,0,%pi]);
(Thanks to Michael M. Tung for the code example.)
- By default, plots are saved in a file and directly embedded in the note.
- Requirements: OCaml is installed and the correct path is set in the settings.
print_endline "Hello, OCaml!"
- Requirements: Swift is installed and the correct path is set in the settings.
print("Hello, world!")
Squiggle: For Squiggle support take a look at the Obsidian Squiggle plugin by @jqhoogland.
Support for the following is planned:
- Matlab
- Julia Lang
Open for suggestions.
Magic Commands 🪄
Magic commands are some meta commands that can be used in the code block. They are processed by the plugin before the source code is executed.
The following magic commands are supported:
@vault_path: Inserts the vault path as string (e.g. "/User/path/to/vault")@vault_url: Inserts the vault url as string. (e.g. "app://local/path/to/vault")@note_path: Inserts the vault path as string (e.g. "/User/path/to/vault/Note.md")@note_url: Inserts the vault url as string. (e.g. "app://local/path/to/vault/Note.md")@title: Inserts the note title as string.@show(ImagePath): Displays an image at the given path in the note.@show(ImagePath, Width, Height): Displays an image at the given path in the note.@show(ImagePath, Width, Height, Alignment[center|left|right]): Displays an image at the given path in the note.@html(HtmlSource): Displays HTML in the note
(@show(...) and @html(...) are only supported for JavaScript and Python yet.)
(The old commands @note and @vault are still supported, but may be removed in the future.)
Examples for the magic commands with Python:
print("Vault path:", @vault_path)
print("Vault url:", @vault_url)

print("Note path:", @note_path)
print("Note url:", @note_url)

print("Note title:", @title)
@show("image.png")
@show("image.png", 100, 100)
@show("https://upload.wikimedia.org/wikipedia/commons/d/de/TestScreen_square.svg", 10%, 10%, "center")
@html("<h1>HTML Caption</h1>")
@html('''
<svg width="100%" height="100%" viewBox="0 0 600 600" xmlns="http://www.w3.org/2000/svg" xmlns:xlink="http://www.w3.org/1999/xlink">
  <circle cx="300" cy="300" r="250" style="fill:peru;" />
  <circle cx="200" cy="250" r="50" style="fill:black;" />
  <circle cx="400" cy="250" r="50" style="fill:black;" />
  <circle cx="190" cy="230" r="20" style="fill:white;" />
  <circle cx="390" cy="230" r="20" style="fill:white;" />
  <circle cx="250" cy="400" r="85" style="fill:saddlebrown;" />
  <circle cx="350" cy="400" r="85" style="fill:saddlebrown;" />
  <ellipse cx="300" cy="380" rx="50" ry="35" style="fill:black;" />
  <ellipse cx="130" cy="100" rx="110" ry="70" style="fill:saddlebrown;"/>
<ellipse cx="470" cy="100" rx="110" ry="70" style="fill:saddlebrown;" />
</svg>
''')
Try it out yourself!

Running in Preview ⏩
Adding run- before the language name in the code blocks (as in the example below) renders the code block in the preview already.
This allows you to execute the code in the preview.
```run-python
def hello(name):
print("Hello", name)

    if __name__ == "__main__":
        hello("Eve")
Code Block Arguments 🏷
Code blocks support specifying additional arguments in the form {key='value', otherkey=['val1', 'val2']}. Add them to code blocks like so:
```python {label='my label'}
print('my labelled code block')
```
Global Code Injection and Reusing Code Blocks 📘
Sometimes it is helpful to have code that is executed before or after each other block of the same language. This plugin supports this in a few ways:
Global Injection in the Settings
All languages have a 'global inject' option in the settings that allows defining code to be added to the top of every single code block on a per-language basis. Code reuse fully works with all languages, and all existing magic commands, including showing images, and inline plot outputs. This can be used to define e.g. often used functions or import your favourite packages or libraries.
Note-wide Pre- and Post-Code Blocks
You can specify the pre argument to create a block that is executed before each following code block:
```python {pre}
import pandas as pd
```
This code block is added before each python block you define below in the note and import the pandas package.
post blocks work the same way, but the code in post blocks is executed after your other code blocks.
Pre/Post blocks will only apply to code blocks defined below them, and will only apply to code blocks from the same language.
You can also have a pre and post block at the same time by specifying {pre, post}
Note, the pre/post arguments are special in that you don't need to explicitly state a key/value pair, however you can do so if you wish:
{pre} is equivalent to {export='pre'}, {pre, post} is equivalent to {export=['pre', 'post']}.
Labelled Code Blocks
You can label specific code blocks with the label='string' argument, then import them explicitly in other blocks with the import='string' or import=['string1', 'string2', ...] argument so they aren't automatically imported as with pre / post blocks:
```python {label='block 1'}
print('running block 1')
```

```python {label='block 2'}
print('running block 2')
```

```python {import=['block 1', 'block 2']}
print('should run block 1 and 2')
```
Labelled code blocks will be executed before the code block being run, however after global injects and pre blocks.
Ignoring Code Exports
In case you want to manually ignore specific exports in a code block like pre / post / global exports, you can do so with the ignore argument that accepts either pre, post, global, an array of any of these 3, or all to ignore all exports:
```python {ignore='all'}
print('should not run any global injects or pre / post blocks')
```

```python {ignore=['global', 'pre']}
print('should not run any pre blocks or global injects')
```
Notebook Mode
A few languages (currently JS and Python) support Notebook Mode. If a language is using Notebook Mode (configurable in Settings), then all code blocks in a given file will execute in the same environment.
Variables functions, etc. defined in one code block will be available in other code blocks. Code blocks are executed on demand; the order of code blocks in the file does not affect the order in which they are executed:
```js
console.log(f)
```
```js
var f = 3;
```
Running the first code block, then the second, then the first again will give:
Uncaught ReferenceError: f is not defined
undefined
3
To manage the open runtimes for Notebook Mode, you can use the Open Code Runtime Management command in the command palette. From this sidebar window, you can stop kernels. Note: force-stopping requires taskkill on Windows and pkill on Unix. 99% of systems should have these preinstalled: if yours doesn't, please file an issue
Persistent Output [Experimental]
Since version 2.0.0, the plugin supports persistent output. This means that the output of a code block is stored in the note and will be displayed when you open the note again. This is useful for long-running code blocks or code blocks that produce a lot of output. The output is stored in the note as a comment and will be displayed in the preview mode.
To enable this feature, you have to enable the setting Persistent Output in the plugin settings.
We recommend reopening open notes that contain code blocks after enabling this feature.
This feature is still experimental and may not work as expected in all cases. We recommend that you disable this feature if you encounter any problems.
Misc 📦
Style Settings 🎨
This plugin supports customising styles using the Style Settings plugin or the Obsidian Code Styler plugin.
Other Tools
Take a look at the Obsidian Tools python package to find some useful tools for interacting with your vault.
Quickstart Guide
Start by checking if the plugin is installed and activated. Continue by creating a code block in your preferred language. Check above to see if the language is supported.
Now you can switch from the preview mode to the rendered mode (where you can't edit the text anymore). Now, when you hover over the code block, you should see a button labeled "run". Click it!
If it didn't work and a warning appears (that is not related to a bug in your code), you probably need to set the correct execution part for the language (e.g., "C://User/YourName/anaconda/python.exe" or something like that). You can find instructions about how to find the right path below.
Now it works, great! Feel free to read or skim through the text above to learn more features you might like, for example persistent output or embedding of plots.
Installation 💾
In your vault go to Settings > Community plugins > Browse and search for "Execute Code". Select the plugin, install it and activate it.
or
Follow this link and click "Open in Obsidian".
Locating Path Settings ( ex. JavaScript | Node )
To avoid or resolve errors from an incorrect path.
('where' for Mac and Windows) --- (for Linux Users, replace 'where' with 'which')
- In your terminal, type 'where node'

- Copy path from terminal ( ex. /opt/homebrew/bin/node )
- Paste in path under settings ( ex. Node path )

Warning ⚠
Do not execute code from sources you don't know or code you don't understand. Executing code can cause irreparable damage.
Known Problems 🛠
- On Linux, Snap/Flatpak/AppImage installations of Obsidian run in an isolated environment. As such, they will not have access to any of your installed programs. If you are on Linux, make sure to install the
.debversion of Obsidian. If your distro isn't compatible with.debfiles, you may see issues. - Missing when
runbutton after switching the theme: Try to close and reopen your notes and wait for a few minutes. It seems like obsidian doesn't call the postprocessors after the theme switch. - Pre- / Post-blocks may not be executed if the file contains duplicate code blocks.
- In Python, Embed Plots may not be off while Notebook Mode is on
Future Work 📑
- Error warning when the execution fails (e.g. when python isn't installed)
- Test if this plugin works in combination with dataview.
Contribution 🤝
All contributions are welcome. Just create a merge request or email me: tim.wibiral(at)uni-ulm.de
The bullet points in Future Work are a good starting point if you want to help.
Contributors ♥
<a href="https://github.com/twibiral/obsidian-execute-code/graphs/contributors"> <img alt="List of contributors to this project." src="https://contrib.rocks/image?repo=twibiral/obsidian-execute-code" /> </a><sub>Made with contrib.rocks.</sub>