Awesome
Unity Capture
Overview
Unity Capture is a Windows DirectShow Filter that allows you to stream a rendered camera directly to another application.
In more simple terms, it essentially makes Unity simulate a web cam device on Windows that shows a rendered camera.
This project is based on UnityCam by Yamen Saraiji with added features and big performance improvements. It supports lag-free 1080p at 60 FPS on moderate PCs and can handle 4K resolutions on a faster PC. It also supports capturing multiple cameras and alpha channel (transparency) in receiving applications that support it (like OBS).
Installation
First download this project from GitHub with the Download ZIP button or by cloning the repository.
To register the DirectShow Filter to be available in Windows programs, run the Install.bat inside the Install directory.
Make sure the files in the install directory are placed where you want them to be.
If you want to move or delete the files, run Uninstall.bat first.
If you have problems registering or unregistering, right click on the Install.bat and choose "Run as Administrator".
The script Install.bat registers just a single capture device usable for capturing a single Unity camera. If you want to
capture multiple cameras simultaneously you can instead run the InstallMultipleDevices.bat script which prompts for a
number of capture devices you wish to register.
Update
When updating from a version from before April 2023 it is recommended to uninstall the old version first.
The old version is available here.
Test in Unity
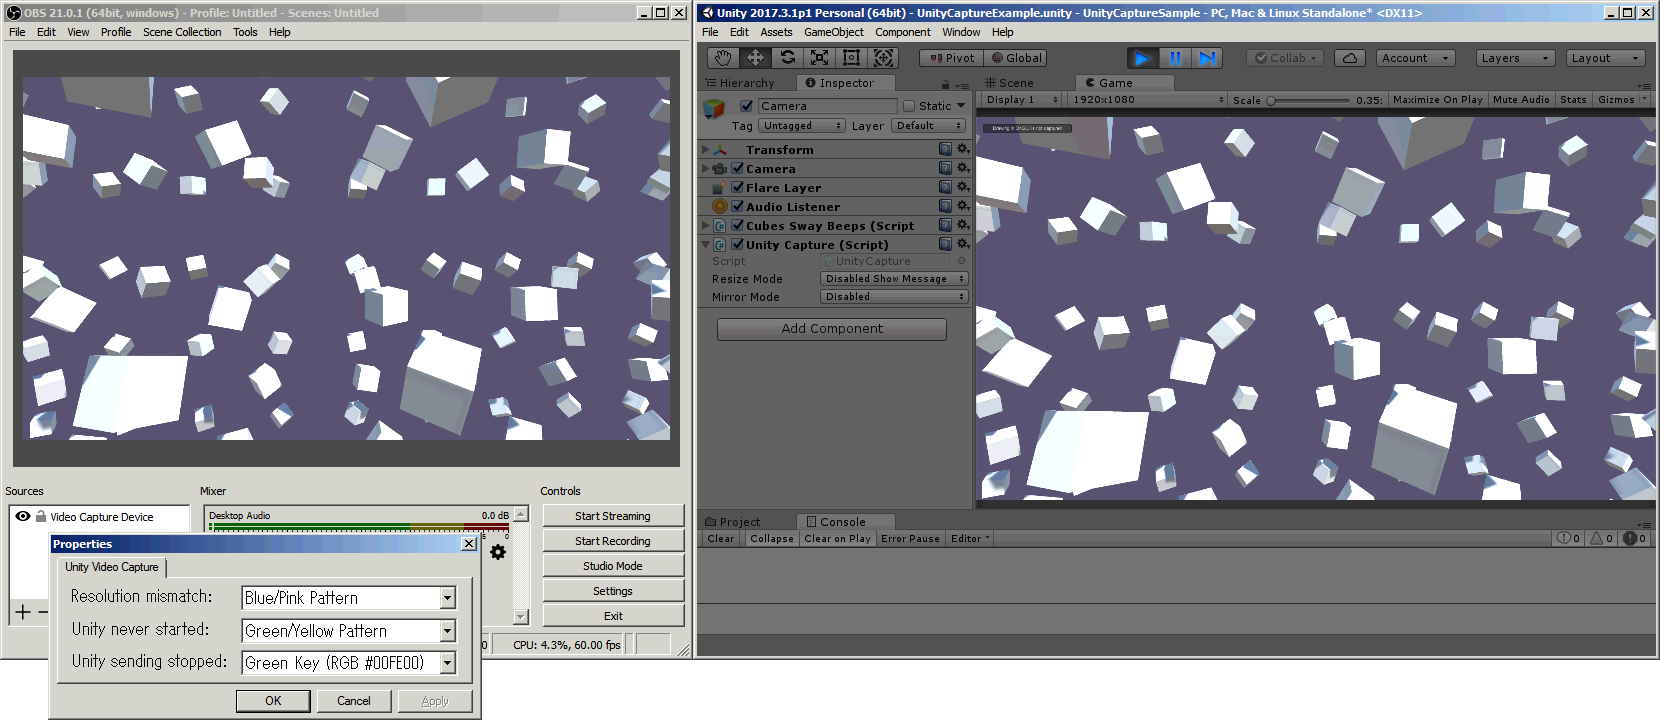
Open the included UnityCaptureSample project in Unity, load the scene 'UnityCaptureExample' and hit play.
Then run a receiving application (like OBS, any program with web cam support
or a WebRTC website) and request
video from the "Unity Video Capture" device.
You should see the rendering output from Unity displayed in your target application.
If you see a message about matching rendering and display resolutions, use the resolution settings on the 'Game' tab in Unity to set a fixed resolution to match the capture output.
Setup in your Unity project
Just copy the UnityCapture asset directory from the included sample project into your own project and then add the 'Unity Capture' behavior to your camera at the bottom.
You can also enable this behavior on a secondary camera that is not your main game camera by setting a target texture with your desired capture output resolution.
If you want to capture multiple cameras simultaneously you can refer to the 'UnityCaptureMultiCam' scene and the 'MultiCam' script used by it.
If you want to capture a custom texture (generated texture, a video, another webcam feed or a static image) you can refer to the 'UnityCaptureTextureExample' scene and the 'CaptureTexture' script used by it.
Settings
There are a few settings for the 'Unity Capture' behavior.
- 'Capture Device': Set the capture device filter number (only relevant when multiple capture devices were installed)
- 'Timeout': Sets how many milliseconds to wait for a new frame until sending is considered to be stopped
If rendering every frame this can be very low. Default is 1000 to allow stalls due to loading, etc. When set to 0 the image will stay up even when Unity is ended (until the receiving application also ends). - 'Resize Mode': It is suggested to leave this disabled and just let your capture target application handle the display sizing/resizing because this setting can introduce frame skipping. So far only a very basic linear resize is supported.
- 'Mirror Mode': This setting should also be handled by your target application if possible and needed, but it is available.
- 'Double Buffering': See performance caveats below
- 'Enable V Sync': Overwrite the state of the application v-sync setting on component start
- 'Target Frame Rate': Overwrite the application target fps setting on component start
- 'Hide Warnings': Disable output of warning messages (but not errors)
Possible errors/warnings
- Warning: "Capture device did skip a frame read, capture frame rate will not match render frame rate."
Output when a frame rendered by Unity was never displayed in the target capture application due to performance problems or target application being slow. - Warning: "Capture device is inactive"
If the target capture application has not been started yet. - Error: "Unsupported graphics device (only D3D11 supported)"
When Unity uses a rendering back-end other than Direct 3D 11. - Error: "Render resolution is too large to send to capture device"
When trying to send data with a resolution higher than the maximum supported 3840 x 2160 - Error: "Render texture format is unsupported"
When the rendered data/color format would require additional conversation. - Error: "Error while reading texture image data"
Generic error when the plugin is unable to access the rendered image pixel data.
Output Device Configuration
In your receiving application mainly two settings are of relevance. Depending on the application, the settings might be named different or not available at all in which case it will fall back to a default.
- Resolution: Set this to match the rendering resolution in Unity. Depending on your target application you may be able to request a custom resolution. For instance in OBS you can input 512x512 into the resolution settings textbox. For custom resolutions, make sure width is specified in increments of 4.
- Video Format: Set this to ARGB if you want to capture the alpha channel (transparency). Other settings like FPS, color space or buffering are irrelevant as the output from Unity controls these parameters.
There are four additional settings in the configuration panel offered by the capture device. Some applications like OBS allow you to access these settings with a 'Configure Video' button, other applications like web browsers might not.
These settings control what will be displayed in the output in case of an error:
- 'Resolution mismatch': When resizing in the Unity behavior is disabled and the capture output and the rendering resolutions don't match.
- 'Unity never started': When rendering in Unity with a 'Unity Capture' behavior has never started sending video data.
- 'Unity sending stopped': When video data stops being received (i.e. Unity game stopped or crashed).
There are four modes that can be set for the settings above:
- 'Fill Black': Show just black.
- 'Blue/Pink Pattern': A pattern that is blue and pink.
- 'Green/Yellow Pattern': A pattern that is green and yellow.
- 'Green Key (RGB #00FE00)': Fills the output with a specific color (red and blue at 0, green at 254). This can be used for instance in OBS with the 'Color Key' video filter to show a layer behind the video capture. You can use this if you want to show a 'Please stand by...' image layer when Unity is stopped.
The settings 'Fill Black' and 'Green Key' are shown as completely transparent when capturing with alpha channel.
For the two colored patterns an additional text message will be displayed detailing the error.
The setting 'Display FPS' shows the capture frame rate (frames per second) on the capture device output.
Performance caveats
There are two main improvements to capture stream frame rate.
One is to disable the camera setting 'Allow HDR' which causes the camera output texture format to be in a favorable format (8-bit integer per color per pixel). If your shaders and post-processing allow it, it's recommended to leave HDR off.
The other is the setting 'DoubleBuffering' in the UnityCapture component.
Double buffering causes 1 frame of additional latency but improves the image data throughput.
You can check the Unity profiler for how much it impacts performance in your project.
Otherwise it is recommended to leave scaling and mirroring disabled in the UnityCapture component.
Todo
- Saving of the output device configuration
- Bilinear filtered resizing
License
Unity Capture is divided into two parts that are separately licensed.
The filter 'UnityCaptureFilter' is available under the MIT license.
The Unity plugin 'UnityCapturePlugin' is available under the zlib license (so attribution in your Unity project is optional).