Awesome
Papercraft
Introduction
Papercraft is a tool to unwrap paper 3D models, so that you can cut and glue them together and get a real world paper model.
The main purpose of this program is to do the unwrapping, that is, it takes a 3D model as input and outputs a printable document with the pieces to cut. It is not a 3D modelling program. For that I recommend using Blender.
The interface looks like this:
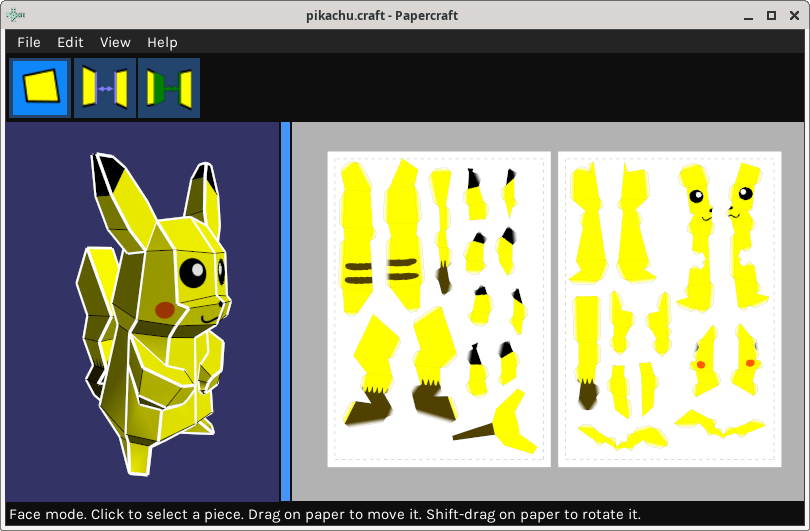
The printable document will look like this (just a piece):
And the final model is:
<img src="https://user-images.githubusercontent.com/1128630/212487900-c4670eb1-1eff-49a3-9843-5ca23b9d5fc7.jpg" width="300">Note: the model in the example is based on the Low-Poly Pikachu by Agustin "Flowalistik" Arroyo, published under CC BY-NC-SA 4.0. You can get this Papercraft project from the examples directory, with the same license.
License
This program is published under the GPL-3.0-or-later license. See the LICENSE file for the full text.
Files generated with this program are not affected by this license but by that of the 3D model you use, as it will be a derivative work. If in doubt contact a real lawyer.
If you create any nice paper model, I'd appreciate if you open an issue and send some pictures.
Installation
If you use Windows, this program does not use any installation, you just copy it into a local folder and run it. Just download the latest package from here and uncompress it to your destination folder.
Select the Win32 or Win64 version depending on your particular Windows and preferences. If you do not know which one you need, try both and see what happens.
Then run the program directly by double-clicking or create a shortcut to your desktop.
If you use Linux you can compile it from source (quite easy, really) or use the precompiled AppImage from the releases page. Remember to set the downloaded file to executable, then just run it.
If you use any other OS you can try compiling from source, but I don't know if you will succeed. Let me now either way.
Basic usage
In the left side of the screen there is a 3D view of the model. In the right side there is the current 2D unwrapping.
First of all you need a 3D model. Currently it only understands the Wavefront OBJ format, that is exportable by most (or all) usual 3D editing programs. Just remember that the material definition (textures) of an OBJ file is in a separate file with MTL extension. And the textures themselves, if any, are in separate image files, so if you move the model around remember to move all the dependent files too.
When you load a model into Papercraft it will start with all faces split and distributed around the paper. Before startint cutting you should join them in big pieces and reorder them in the paper.
For that the program has three basic working modes, selectables with the buttons in the toolbar or the Edit menu:
Edge mode
This is probably the most important mode. If you click an open edge, faces to both sides of the edge will snap together. If you click on a closed edge it will split. If the Shift key is pressed while an open edge is clicked, then it will join a whole strip of faces, as long as they are composed of simple quads. This is useful for big meshes that are mostly made of quads and are usually unwrapped as parallel strips.
With this tool you can create the pieces to be cut as big as you want.
Flap mode
In this mode, if you click an open edge the flap will switch to the other side. Press the Shift key while clicking to hide the flap.
Face mode
In this mode you can select and move the pieces in the 2D paper. Press the shift key while dragging to rotate the pieces.
You can also move the pieces in any other mode, but this one disables clicking on edges, making the handling of smaller pieces much easier.
Document properties
In the menu Edit / Document properties you can edit many options related to the document as a whole:
- Model scale: the units in the original OBJ model are assumed to be millimeters. This value scales up or down that measure to make the final model bigger or smaller. You can check the final size of the model in the information box below.
- Textured: you can disable the texture images so that in the 2D output you get only the outline of the pieces. Useful if you intend to paint it by hand.
- Texture filter: whether you want to apply a bilinear filter to the texture image. You can unset if you prefer a pixelated minecraft-ly look, particularly with very low-resolution textures.
- Flap style: how are the flaps (those paper flaps here the glue goes) generated:
- Textured: they get the texture of the neighboring face, so that small imperfections when gluing them together are not so noticeable.
- Half-textured: as textured but fading to white at the far edge. It makes them more easy to see, particularly if there are many small faces.
- White: flaps are colorless.
- None: no flaps. How will you glue the pieces together?
- Shadow flaps: If it is greater than 0, it indicated the darkness of the shadow flaps. These are painted over the opposite side of a flap, and are particularly useful if you glue the tabs on the outside of the model, instead of the traditional inside.
- Flap width: the maximum with of the flap, in millimeters. The may be smaller if the neighbor face is smaller.
- Flap angle: the angle of the sides of the flap, in degrees. 90 will make them rectangles. 45 is a more useful value. Real angles may be smaller depending on the shape of the neighbor face.
- Fold style: how the fold lines that instruct you where to fold are drawn:
- Full line: a full line is drawn. The line will be solid when it is a mountain, dashed when it is a valley.
- Out segment: only a small line to the sides of each fold will be drawn, outside the piece itself. This is so in the final model no lines will be visible. If you do this, you probable will want to do a rough cut keeping these segemnts, then fold the model and finally do the real cut-out.
- Full & out segment: A combination of full line and out segment.
- In segment: Like out segment but inside the model, only two small lines are drawn to each side of the fold.
- Out & in segment: A combination of in and out segments.
- None: No fold line. How to fold them is up to you. You you use very thin paper you can even try to glue the model without folding.
- Fold length: when using in or out segments, the length of the segment.
- Line width: with of the folded printed lines, in millimeters.
- Hidden fold angle: edges that separate faces with an angle below this one will not be drawn. It is 0 by default meaning that all edges will be printed. It affects only angles between faces of the model, it will never hide the fold line for a flap; if you want to hide those set the "Fold style" to "None" instead.
- Edge id position: Complex models are difficult to build. In order to help the user, each edge to be glued can be annotated with an "edge id". Each edge id is composed by the opposite piece name (one or a few letters), a colon and the edge number. Edges with the same number are to be glued together. With this option you can choose if you want to print the edge ids and piece names outside of the model, to keep your texture untainted, or inside the model, to keep the ids even after you've cut the pieces out. Or you can choose to omit the ids and not to print them.
- Pages: the number of pages of the output printable document.
- Columns: how many columns are used to order the pages in the 2D view. It does not have any effect in the final printable file.
- Print Papercraft signature. You can disable the signature that is printed in the printable document linking to this Internet page. It is useful if you want to let your friends know how you create all these awesome paper models. Or you can disable it to keep your secrets.
- Print page number: big models can be a bit of a mess, adding the page numer may help in keeping order.
- Paper size: the size of the paper, in millimeters. The most usual paper sizes are listed in the drop-down menu.
- DPI: (dots-per-inch) the resolution of the final printable file. Usual values are 300 and 600. Higher values mean better resolution but bigger files.
- Margins: the margins of the page, in millimeters. The margins are shown in the 2D view but have no effect in the final printable file.
Other options
There are a few other options in this program, available from the main menu. These options do the expected thing:
- File/Open: opens an existing Papercraft file. This program uses the
.craftextension. - File/Save: saves the current project as a
.craftfile. - File/Save as: saves the project with a different name.
- File/Import model: creates a new project using by importing an existing 3D model. Currently Papercraft understands the following formats:
- Wavefrom OBJ, with textures.
- Pepakura PDO, with textures and piece unwrapping.
- STL models, no textures here, just the geometry.
- File/Quit: closes this program.
- Edit/Undo: undoes the last action.
- Edit/Document properties: opens the "Document properties" dialog.
- Edit/Face,Edge,Flaps: switches to the given mode.
- Edit/Repack pieces: If you have all the pieces overlapping each other, this option will tidy them up a bit.
- View/Reset views: If you move the 2D or 3D view too much and you lose yourself, this option will get you back to the initial view.
More interesting are the following:
File/Update with new model
If you are unwrapping a model and you realize that there is some part that you don't like, you have to go back to your 3D editing tool and re-export the model file. Then, do you have to start the Papercraft unwrapping from scratch? Of course not! Just use this option to update the current Papercraft projects with an updated 3D model. It will try to keep the current work as much as it can.
File/Export OBJ
Did you import an OBJ model into Papercraft and then lost the original model? No problem, you can re-export the OBJ with this option and then import it in your 3D model software.
Generate Printable
The main purpose of this program is to create a document with the 2D unwrapping of the 3D model. This option does it. Big models with big paper and high resolution may take a while, so be patient.
There are currently three formats for the printable document:
- PDF: default format. It will create a multi-page PDF.
- PNG: it creates one PNG file per page, autonumbered.
- SVG: it creates one SVG file per page, as SVG format does not support multiple pages. Each SVG will have several layers, the idea is that those layers may be used to feed an automatic cutting machine.
- One visible layer with the image to be printed.
- One hidden layer with the cuts.
- One hidden layer with the folds: one sublayer with the valleys another with the mountains.
View/Textures
Hides/shows the texture from 3D and 2D views. It may be easier to see the geometry. It will not affect the printable document.
View/3D lines
Hides/shows the lines from the 3D view. It makes the model look nicer.
View/Flaps
Hides/shows the flaps in the 2D view. It may be easier to see the geometry, particularly with small pieces. It will not affect the printable document.
View/X-ray selection
Normally the selected face/piece is shown in the 3D view over the geometry, even if it is hidden behind something. That is to make it easier to find it, but sometimes it may get confusing. This option can be used to disable that behavior.
View/Highlight overlaps
When two pieces overlap, or even one piece overlaps with itself, it may not be obvious. This option will highlight in pink any overlapping pixels. It will also highlight pieces that are outside of the paper, although that is easier to see.
Note that some overlapping in flaps is perfectly acceptable, you just cut through them, but overlapping in real faces is not nice.