Awesome
Yolo-v4 and Yolo-v3/v2 for Windows and Linux
(neural network for object detection) - Tensor Cores can be used on Linux and Windows
Paper Yolo v4: https://arxiv.org/abs/2004.10934
More details: http://pjreddie.com/darknet/yolo/


![]()
![]()
- Requirements (and how to install dependecies)
- Pre-trained models
- Explanations in issues
- Yolo v3 in other frameworks (TensorRT, TensorFlow, PyTorch, OpenVINO, OpenCV-dnn, TVM,...)
- Datasets
- Improvements in this repository
- How to use
- How to compile on Linux
- How to compile on Windows
- Training and Evaluation of speed and accuracy on MS COCO
- How to train with multi-GPU:
- How to train (to detect your custom objects)
- How to train tiny-yolo (to detect your custom objects)
- When should I stop training
- How to improve object detection
- How to mark bounded boxes of objects and create annotation files
- How to use Yolo as DLL and SO libraries
 | 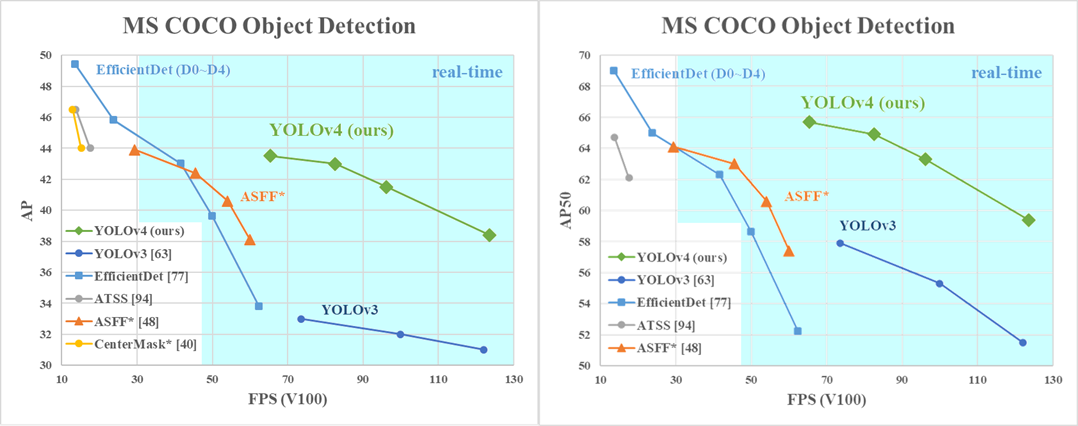 AP50:95 / AP50 - FPS (Tesla V100) Paper: https://arxiv.org/abs/2004.10934 AP50:95 / AP50 - FPS (Tesla V100) Paper: https://arxiv.org/abs/2004.10934 |
|---|
- Yolo v4 Full comparison: map_fps
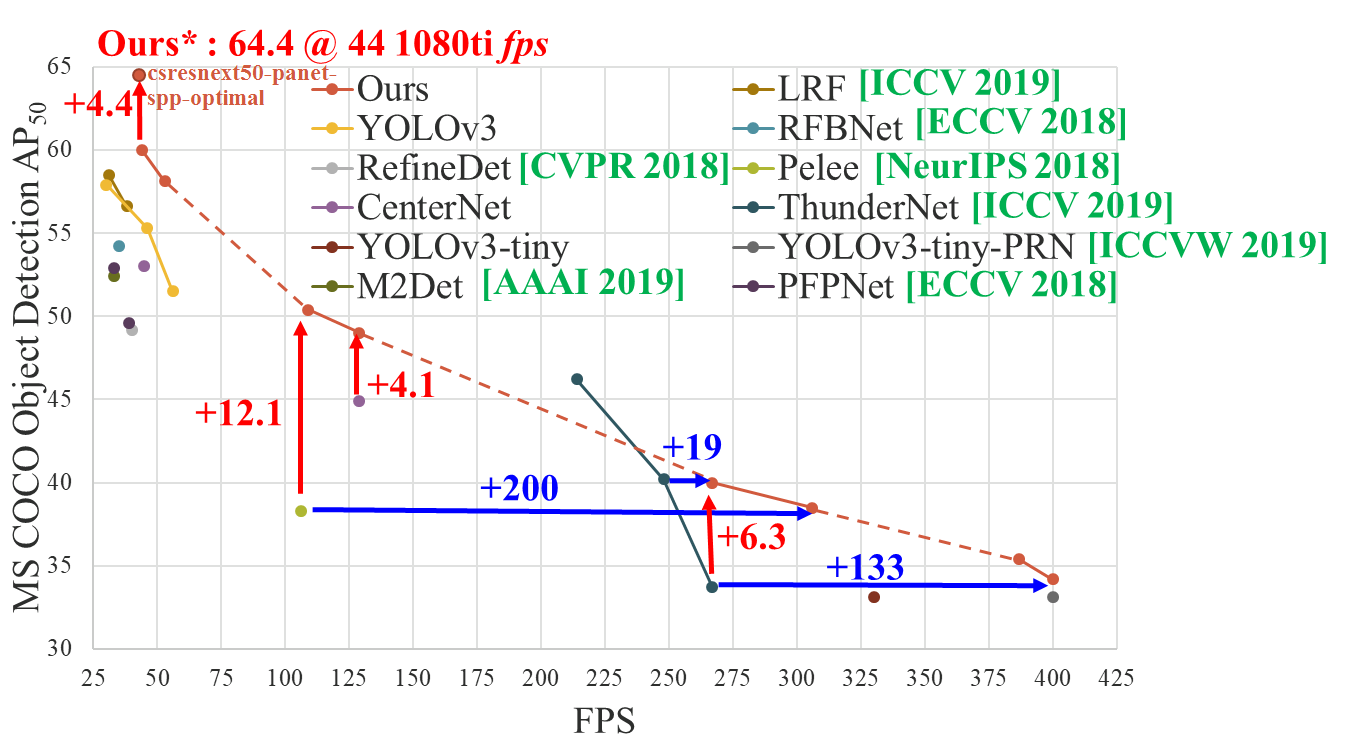
- CSPNet: paper and map_fps comparison: https://github.com/WongKinYiu/CrossStagePartialNetworks
- Yolo v3 on MS COCO: Speed / Accuracy (mAP@0.5) chart
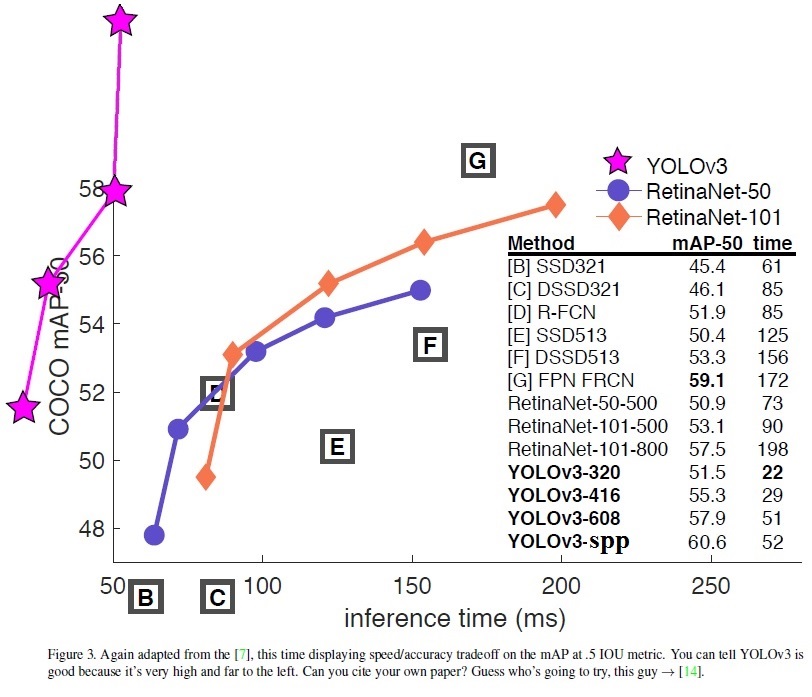
- Yolo v3 on MS COCO (Yolo v3 vs RetinaNet) - Figure 3: https://arxiv.org/pdf/1804.02767v1.pdf
- Yolo v2 on Pascal VOC 2007: https://hsto.org/files/a24/21e/068/a2421e0689fb43f08584de9d44c2215f.jpg
- Yolo v2 on Pascal VOC 2012 (comp4): https://hsto.org/files/3a6/fdf/b53/3a6fdfb533f34cee9b52bdd9bb0b19d9.jpg
How to evaluate AP of YOLOv4 on the MS COCO evaluation server
- Download and unzip test-dev2017 dataset from MS COCO server: http://images.cocodataset.org/zips/test2017.zip
- Download list of images for Detection taks and replace the paths with yours: https://raw.githubusercontent.com/AlexeyAB/darknet/master/scripts/testdev2017.txt
- Download
yolov4.weightsfile: https://drive.google.com/open?id=1cewMfusmPjYWbrnuJRuKhPMwRe_b9PaT - Content of the file
cfg/coco.datashould be
classes= 80
train  = <replace with your path>/trainvalno5k.txt
valid = <replace with your path>/testdev2017.txt
names = data/coco.names
backup = backup
eval=coco
- Create
/results/folder near with./darknetexecutable file - Run validation:
./darknet detector valid cfg/coco.data cfg/yolov4.cfg yolov4.weights - Rename the file
/results/coco_results.jsontodetections_test-dev2017_yolov4_results.jsonand compress it todetections_test-dev2017_yolov4_results.zip - Submit file
detections_test-dev2017_yolov4_results.zipto the MS COCO evaluation server for thetest-dev2019 (bbox)
How to evaluate FPS of YOLOv4 on GPU
- Compile Darknet with
GPU=1 CUDNN=1 CUDNN_HALF=1 OPENCV=1in theMakefile(or use the same settings with Cmake) - Download
yolov4.weightsfile 245 MB: yolov4.weights (Google-drive mirror yolov4.weights ) - Get any .avi/.mp4 video file (preferably not more than 1920x1080 to avoid bottlenecks in CPU performance)
- Run one of two commands and look at the AVG FPS:
- include video_capturing + NMS + drawing_bboxes:
./darknet detector demo cfg/coco.data cfg/yolov4.cfg yolov4.weights test.mp4 -dont_show -ext_output - exclude video_capturing + NMS + drawing_bboxes:
./darknet detector demo cfg/coco.data cfg/yolov4.cfg yolov4.weights test.mp4 -benchmark
Pre-trained models
There are weights-file for different cfg-files (trained for MS COCO dataset):
FPS on RTX 2070 (R) and Tesla V100 (V):
-
yolov4.cfg - 245 MB: yolov4.weights (Google-drive mirror yolov4.weights ) paper Yolo v4 just change
width=andheight=parameters inyolov4.cfgfile and use the sameyolov4.weightsfile for all cases:width=608 height=608in cfg: 65.7% mAP@0.5 (43.5% AP@0.5:0.95) - 34(R) FPS / 62(V) FPS - 128.5 BFlopswidth=512 height=512in cfg: 64.9% mAP@0.5 (43.0% AP@0.5:0.95) - 45(R) FPS / 83(V) FPS - 91.1 BFlopswidth=416 height=416in cfg: 62.8% mAP@0.5 (41.2% AP@0.5:0.95) - 55(R) FPS / 96(V) FPS - 60.1 BFlopswidth=320 height=320in cfg: 60% mAP@0.5 ( 38% AP@0.5:0.95) - 63(R) FPS / 123(V) FPS - 35.5 BFlops
-
yolov3-tiny-prn.cfg - 33.1% mAP@0.5 - 370(R) FPS - 3.5 BFlops - 18.8 MB: yolov3-tiny-prn.weights
-
enet-coco.cfg (EfficientNetB0-Yolov3) - 45.5% mAP@0.5 - 55(R) FPS - 3.7 BFlops - 18.3 MB: enetb0-coco_final.weights
-
yolov3-openimages.cfg - 247 MB - 18(R) FPS - OpenImages dataset: yolov3-openimages.weights
-
csresnext50-panet-spp-original-optimal.cfg - 65.4% mAP@0.5 (43.2% AP@0.5:0.95) - 32(R) FPS - 100.5 BFlops - 217 MB: csresnext50-panet-spp-original-optimal_final.weights
-
yolov3-spp.cfg - 60.6% mAP@0.5 - 38(R) FPS - 141.5 BFlops - 240 MB: yolov3-spp.weights
-
csresnext50-panet-spp.cfg - 60.0% mAP@0.5 - 44 FPS - 71.3 BFlops - 217 MB: csresnext50-panet-spp_final.weights
-
yolov3.cfg - 55.3% mAP@0.5 - 66(R) FPS - 65.9 BFlops - 236 MB: yolov3.weights
-
yolov3-tiny.cfg - 33.1% mAP@0.5 - 345(R) FPS - 5.6 BFlops - 33.7 MB: yolov3-tiny.weights
yolov2.cfg(194 MB COCO Yolo v2) - requires 4 GB GPU-RAM: https://pjreddie.com/media/files/yolov2.weightsyolo-voc.cfg(194 MB VOC Yolo v2) - requires 4 GB GPU-RAM: http://pjreddie.com/media/files/yolo-voc.weightsyolov2-tiny.cfg(43 MB COCO Yolo v2) - requires 1 GB GPU-RAM: https://pjreddie.com/media/files/yolov2-tiny.weightsyolov2-tiny-voc.cfg(60 MB VOC Yolo v2) - requires 1 GB GPU-RAM: http://pjreddie.com/media/files/yolov2-tiny-voc.weightsyolo9000.cfg(186 MB Yolo9000-model) - requires 4 GB GPU-RAM: http://pjreddie.com/media/files/yolo9000.weights
Put it near compiled: darknet.exe
You can get cfg-files by path: darknet/cfg/
Requirements
- Windows or Linux
- CMake >= 3.8 for modern CUDA support: https://cmake.org/download/
- CUDA 10.0: https://developer.nvidia.com/cuda-toolkit-archive (on Linux do Post-installation Actions)
- OpenCV >= 2.4: use your preferred package manager (brew, apt), build from source using vcpkg or download from OpenCV official site (on Windows set system variable
OpenCV_DIR=C:\opencv\build- where are theincludeandx64folders image) - cuDNN >= 7.0 for CUDA 10.0 https://developer.nvidia.com/rdp/cudnn-archive (on Linux copy
cudnn.h,libcudnn.so... as desribed here https://docs.nvidia.com/deeplearning/sdk/cudnn-install/index.html#installlinux-tar , on Windows copycudnn.h,cudnn64_7.dll,cudnn64_7.libas desribed here https://docs.nvidia.com/deeplearning/sdk/cudnn-install/index.html#installwindows ) - GPU with CC >= 3.0: https://en.wikipedia.org/wiki/CUDA#GPUs_supported
- on Linux GCC or Clang, on Windows MSVC 2015/2017/2019 https://visualstudio.microsoft.com/thank-you-downloading-visual-studio/?sku=Community
Yolo v3 in other frameworks
- TensorFlow: convert
yolov3.weights/cfgfiles toyolov3.ckpt/pb/meta: by using mystic123 or jinyu121 projects, and TensorFlow-lite - Intel OpenVINO 2019 R1: (Myriad X / USB Neural Compute Stick / Arria FPGA): read this manual
- OpenCV-dnn the fastest implementation for CPU (x86/ARM-Android), OpenCV can be compiled with OpenVINO-backend for running on (Myriad X / USB Neural Compute Stick / Arria FPGA), use
yolov3.weights/cfgwith: C++ example or Python example - PyTorch > ONNX > CoreML > iOS how to convert cfg/weights-files to pt-file: ultralytics/yolov3 and iOS App
- TensorRT for YOLOv3 (-70% faster inference): Yolo is natively supported in DeepStream 4.0 read PDF
- TVM - compilation of deep learning models (Keras, MXNet, PyTorch, Tensorflow, CoreML, DarkNet) into minimum deployable modules on diverse hardware backends (CPUs, GPUs, FPGA, and specialized accelerators): https://tvm.ai/about
- OpenDataCam - It detects, tracks and counts moving objects by using Yolo: https://github.com/opendatacam/opendatacam#-hardware-pre-requisite
- Netron - Visualizer for neural networks: https://github.com/lutzroeder/netron
Datasets
- MS COCO: use
./scripts/get_coco_dataset.shto get labeled MS COCO detection dataset - OpenImages: use
python ./scripts/get_openimages_dataset.pyfor labeling train detection dataset - Pascal VOC: use
python ./scripts/voc_label.pyfor labeling Train/Test/Val detection datasets - ILSVRC2012 (ImageNet classification): use
./scripts/get_imagenet_train.sh(alsoimagenet_label.shfor labeling valid set) - German/Belgium/Russian/LISA/MASTIF Traffic Sign Datasets for Detection - use this parsers: https://github.com/angeligareta/Datasets2Darknet#detection-task
- List of other datasets: https://github.com/AlexeyAB/darknet/tree/master/scripts#datasets
Examples of results
Others: https://www.youtube.com/user/pjreddie/videos
Improvements in this repository
- added support for Windows
- added State-of-Art models: CSP, PRN, EfficientNet
- added layers: [conv_lstm], [scale_channels] SE/ASFF/BiFPN, [local_avgpool], [sam], [Gaussian_yolo], [reorg3d] (fixed [reorg]), fixed [batchnorm]
- added the ability for training recurrent models (with layers conv-lstm
[conv_lstm]/conv-rnn[crnn]) for accurate detection on video - added data augmentation:
[net] mixup=1 cutmix=1 mosaic=1 blur=1. Added activations: SWISH, MISH, NORM_CHAN, NORM_CHAN_SOFTMAX - added the ability for training with GPU-processing using CPU-RAM to increase the mini_batch_size and increase accuracy (instead of batch-norm sync)
- improved binary neural network performance 2x-4x times for Detection on CPU and GPU if you trained your own weights by using this XNOR-net model (bit-1 inference) : https://github.com/AlexeyAB/darknet/blob/master/cfg/yolov3-tiny_xnor.cfg
- improved neural network performance ~7% by fusing 2 layers into 1: Convolutional + Batch-norm
- improved performance: Detection 2x times, on GPU Volta/Turing (Tesla V100, GeForce RTX, ...) using Tensor Cores if
CUDNN_HALFdefined in theMakefileordarknet.sln - improved performance ~1.2x times on FullHD, ~2x times on 4K, for detection on the video (file/stream) using
darknet detector demo... - improved performance 3.5 X times of data augmentation for training (using OpenCV SSE/AVX functions instead of hand-written functions) - removes bottleneck for training on multi-GPU or GPU Volta
- improved performance of detection and training on Intel CPU with AVX (Yolo v3 ~85%)
- optimized memory allocation during network resizing when
random=1 - optimized GPU initialization for detection - we use batch=1 initially instead of re-init with batch=1
- added correct calculation of mAP, F1, IoU, Precision-Recall using command
darknet detector map... - added drawing of chart of average-Loss and accuracy-mAP (
-mapflag) during training - run
./darknet detector demo ... -json_port 8070 -mjpeg_port 8090as JSON and MJPEG server to get results online over the network by using your soft or Web-browser - added calculation of anchors for training
- added example of Detection and Tracking objects: https://github.com/AlexeyAB/darknet/blob/master/src/yolo_console_dll.cpp
- run-time tips and warnings if you use incorrect cfg-file or dataset
- many other fixes of code...
And added manual - How to train Yolo v4-v2 (to detect your custom objects)
Also, you might be interested in using a simplified repository where is implemented INT8-quantization (+30% speedup and -1% mAP reduced): https://github.com/AlexeyAB/yolo2_light
How to use on the command line
On Linux use ./darknet instead of darknet.exe, like this:./darknet detector test ./cfg/coco.data ./cfg/yolov4.cfg ./yolov4.weights
On Linux find executable file ./darknet in the root directory, while on Windows find it in the directory \build\darknet\x64
- Yolo v4 COCO - image:
darknet.exe detector test cfg/coco.data cfg/yolov4.cfg yolov4.weights -thresh 0.25 - Output coordinates of objects:
darknet.exe detector test cfg/coco.data yolov4.cfg yolov4.weights -ext_output dog.jpg - Yolo v4 COCO - video:
darknet.exe detector demo cfg/coco.data cfg/yolov4.cfg yolov4.weights -ext_output test.mp4 - Yolo v4 COCO - WebCam 0:
darknet.exe detector demo cfg/coco.data cfg/yolov4.cfg yolov4.weights -c 0 - Yolo v4 COCO for net-videocam - Smart WebCam:
darknet.exe detector demo cfg/coco.data cfg/yolov4.cfg yolov4.weights http://192.168.0.80:8080/video?dummy=param.mjpg - Yolo v4 - save result videofile res.avi:
darknet.exe detector demo cfg/coco.data cfg/yolov4.cfg yolov4.weights test.mp4 -out_filename res.avi - Yolo v3 Tiny COCO - video:
darknet.exe detector demo cfg/coco.data cfg/yolov3-tiny.cfg yolov3-tiny.weights test.mp4 - JSON and MJPEG server that allows multiple connections from your soft or Web-browser
ip-address:8070and 8090:./darknet detector demo ./cfg/coco.data ./cfg/yolov3.cfg ./yolov3.weights test50.mp4 -json_port 8070 -mjpeg_port 8090 -ext_output - Yolo v3 Tiny on GPU #1:
darknet.exe detector demo cfg/coco.data cfg/yolov3-tiny.cfg yolov3-tiny.weights -i 1 test.mp4 - Alternative method Yolo v3 COCO - image:
darknet.exe detect cfg/yolov4.cfg yolov4.weights -i 0 -thresh 0.25 - Train on Amazon EC2, to see mAP & Loss-chart using URL like:
http://ec2-35-160-228-91.us-west-2.compute.amazonaws.com:8090in the Chrome/Firefox (Darknet should be compiled with OpenCV):./darknet detector train cfg/coco.data yolov4.cfg yolov4.conv.137 -dont_show -mjpeg_port 8090 -map - 186 MB Yolo9000 - image:
darknet.exe detector test cfg/combine9k.data cfg/yolo9000.cfg yolo9000.weights - Remeber to put data/9k.tree and data/coco9k.map under the same folder of your app if you use the cpp api to build an app
- To process a list of images
data/train.txtand save results of detection toresult.jsonfile use:darknet.exe detector test cfg/coco.data cfg/yolov4.cfg yolov4.weights -ext_output -dont_show -out result.json < data/train.txt - To process a list of images
data/train.txtand save results of detection toresult.txtuse:
darknet.exe detector test cfg/coco.data cfg/yolov4.cfg yolov4.weights -dont_show -ext_output < data/train.txt > result.txt - Pseudo-lableing - to process a list of images
data/new_train.txtand save results of detection in Yolo training format for each image as label<image_name>.txt(in this way you can increase the amount of training data) use:darknet.exe detector test cfg/coco.data cfg/yolov4.cfg yolov4.weights -thresh 0.25 -dont_show -save_labels < data/new_train.txt - To calculate anchors:
darknet.exe detector calc_anchors data/obj.data -num_of_clusters 9 -width 416 -height 416 - To check accuracy mAP@IoU=50:
darknet.exe detector map data/obj.data yolo-obj.cfg backup\yolo-obj_7000.weights - To check accuracy mAP@IoU=75:
darknet.exe detector map data/obj.data yolo-obj.cfg backup\yolo-obj_7000.weights -iou_thresh 0.75
For using network video-camera mjpeg-stream with any Android smartphone
-
Download for Android phone mjpeg-stream soft: IP Webcam / Smart WebCam
- Smart WebCam - preferably: https://play.google.com/store/apps/details?id=com.acontech.android.SmartWebCam2
- IP Webcam: https://play.google.com/store/apps/details?id=com.pas.webcam
-
Connect your Android phone to computer by WiFi (through a WiFi-router) or USB
-
Start Smart WebCam on your phone
-
Replace the address below, on shown in the phone application (Smart WebCam) and launch:
- Yolo v4 COCO-model:
darknet.exe detector demo data/coco.data yolov4.cfg yolov4.weights http://192.168.0.80:8080/video?dummy=param.mjpg -i 0
How to compile on Linux (using cmake)
The CMakeLists.txt will attempt to find installed optional dependencies like
CUDA, cudnn, ZED and build against those. It will also create a shared object
library file to use darknet for code development.
Do inside the cloned repository:
mkdir build-release
cd build-release
cmake ..
make
make install
How to compile on Linux (using make)
Just do make in the darknet directory.
Before make, you can set such options in the Makefile: link
GPU=1to build with CUDA to accelerate by using GPU (CUDA should be in/usr/local/cuda)CUDNN=1to build with cuDNN v5-v7 to accelerate training by using GPU (cuDNN should be in/usr/local/cudnn)CUDNN_HALF=1to build for Tensor Cores (on Titan V / Tesla V100 / DGX-2 and later) speedup Detection 3x, Training 2xOPENCV=1to build with OpenCV 4.x/3.x/2.4.x - allows to detect on video files and video streams from network cameras or web-camsDEBUG=1to bould debug version of YoloOPENMP=1to build with OpenMP support to accelerate Yolo by using multi-core CPULIBSO=1to build a librarydarknet.soand binary runable fileuselibthat uses this library. Or you can try to run soLD_LIBRARY_PATH=./:$LD_LIBRARY_PATH ./uselib test.mp4How to use this SO-library from your own code - you can look at C++ example: https://github.com/AlexeyAB/darknet/blob/master/src/yolo_console_dll.cpp or use in such a way:LD_LIBRARY_PATH=./:$LD_LIBRARY_PATH ./uselib data/coco.names cfg/yolov4.cfg yolov4.weights test.mp4ZED_CAMERA=1to build a library with ZED-3D-camera support (should be ZED SDK installed), then runLD_LIBRARY_PATH=./:$LD_LIBRARY_PATH ./uselib data/coco.names cfg/yolov4.cfg yolov4.weights zed_camera
To run Darknet on Linux use examples from this article, just use ./darknet instead of darknet.exe, i.e. use this command: ./darknet detector test ./cfg/coco.data ./cfg/yolov4.cfg ./yolov4.weights
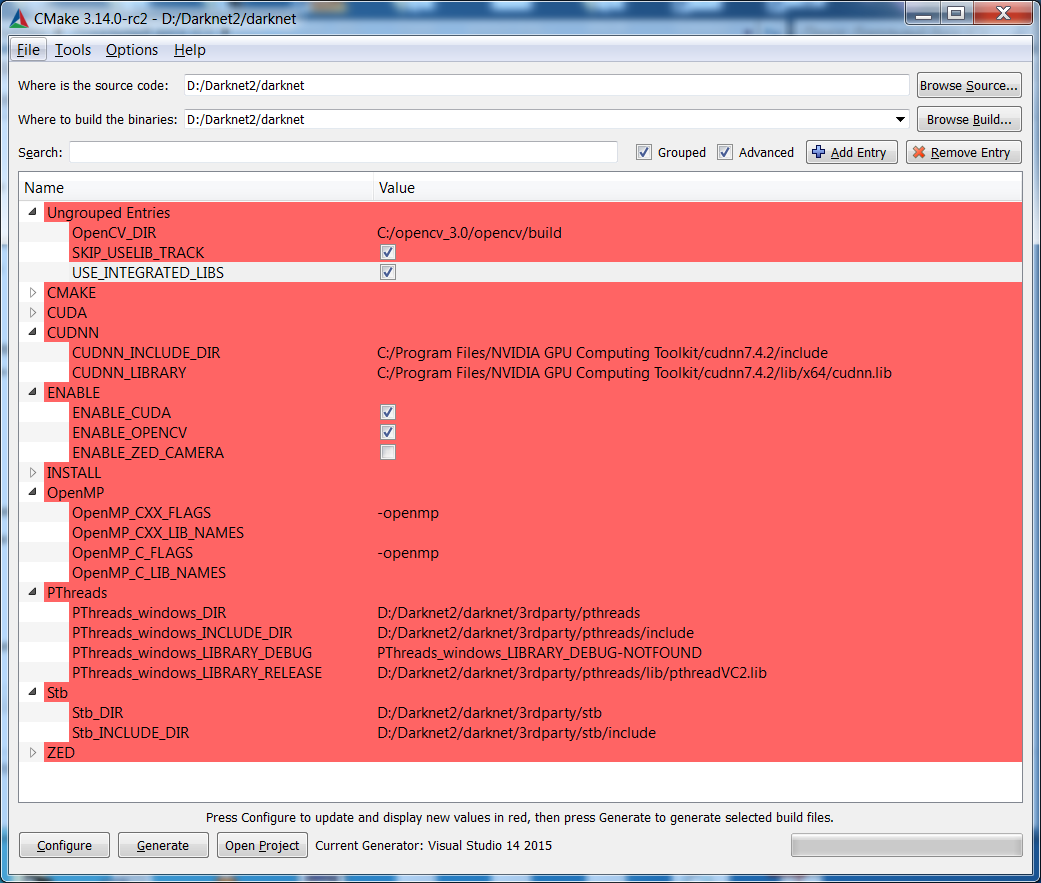
How to compile on Windows (using CMake-GUI)
This is the recommended approach to build Darknet on Windows if you have already installed Visual Studio 2015/2017/2019, CUDA > 10.0, cuDNN > 7.0, and OpenCV > 2.4.
Use CMake-GUI as shown here on this IMAGE:
- Configure
- Optional platform for generator (Set: x64)
- Finish
- Generate
- Open Project
- Set: x64 & Release
- Build
- Build solution
How to compile on Windows (using vcpkg)
If you have already installed Visual Studio 2015/2017/2019, CUDA > 10.0, cuDNN > 7.0, OpenCV > 2.4, then to compile Darknet it is recommended to use CMake-GUI.
Otherwise, follow these steps:
-
Install or update Visual Studio to at least version 2017, making sure to have it fully patched (run again the installer if not sure to automatically update to latest version). If you need to install from scratch, download VS from here: Visual Studio Community
-
Install CUDA and cuDNN
-
Install
gitandcmake. Make sure they are on the Path at least for the current account -
Install vcpkg and try to install a test library to make sure everything is working, for example
vcpkg install opengl -
Define an environment variables,
VCPKG_ROOT, pointing to the install path ofvcpkg -
Define another environment variable, with name
VCPKG_DEFAULT_TRIPLETand valuex64-windows -
Open Powershell and type these commands:
PS \>                  cd $env:VCPKG_ROOT
PS Code\vcpkg>         .\vcpkg install pthreads opencv[ffmpeg] #replace with opencv[cuda,ffmpeg] in case you want to use cuda-accelerated openCV
- Open Powershell, go to the
darknetfolder and build with the command.\build.ps1. If you want to use Visual Studio, you will find two custom solutions created for you by CMake after the build, one inbuild_win_debugand the other inbuild_win_release, containing all the appropriate config flags for your system.
How to compile on Windows (legacy way)
-
If you have CUDA 10.0, cuDNN 7.4 and OpenCV 3.x (with paths:
C:\opencv_3.0\opencv\build\include&C:\opencv_3.0\opencv\build\x64\vc14\lib), then openbuild\darknet\darknet.sln, set x64 and Release https://hsto.org/webt/uh/fk/-e/uhfk-eb0q-hwd9hsxhrikbokd6u.jpeg and do the: Build -> Build darknet. Also add Windows system variableCUDNNwith path to CUDNN: https://user-images.githubusercontent.com/4096485/53249764-019ef880-36ca-11e9-8ffe-d9cf47e7e462.jpg1.1. Find files
opencv_world320.dllandopencv_ffmpeg320_64.dll(oropencv_world340.dllandopencv_ffmpeg340_64.dll) inC:\opencv_3.0\opencv\build\x64\vc14\binand put it near withdarknet.exe1.2 Check that there are
binandincludefolders in theC:\Program Files\NVIDIA GPU Computing Toolkit\CUDA\v10.0if aren't, then copy them to this folder from the path where is CUDA installed1.3. To install CUDNN (speedup neural network), do the following:
-
download and install cuDNN v7.4.1 for CUDA 10.0: https://developer.nvidia.com/rdp/cudnn-archive
-
add Windows system variable
CUDNNwith path to CUDNN: https://user-images.githubusercontent.com/4096485/53249764-019ef880-36ca-11e9-8ffe-d9cf47e7e462.jpg -
copy file
cudnn64_7.dllto the folder\build\darknet\x64near withdarknet.exe
1.4. If you want to build without CUDNN then: open
\darknet.sln-> (right click on project) -> properties -> C/C++ -> Preprocessor -> Preprocessor Definitions, and remove this:CUDNN; -
-
If you have other version of CUDA (not 10.0) then open
build\darknet\darknet.vcxprojby using Notepad, find 2 places with "CUDA 10.0" and change it to your CUDA-version. Then open\darknet.sln-> (right click on project) -> properties -> CUDA C/C++ -> Device and remove there;compute_75,sm_75. Then do step 1 -
If you don't have GPU, but have OpenCV 3.0 (with paths:
C:\opencv_3.0\opencv\build\include&C:\opencv_3.0\opencv\build\x64\vc14\lib), then openbuild\darknet\darknet_no_gpu.sln, set x64 and Release, and do the: Build -> Build darknet_no_gpu -
If you have OpenCV 2.4.13 instead of 3.0 then you should change paths after
\darknet.slnis opened4.1 (right click on project) -> properties -> C/C++ -> General -> Additional Include Directories:
C:\opencv_2.4.13\opencv\build\include4.2 (right click on project) -> properties -> Linker -> General -> Additional Library Directories:
C:\opencv_2.4.13\opencv\build\x64\vc14\lib -
If you have GPU with Tensor Cores (nVidia Titan V / Tesla V100 / DGX-2 and later) speedup Detection 3x, Training 2x:
\darknet.sln-> (right click on project) -> properties -> C/C++ -> Preprocessor -> Preprocessor Definitions, and add here:CUDNN_HALF;Note: CUDA must be installed only after Visual Studio has been installed.
How to compile (custom):
Also, you can to create your own darknet.sln & darknet.vcxproj, this example for CUDA 9.1 and OpenCV 3.0
Then add to your created project:
- (right click on project) -> properties -> C/C++ -> General -> Additional Include Directories, put here:
C:\opencv_3.0\opencv\build\include;..\..\3rdparty\include;%(AdditionalIncludeDirectories);$(CudaToolkitIncludeDir);$(CUDNN)\include
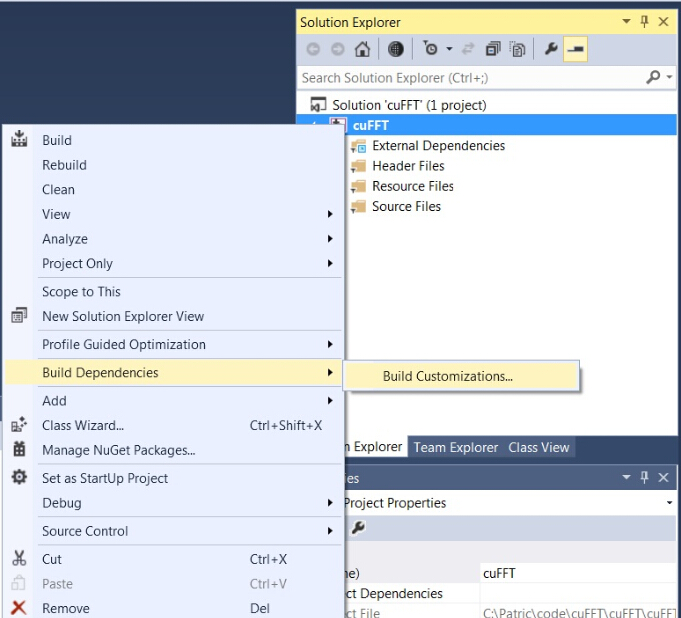
- (right click on project) -> Build dependecies -> Build Customizations -> set check on CUDA 9.1 or what version you have - for example as here: http://devblogs.nvidia.com/parallelforall/wp-content/uploads/2015/01/VS2013-R-5.jpg
- add to project:
- all
.cfiles - all
.cufiles - file
http_stream.cppfrom\srcdirectory - file
darknet.hfrom\includedirectory
- all
- (right click on project) -> properties -> Linker -> General -> Additional Library Directories, put here:
C:\opencv_3.0\opencv\build\x64\vc14\lib;$(CUDA_PATH)\lib\$(PlatformName);$(CUDNN)\lib\x64;%(AdditionalLibraryDirectories)
- (right click on project) -> properties -> Linker -> Input -> Additional dependecies, put here:
..\..\3rdparty\lib\x64\pthreadVC2.lib;cublas.lib;curand.lib;cudart.lib;cudnn.lib;%(AdditionalDependencies)
- (right click on project) -> properties -> C/C++ -> Preprocessor -> Preprocessor Definitions
OPENCV;_TIMESPEC_DEFINED;_CRT_SECURE_NO_WARNINGS;_CRT_RAND_S;WIN32;NDEBUG;_CONSOLE;_LIB;%(PreprocessorDefinitions)
-
compile to .exe (X64 & Release) and put .dll-s near with .exe: https://hsto.org/webt/uh/fk/-e/uhfk-eb0q-hwd9hsxhrikbokd6u.jpeg
-
pthreadVC2.dll, pthreadGC2.dllfrom \3rdparty\dll\x64 -
cusolver64_91.dll, curand64_91.dll, cudart64_91.dll, cublas64_91.dll- 91 for CUDA 9.1 or your version, from C:\Program Files\NVIDIA GPU Computing Toolkit\CUDA\v9.1\bin -
For OpenCV 3.2:
opencv_world320.dllandopencv_ffmpeg320_64.dllfromC:\opencv_3.0\opencv\build\x64\vc14\bin -
For OpenCV 2.4.13:
opencv_core2413.dll,opencv_highgui2413.dllandopencv_ffmpeg2413_64.dllfromC:\opencv_2.4.13\opencv\build\x64\vc14\bin
-
How to train with multi-GPU:
-
Train it first on 1 GPU for like 1000 iterations:
darknet.exe detector train cfg/coco.data cfg/yolov4.cfg yolov4.conv.137 -
Then stop and by using partially-trained model
/backup/yolov4_1000.weightsrun training with multigpu (up to 4 GPUs):darknet.exe detector train cfg/coco.data cfg/yolov4.cfg /backup/yolov4_1000.weights -gpus 0,1,2,3
If you get a Nan, then for some datasets better to decrease learning rate, for 4 GPUs set learning_rate = 0,00065 (i.e. learning_rate = 0.00261 / GPUs). In this case also increase 4x times burn_in = in your cfg-file. I.e. use burn_in = 4000 instead of 1000.
https://groups.google.com/d/msg/darknet/NbJqonJBTSY/Te5PfIpuCAAJ
How to train (to detect your custom objects):
(to train old Yolo v2 yolov2-voc.cfg, yolov2-tiny-voc.cfg, yolo-voc.cfg, yolo-voc.2.0.cfg, ... click by the link)
Training Yolo v4 (and v3):
-
For training
cfg/yolov4-custom.cfgdownload the pre-trained weights-file (162 MB): yolov4.conv.137 (Google drive mirror yolov4.conv.137 ) -
Create file
yolo-obj.cfgwith the same content as inyolov4-custom.cfg(or copyyolov4-custom.cfgtoyolo-obj.cfg)and:
- change line batch to
batch=64 - change line subdivisions to
subdivisions=16 - change line max_batches to (
classes*2000but not less than4000), f.e.max_batches=6000if you train for 3 classes - change line steps to 80% and 90% of max_batches, f.e.
steps=4800,5400 - set network size
width=416 height=416or any value multiple of 32: https://github.com/AlexeyAB/darknet/blob/0039fd26786ab5f71d5af725fc18b3f521e7acfd/cfg/yolov3.cfg#L8-L9 - change line
classes=80to your number of objects in each of 3[yolo]-layers:- https://github.com/AlexeyAB/darknet/blob/0039fd26786ab5f71d5af725fc18b3f521e7acfd/cfg/yolov3.cfg#L610
- https://github.com/AlexeyAB/darknet/blob/0039fd26786ab5f71d5af725fc18b3f521e7acfd/cfg/yolov3.cfg#L696
- https://github.com/AlexeyAB/darknet/blob/0039fd26786ab5f71d5af725fc18b3f521e7acfd/cfg/yolov3.cfg#L783
- change [
filters=255] to filters=(classes + 5)x3 in the 3[convolutional]before each[yolo]layer, keep in mind that it only has to be the last[convolutional]before each of the[yolo]layers.- https://github.com/AlexeyAB/darknet/blob/0039fd26786ab5f71d5af725fc18b3f521e7acfd/cfg/yolov3.cfg#L603
- https://github.com/AlexeyAB/darknet/blob/0039fd26786ab5f71d5af725fc18b3f521e7acfd/cfg/yolov3.cfg#L689
- https://github.com/AlexeyAB/darknet/blob/0039fd26786ab5f71d5af725fc18b3f521e7acfd/cfg/yolov3.cfg#L776
- when using
[Gaussian_yolo]layers, change [filters=57] filters=(classes + 9)x3 in the 3[convolutional]before each[Gaussian_yolo]layer- https://github.com/AlexeyAB/darknet/blob/6e5bdf1282ad6b06ed0e962c3f5be67cf63d96dc/cfg/Gaussian_yolov3_BDD.cfg#L604
- https://github.com/AlexeyAB/darknet/blob/6e5bdf1282ad6b06ed0e962c3f5be67cf63d96dc/cfg/Gaussian_yolov3_BDD.cfg#L696
- https://github.com/AlexeyAB/darknet/blob/6e5bdf1282ad6b06ed0e962c3f5be67cf63d96dc/cfg/Gaussian_yolov3_BDD.cfg#L789
So if classes=1 then should be filters=18. If classes=2 then write filters=21.
(Do not write in the cfg-file: filters=(classes + 5)x3)
(Generally filters depends on the classes, coords and number of masks, i.e. filters=(classes + coords + 1)*<number of mask>, where mask is indices of anchors. If mask is absence, then filters=(classes + coords + 1)*num)
So for example, for 2 objects, your file yolo-obj.cfg should differ from yolov4-custom.cfg in such lines in each of 3 [yolo]-layers:
[convolutional]
filters=21

[region]
classes=2
-
Create file
obj.namesin the directorybuild\darknet\x64\data\, with objects names - each in new line -
Create file
obj.datain the directorybuild\darknet\x64\data\, containing (where classes = number of objects):
classes= 2
train  = data/train.txt
valid  = data/test.txt
names = data/obj.names
backup = backup/
-
Put image-files (.jpg) of your objects in the directory
build\darknet\x64\data\obj\ -
You should label each object on images from your dataset. Use this visual GUI-software for marking bounded boxes of objects and generating annotation files for Yolo v2 & v3: https://github.com/AlexeyAB/Yolo_mark
It will create .txt-file for each .jpg-image-file - in the same directory and with the same name, but with .txt-extension, and put to file: object number and object coordinates on this image, for each object in new line:
<object-class> <x_center> <y_center> <width> <height>
Where:
<object-class>- integer object number from0to(classes-1)<x_center> <y_center> <width> <height>- float values relative to width and height of image, it can be equal from(0.0 to 1.0]- for example:
<x> = <absolute_x> / <image_width>or<height> = <absolute_height> / <image_height> - atention:
<x_center> <y_center>- are center of rectangle (are not top-left corner)
For example for img1.jpg you will be created img1.txt containing:
1 0.716797 0.395833 0.216406 0.147222
0 0.687109 0.379167 0.255469 0.158333
1 0.420312 0.395833 0.140625 0.166667
- Create file
train.txtin directorybuild\darknet\x64\data\, with filenames of your images, each filename in new line, with path relative todarknet.exe, for example containing:
data/obj/img1.jpg
data/obj/img2.jpg
data/obj/img3.jpg
-
Download pre-trained weights for the convolutional layers and put to the directory
build\darknet\x64- for
yolov4.cfg,yolov4-custom.cfg(162 MB): yolov4.conv.137 (Google drive mirror yolov4.conv.137 ) - for
csresnext50-panet-spp.cfg(133 MB): csresnext50-panet-spp.conv.112 - for
yolov3.cfg, yolov3-spp.cfg(154 MB): darknet53.conv.74 - for
yolov3-tiny-prn.cfg , yolov3-tiny.cfg(6 MB): yolov3-tiny.conv.11 - for
enet-coco.cfg (EfficientNetB0-Yolov3)(14 MB): enetb0-coco.conv.132
- for
-
Start training by using the command line:
darknet.exe detector train data/obj.data yolo-obj.cfg yolov4.conv.137To train on Linux use command:
./darknet detector train data/obj.data yolo-obj.cfg yolov4.conv.137(just use./darknetinstead ofdarknet.exe)- (file
yolo-obj_last.weightswill be saved to thebuild\darknet\x64\backup\for each 100 iterations) - (file
yolo-obj_xxxx.weightswill be saved to thebuild\darknet\x64\backup\for each 1000 iterations) - (to disable Loss-Window use
darknet.exe detector train data/obj.data yolo-obj.cfg yolov4.conv.137 -dont_show, if you train on computer without monitor like a cloud Amazon EC2) - (to see the mAP & Loss-chart during training on remote server without GUI, use command
darknet.exe detector train data/obj.data yolo-obj.cfg yolov4.conv.137 -dont_show -mjpeg_port 8090 -mapthen open URLhttp://ip-address:8090in Chrome/Firefox browser)
- (file
8.1. For training with mAP (mean average precisions) calculation for each 4 Epochs (set valid=valid.txt or train.txt in obj.data file) and run: darknet.exe detector train data/obj.data yolo-obj.cfg yolov4.conv.137 -map
- After training is complete - get result
yolo-obj_final.weightsfrom pathbuild\darknet\x64\backup\
-
After each 100 iterations you can stop and later start training from this point. For example, after 2000 iterations you can stop training, and later just start training using:
darknet.exe detector train data/obj.data yolo-obj.cfg backup\yolo-obj_2000.weights(in the original repository https://github.com/pjreddie/darknet the weights-file is saved only once every 10 000 iterations
if(iterations > 1000)) -
Also you can get result earlier than all 45000 iterations.
Note: If during training you see nan values for avg (loss) field - then training goes wrong, but if nan is in some other lines - then training goes well.
Note: If you changed width= or height= in your cfg-file, then new width and height must be divisible by 32.
Note: After training use such command for detection: darknet.exe detector test data/obj.data yolo-obj.cfg yolo-obj_8000.weights
Note: if error Out of memory occurs then in .cfg-file you should increase subdivisions=16, 32 or 64: link
How to train tiny-yolo (to detect your custom objects):
Do all the same steps as for the full yolo model as described above. With the exception of:
- Download default weights file for yolov3-tiny: https://pjreddie.com/media/files/yolov3-tiny.weights
- Get pre-trained weights
yolov3-tiny.conv.15using command:darknet.exe partial cfg/yolov3-tiny.cfg yolov3-tiny.weights yolov3-tiny.conv.15 15 - Make your custom model
yolov3-tiny-obj.cfgbased oncfg/yolov3-tiny_obj.cfginstead ofyolov3.cfg - Start training:
darknet.exe detector train data/obj.data yolov3-tiny-obj.cfg yolov3-tiny.conv.15
For training Yolo based on other models (DenseNet201-Yolo or ResNet50-Yolo), you can download and get pre-trained weights as showed in this file: https://github.com/AlexeyAB/darknet/blob/master/build/darknet/x64/partial.cmd If you made you custom model that isn't based on other models, then you can train it without pre-trained weights, then will be used random initial weights.
When should I stop training:
Usually sufficient 2000 iterations for each class(object), but not less than 4000 iterations in total. But for a more precise definition when you should stop training, use the following manual:
- During training, you will see varying indicators of error, and you should stop when no longer decreases 0.XXXXXXX avg:
Region Avg IOU: 0.798363, Class: 0.893232, Obj: 0.700808, No Obj: 0.004567, Avg Recall: 1.000000, count: 8 Region Avg IOU: 0.800677, Class: 0.892181, Obj: 0.701590, No Obj: 0.004574, Avg Recall: 1.000000, count: 8
9002: 0.211667, 0.60730 avg, 0.001000 rate, 3.868000 seconds, 576128 images Loaded: 0.000000 seconds
- 9002 - iteration number (number of batch)
- 0.60730 avg - average loss (error) - the lower, the better
When you see that average loss 0.xxxxxx avg no longer decreases at many iterations then you should stop training. The final avgerage loss can be from 0.05 (for a small model and easy dataset) to 3.0 (for a big model and a difficult dataset).
- Once training is stopped, you should take some of last
.weights-files fromdarknet\build\darknet\x64\backupand choose the best of them:
For example, you stopped training after 9000 iterations, but the best result can give one of previous weights (7000, 8000, 9000). It can happen due to overfitting. Overfitting - is case when you can detect objects on images from training-dataset, but can't detect objects on any others images. You should get weights from Early Stopping Point:

To get weights from Early Stopping Point:
2.1. At first, in your file obj.data you must specify the path to the validation dataset valid = valid.txt (format of valid.txt as in train.txt), and if you haven't validation images, just copy data\train.txt to data\valid.txt.
2.2 If training is stopped after 9000 iterations, to validate some of previous weights use this commands:
(If you use another GitHub repository, then use darknet.exe detector recall... instead of darknet.exe detector map...)
darknet.exe detector map data/obj.data yolo-obj.cfg backup\yolo-obj_7000.weightsdarknet.exe detector map data/obj.data yolo-obj.cfg backup\yolo-obj_8000.weightsdarknet.exe detector map data/obj.data yolo-obj.cfg backup\yolo-obj_9000.weights
And comapre last output lines for each weights (7000, 8000, 9000):
Choose weights-file with the highest mAP (mean average precision) or IoU (intersect over union)
For example, bigger mAP gives weights yolo-obj_8000.weights - then use this weights for detection.
Or just train with -map flag:
darknet.exe detector train data/obj.data yolo-obj.cfg yolov4.conv.137 -map
So you will see mAP-chart (red-line) in the Loss-chart Window. mAP will be calculated for each 4 Epochs using valid=valid.txt file that is specified in obj.data file (1 Epoch = images_in_train_txt / batch iterations)
(to change the max x-axis value - change max_batches= parameter to 2000*classes, f.e. max_batches=6000 for 3 classes)

Example of custom object detection: darknet.exe detector test data/obj.data yolo-obj.cfg yolo-obj_8000.weights
-
IoU (intersect over union) - average instersect over union of objects and detections for a certain threshold = 0.24
-
mAP (mean average precision) - mean value of
average precisionsfor each class, whereaverage precisionis average value of 11 points on PR-curve for each possible threshold (each probability of detection) for the same class (Precision-Recall in terms of PascalVOC, where Precision=TP/(TP+FP) and Recall=TP/(TP+FN) ), page-11: http://homepages.inf.ed.ac.uk/ckiw/postscript/ijcv_voc09.pdf
mAP is default metric of precision in the PascalVOC competition, this is the same as AP50 metric in the MS COCO competition. In terms of Wiki, indicators Precision and Recall have a slightly different meaning than in the PascalVOC competition, but IoU always has the same meaning.

Custom object detection:
Example of custom object detection: darknet.exe detector test data/obj.data yolo-obj.cfg yolo-obj_8000.weights
 |  |
|---|
How to improve object detection:
- Before training:
-
set flag
random=1in your.cfg-file - it will increase precision by training Yolo for different resolutions: link -
increase network resolution in your
.cfg-file (height=608,width=608or any value multiple of 32) - it will increase precision -
check that each object that you want to detect is mandatory labeled in your dataset - no one object in your data set should not be without label. In the most training issues - there are wrong labels in your dataset (got labels by using some conversion script, marked with a third-party tool, ...). Always check your dataset by using: https://github.com/AlexeyAB/Yolo_mark
-
my Loss is very high and mAP is very low, is training wrong? Run training with
-show_imgsflag at the end of training command, do you see correct bounded boxes of objects (in windows or in filesaug_...jpg)? If no - your training dataset is wrong. -
for each object which you want to detect - there must be at least 1 similar object in the Training dataset with about the same: shape, side of object, relative size, angle of rotation, tilt, illumination. So desirable that your training dataset include images with objects at diffrent: scales, rotations, lightings, from different sides, on different backgrounds - you should preferably have 2000 different images for each class or more, and you should train
2000*classesiterations or more -
desirable that your training dataset include images with non-labeled objects that you do not want to detect - negative samples without bounded box (empty
.txtfiles) - use as many images of negative samples as there are images with objects -
What is the best way to mark objects: label only the visible part of the object, or label the visible and overlapped part of the object, or label a little more than the entire object (with a little gap)? Mark as you like - how would you like it to be detected.
-
for training with a large number of objects in each image, add the parameter
max=200or higher value in the last[yolo]-layer or[region]-layer in your cfg-file (the global maximum number of objects that can be detected by YoloV3 is0,0615234375*(width*height)where are width and height are parameters from[net]section in cfg-file) -
for training for small objects (smaller than 16x16 after the image is resized to 416x416) - set
layers = 23instead of https://github.com/AlexeyAB/darknet/blob/6f718c257815a984253346bba8fb7aa756c55090/cfg/yolov4.cfg#L895 setstride=4instead of https://github.com/AlexeyAB/darknet/blob/6f718c257815a984253346bba8fb7aa756c55090/cfg/yolov4.cfg#L892 and setstride=4instead of https://github.com/AlexeyAB/darknet/blob/6f718c257815a984253346bba8fb7aa756c55090/cfg/yolov4.cfg#L989 -
for training for both small and large objects use modified models:
- Full-model: 5 yolo layers: https://raw.githubusercontent.com/AlexeyAB/darknet/master/cfg/yolov3_5l.cfg
- Tiny-model: 3 yolo layers: https://raw.githubusercontent.com/AlexeyAB/darknet/master/cfg/yolov3-tiny_3l.cfg
- YOLOv4: 3 yolo layers: https://raw.githubusercontent.com/AlexeyAB/darknet/master/cfg/yolov4-custom.cfg
-
If you train the model to distinguish Left and Right objects as separate classes (left/right hand, left/right-turn on road signs, ...) then for disabling flip data augmentation - add
flip=0here: https://github.com/AlexeyAB/darknet/blob/3d2d0a7c98dbc8923d9ff705b81ff4f7940ea6ff/cfg/yolov3.cfg#L17 -
General rule - your training dataset should include such a set of relative sizes of objects that you want to detect:
train_network_width * train_obj_width / train_image_width ~= detection_network_width * detection_obj_width / detection_image_widthtrain_network_height * train_obj_height / train_image_height ~= detection_network_height * detection_obj_height / detection_image_height
I.e. for each object from Test dataset there must be at least 1 object in the Training dataset with the same class_id and about the same relative size:
object width in percent from Training dataset~=object width in percent from Test datasetThat is, if only objects that occupied 80-90% of the image were present in the training set, then the trained network will not be able to detect objects that occupy 1-10% of the image.
-
to speedup training (with decreasing detection accuracy) set param
stopbackward=1for layer-136 in cfg-file -
each:
model of object, side, illimination, scale, each 30 gradof the turn and inclination angles - these are different objects from an internal perspective of the neural network. So the more different objects you want to detect, the more complex network model should be used. -
to make the detected bounded boxes more accurate, you can add 3 parameters
ignore_thresh = .9 iou_normalizer=0.5 iou_loss=giouto each[yolo]layer and train, it will increase mAP@0.9, but decrease mAP@0.5. -
Only if you are an expert in neural detection networks - recalculate anchors for your dataset for
widthandheightfrom cfg-file:darknet.exe detector calc_anchors data/obj.data -num_of_clusters 9 -width 416 -height 416then set the same 9anchorsin each of 3[yolo]-layers in your cfg-file. But you should change indexes of anchorsmasks=for each [yolo]-layer, so that 1st-[yolo]-layer has anchors larger than 60x60, 2nd larger than 30x30, 3rd remaining. Also you should change thefilters=(classes + 5)*<number of mask>before each [yolo]-layer. If many of the calculated anchors do not fit under the appropriate layers - then just try using all the default anchors.
- After training - for detection:
-
Increase network-resolution by set in your
.cfg-file (height=608andwidth=608) or (height=832andwidth=832) or (any value multiple of 32) - this increases the precision and makes it possible to detect small objects: link- it is not necessary to train the network again, just use
.weights-file already trained for 416x416 resolution - but to get even greater accuracy you should train with higher resolution 608x608 or 832x832, note: if error
Out of memoryoccurs then in.cfg-file you should increasesubdivisions=16, 32 or 64: link
- it is not necessary to train the network again, just use
How to mark bounded boxes of objects and create annotation files:
Here you can find repository with GUI-software for marking bounded boxes of objects and generating annotation files for Yolo v2 - v4: https://github.com/AlexeyAB/Yolo_mark
With example of: train.txt, obj.names, obj.data, yolo-obj.cfg, air1-6.txt, bird1-4.txt for 2 classes of objects (air, bird) and train_obj.cmd with example how to train this image-set with Yolo v2 - v4
Different tools for marking objects in images:
- in C++: https://github.com/AlexeyAB/Yolo_mark
- in Python: https://github.com/tzutalin/labelImg
- in Python: https://github.com/Cartucho/OpenLabeling
- in C++: https://www.ccoderun.ca/darkmark/
- in JavaScript: https://github.com/opencv/cvat
Using Yolo9000
Simultaneous detection and classification of 9000 objects: darknet.exe detector test cfg/combine9k.data cfg/yolo9000.cfg yolo9000.weights data/dog.jpg
-
yolo9000.weights- (186 MB Yolo9000 Model) requires 4 GB GPU-RAM: http://pjreddie.com/media/files/yolo9000.weights -
yolo9000.cfg- cfg-file of the Yolo9000, also there are paths to the9k.treeandcoco9k.maphttps://github.com/AlexeyAB/darknet/blob/617cf313ccb1fe005db3f7d88dec04a04bd97cc2/cfg/yolo9000.cfg#L217-L218-
9k.tree- WordTree of 9418 categories -<label> <parent_it>, ifparent_id == -1then this label hasn't parent: https://raw.githubusercontent.com/AlexeyAB/darknet/master/build/darknet/x64/data/9k.tree -
coco9k.map- map 80 categories from MSCOCO to WordTree9k.tree: https://raw.githubusercontent.com/AlexeyAB/darknet/master/build/darknet/x64/data/coco9k.map
-
-
combine9k.data- data file, there are paths to:9k.labels,9k.names,inet9k.map, (change path to yourcombine9k.train.list): https://raw.githubusercontent.com/AlexeyAB/darknet/master/build/darknet/x64/data/combine9k.data-
9k.labels- 9418 labels of objects: https://raw.githubusercontent.com/AlexeyAB/darknet/master/build/darknet/x64/data/9k.labels -
9k.names- 9418 names of objects: https://raw.githubusercontent.com/AlexeyAB/darknet/master/build/darknet/x64/data/9k.names -
inet9k.map- map 200 categories from ImageNet to WordTree9k.tree: https://raw.githubusercontent.com/AlexeyAB/darknet/master/build/darknet/x64/data/inet9k.map
-
How to use Yolo as DLL and SO libraries
- on Linux
- using
build.shor - build
darknetusingcmakeor - set
LIBSO=1in theMakefileand domake
- using
- on Windows
- using
build.ps1or - build
darknetusingcmakeor - compile
build\darknet\yolo_cpp_dll.slnsolution orbuild\darknet\yolo_cpp_dll_no_gpu.slnsolution
- using
There are 2 APIs:
- C API: https://github.com/AlexeyAB/darknet/blob/master/include/darknet.h
- Python examples using the C API::
- C++ API: https://github.com/AlexeyAB/darknet/blob/master/include/yolo_v2_class.hpp
- C++ example that uses C++ API: https://github.com/AlexeyAB/darknet/blob/master/src/yolo_console_dll.cpp
-
To compile Yolo as C++ DLL-file
yolo_cpp_dll.dll- open the solutionbuild\darknet\yolo_cpp_dll.sln, set x64 and Release, and do the: Build -> Build yolo_cpp_dll- You should have installed CUDA 10.0
- To use cuDNN do: (right click on project) -> properties -> C/C++ -> Preprocessor -> Preprocessor Definitions, and add at the beginning of line:
CUDNN;
-
To use Yolo as DLL-file in your C++ console application - open the solution
build\darknet\yolo_console_dll.sln, set x64 and Release, and do the: Build -> Build yolo_console_dll-
you can run your console application from Windows Explorer
build\darknet\x64\yolo_console_dll.exeuse this command:yolo_console_dll.exe data/coco.names yolov4.cfg yolov4.weights test.mp4 -
after launching your console application and entering the image file name - you will see info for each object:
<obj_id> <left_x> <top_y> <width> <height> <probability> -
to use simple OpenCV-GUI you should uncomment line
//#define OPENCVinyolo_console_dll.cpp-file: link -
you can see source code of simple example for detection on the video file: link
-
yolo_cpp_dll.dll-API: link
struct bbox_t {
    unsigned int x, y, w, h;    // (x,y) - top-left corner, (w, h) - width & height of bounded box
    float prob;                    // confidence - probability that the object was found correctly
    unsigned int obj_id;        // class of object - from range [0, classes-1]
    unsigned int track_id;        // tracking id for video (0 - untracked, 1 - inf - tracked object)
    unsigned int frames_counter;// counter of frames on which the object was detected
};

class Detector {
public:
        Detector(std::string cfg_filename, std::string weight_filename, int gpu_id = 0);
        ~Detector();

        std::vector<bbox_t> detect(std::string image_filename, float thresh = 0.2, bool use_mean = false);
        std::vector<bbox_t> detect(image_t img, float thresh = 0.2, bool use_mean = false);
        static image_t load_image(std::string image_filename);
        static void free_image(image_t m);

#ifdef OPENCV
        std::vector<bbox_t> detect(cv::Mat mat, float thresh = 0.2, bool use_mean = false);
	std::shared_ptr<image_t> mat_to_image_resize(cv::Mat mat) const;
#endif
};