Awesome
<p align="center"> <img src="https://github.com/preiter93/wireman/blob/main/resources/logo-light.png?raw=true#gh-light-mode-only" width="700"/> <img src="https://github.com/preiter93/wireman/blob/main/resources/logo-dark.png?raw=true#gh-dark-mode-only" width="700"/> </p> <div align="center">![]()
What is WireMan?
WireMan is a terminal-based gRPC client with a user-friendly interface. It reads .proto files from a config file and keeps a history of requests.
WireMan is an ideal choice for developers testing gRPC endpoints directly from the terminal.
Getting Started with WireMan
This guide will walk you through the steps to set up and run WireMan.
Prerequisites
- Rust: [Minimum required Rust version is 1.70] (Installation Guide)
Installation
Install with cargo
cargo install wireman
Install with brew
brew install preiter93/wireman/wireman
Download Binary
You can download the latest wireman binary from the releases page.
Install manually
-
Clone the repository:
git clone https://github.com/preiter93/wireman.git -
Build in release mode:
cd wireman cargo build --release -
Copy the binary to your PATH, e.g.:
cp target/release/wireman /usr/local/binAlternatively, you can create an alias to the binary in your
.bashrcor.zshrcfile:echo "alias wireman='CURRENT_DIRECTORY/target/release/wireman'" >> ~/.zshrc
Demo
Configuration
-
Set the
WIREMAN_CONFIG_DIRenvironment variable to specify the directory where your configuration file will be located:export WIREMAN_CONFIG_DIR=~/.config/wireman -
Create the directory specified in
WIREMAN_CONFIG_DIR:mkdir -p ~/.config/wireman -
Create a
wireman.tomlfile in the specified directory. Here's an example configuration:includes = [ "$HOME/your-project" ] files = [ "a-proto-file-in-your-project.proto" ] [server] default_address = "http://localhost:50051" default_auth_header = "Bearer $(getToken.sh)" [history] directory = "$WIREMAN_CONFIG_DIR/history" # Optional. Defaults to $WIREMAN_CONFIG_DIR/history. autosave = true # Optional. Autosaves history on request. Defaults to true. disabled = false # Optional. History is enabled by default. [logging] directory = "$WIREMAN_CONFIG_DIR" # Optional. Defaults to $WIREMAN_CONFIG_DIR. level = "Debug" # Optional. Defaults to Debug. # [ui] # skin = "$WIREMAN_CONFIG_DIR/skins/dracula.toml" # Optional. Set a UI theme.Replace with the appropriate values for your project.
-
Optionally, you can now verify the setup configuration
wireman check
Usage
-
After adding the protos in the config, start
wireman. -
Basic key mappings are displayed in the footer of each page. For extended help, press
?and close with?orEsc. If you want to close the app entirely, typeCtrl+c. -
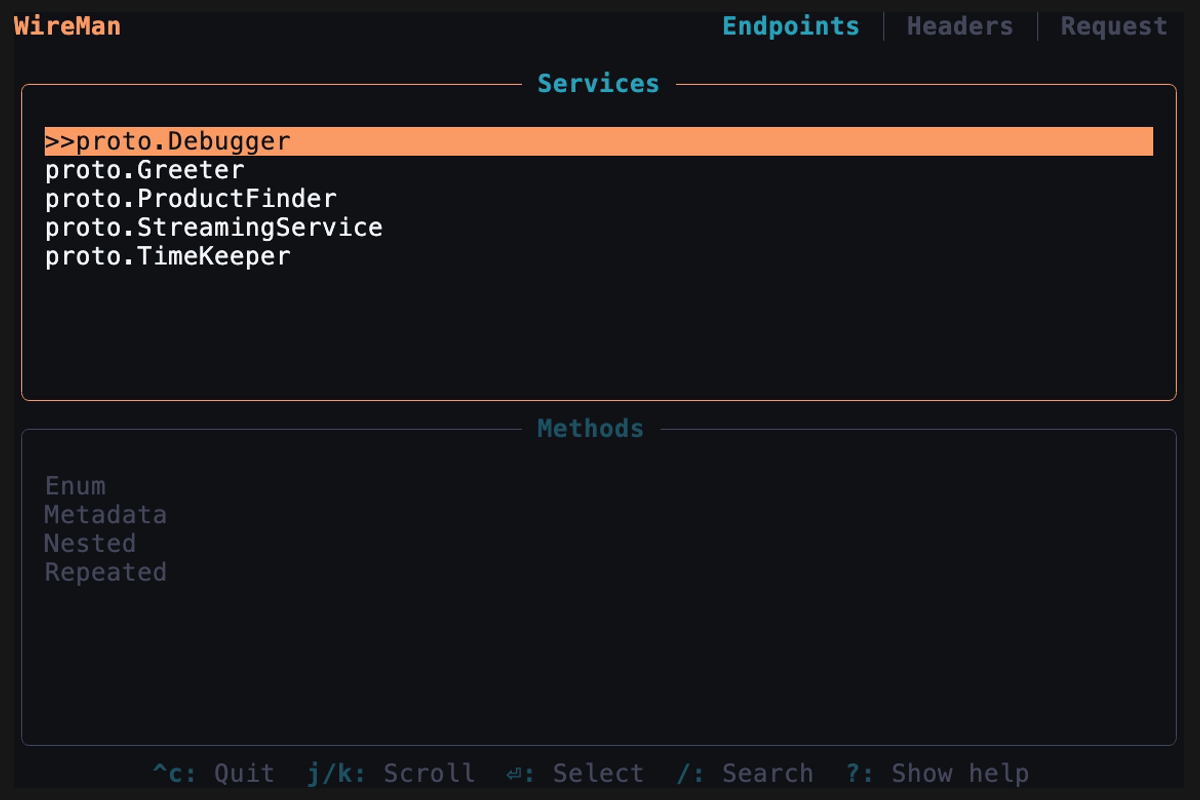
The first page of Wireman will list your grpc services and their methods. You can navigate with
up/downorj/k, select withEnteror unselect withEsc, then clickTab. -
The second page is the message screen. Edit your request message, you can format it with
Ctrl+f. Then click tab. The navigation of the editor is vim-inspired: useh,j,k,lfor motion, go into insert mode withi, and escape insert mode withEsc. For more details, refer to edtui. -
The third page is the config screen where you can edit the address or metadata. Wireman allows for using bash scripts to get your tokens. Place the name of your script in the bearer token field, which must be in your PATH, between
$(). For example, if you have a bash script namedgetToken.shthat prints the Bearer tokeney..., you would use$(getToken.sh)(the script output should not include the word 'Bearer', as it is automatically added). Additional headers can be added withCtrl+aand deleted withCtrl+d. Go to the request page with Shift+Tab or click tab twice. -
Now you can make the request by clicking Enter. You can save it with
Ctrl+s. Saved requests are stored in spots 1 to 5. Switch to a spot by clicking the respective number. You can restore the default request withCtrl+d, which deletes the history. You can also cancel a request with Esc. To copy the response: Navigate to the response by clicking down, enter visual mode by pressingv, select everything and copy the selected text by pressingy. Or follow step 6. -
If you want to get the current request as a gRPCurl command, click
Ctrl+yon the request tab, and it's copied to your clipboard.
Troubleshooting
Wireman logs important information and errors to assist in troubleshooting. By default, logs are stored in $WIREMAN_CONFIG_DIR/wireman.log.Make sure to check this log file if you encounter any unexpected behavior or errors while using the application.
If you are unable to resolve the issue on your own or need further assistance, please don't hesitate to open an issue.
Custom Skins
Wireman allows users to customize the appearance of the UI by adding custom skins. To do this, simply specify the desired skin file in the wireman.toml file config:
[ui]
skin = "path_to_file/custom_skin.toml"
For a collection of pre-made themes, check out the Wireman themes repository.
Server Reflection
Wireman also supports server reflection of gRPC servers. To activate reflection mode, press Ctrl + r on the selection tab, enter the host along with optional authentication headers, and then press Enter. To switch back from reflection mode to file mode press Ctrl + r again.

Roadmap
- Unary gRPC
- Set host address
- Set authentication headers
- Request History
- Defaults of repeated/nested fields
- Yank/Paste from clipboard
- Yank request as grpcurl command
- Vim like editor feeling
- Show loading indicator
- Metadata headers
- Provide installation help
- Custom themes
- Server reflection
Planned
- Edit config file in app
Maybe
- Streaming gRPC