Awesome
GPUInstance
Instancing & Animation library for Unity3D.

This library can be used to quickly and efficiently render thousands to hundreds of thousands of complex models in Unity3D. At a high level, this library uses compute shaders to implement an entity hierarchy system akin to the GameObject-Transform hierarchy Unity3D uses.
Features
A scene with many cube instances flying out in all directions.

- Fully Dynamic Skinned Mesh Rendering- *Multi skinned mesh supported
- GPU based LOD, Culling, & skeleton LOD
- Attaching/Detaching GPU instances to eachother to form complex entity hierarchies with instances composed of different mesh and materials
- Pathing System for moving entities around on the GPU
- Retrieving position & rotation of instances & bone instances without needed GPU readbacks
- Slow down, speed up, and pause time for any instance
- Billboarding, 2D texture animations supported as well.
Paths
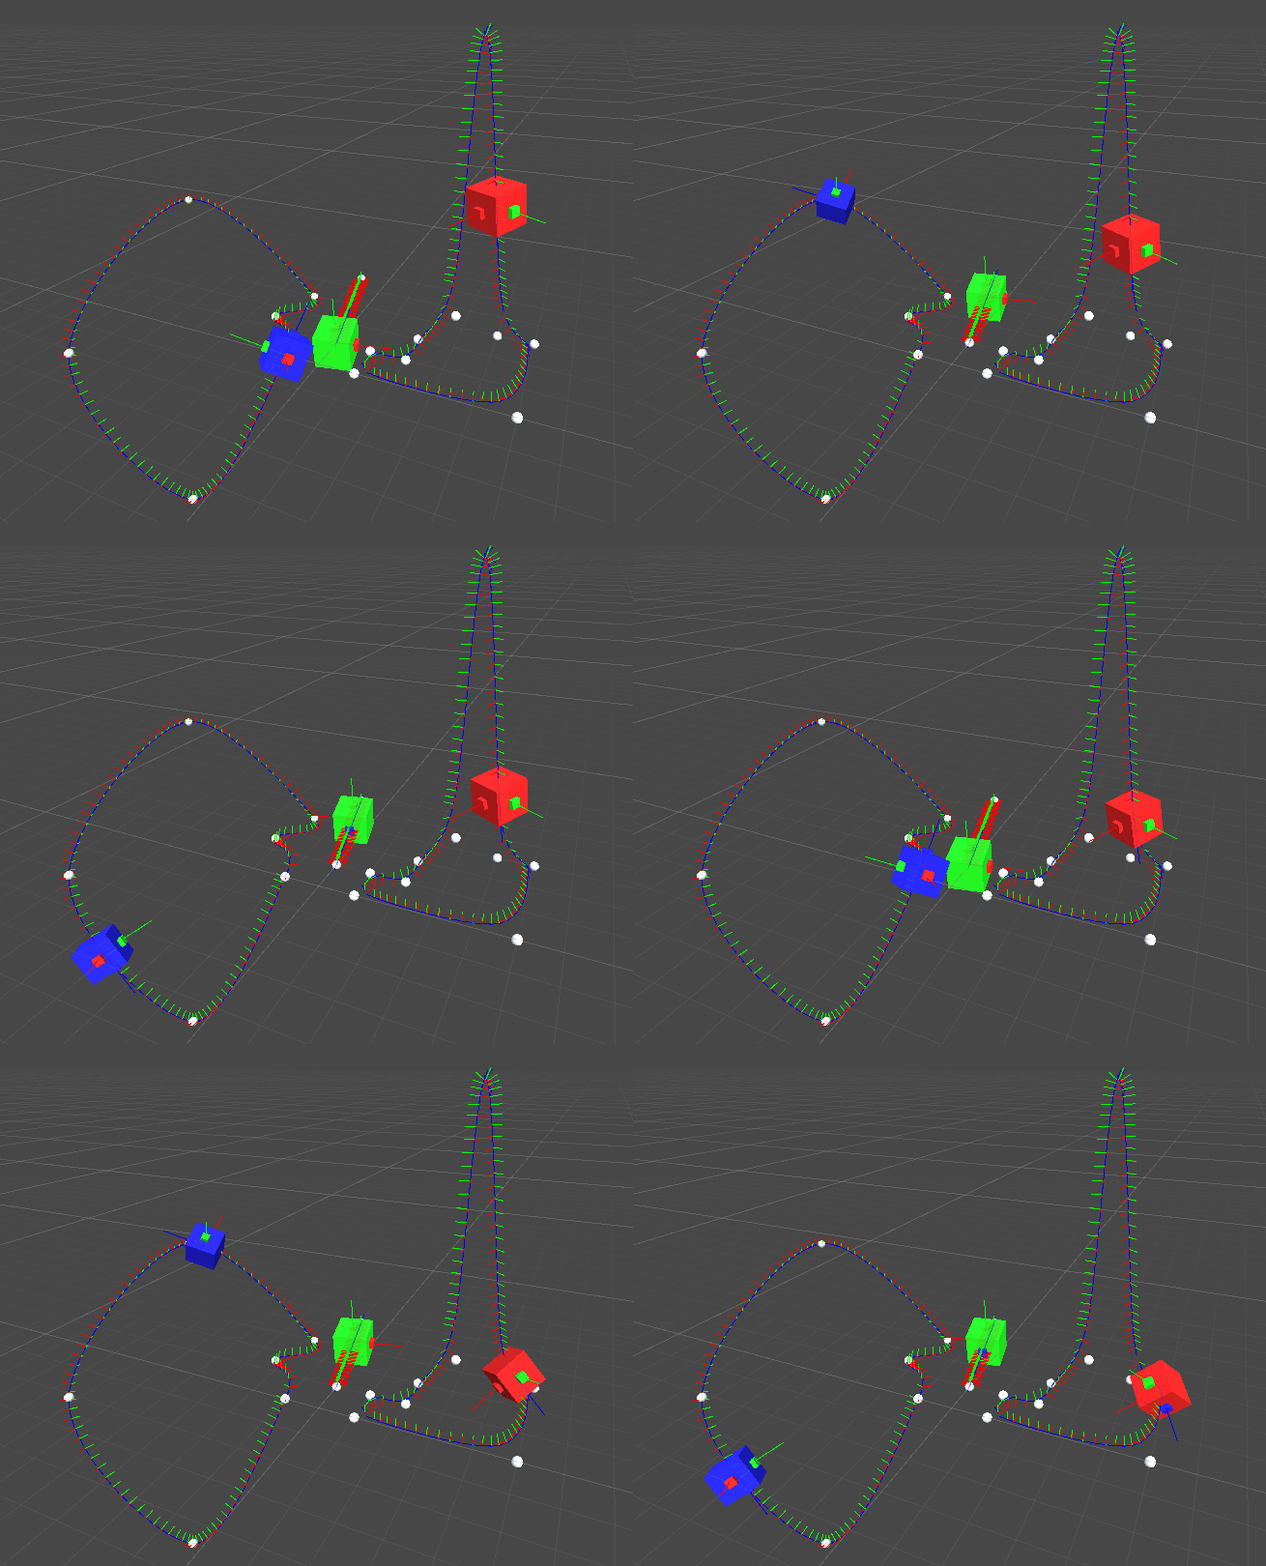
- An Example of the instancing pathing system. The cubes below are instanced and following paths that are running in a compute shader.
- The paths being drawn below are just using Debug.DrawLine to show what the paths look like. The spheres are the actual path points. The paths are being automatically blended by the library to be smooth.
- This isn't a pathfinding solution* The paths (ie like 10 points) are sent to the GPU and the instance will follow it for some period of time. This is useful because the instance wont have to be processed every frame by the CPU. And it won't have to send new matrices to the graphics card every frame.

Billboards
- This library is a bit overkill for billboards. But it can do them if you want. Additionally, this library can do 2D sprite sheet animations for you instances (just use a quad mesh).
- Below is a scene with a bunch of exploding tile sprites

Performant Instancing
- Below is a scene with a half million dynamic asteroids.

Instance Transform Readbacks
- This library uses a discretized tick system to time all of the instance movement and animations.
- Because of this, all of the paths, bones, positions, rotations, and scales of any instance can be lazily calculated at any time without doing GPU readbacks.
- Below is a scene of a skinned mesh where all the bone transforms (white cubes) are being retrieved without requesting data from the GPU.

Can Slow down, Speed up, & pause instance times.
- Just seemed useful for pausing the game.

Guide
This guide will be very basic- you will be expected to look at the demo scenes & demo models to learn how things work. You are expected to already know how to rig your models, create LODS (if you are using them), setup animations, etc... Additionally, this library requires that you know how to code (in c#).
Preparing a Skinned Mesh
- To instance a Skinned Mesh, you need to use the window under Window->EditorGPUInstanceAnimComposer. Just drag the model prefab onto this window & press the compose button. The window may do nothing and print a warning. Adjust your model accordingly.
- The Window->EditorGPUInstanceAnimComposer window will create alot of Assets that the instancing library needs. You will be directed to select a directory for these assets.
- The final output will be labeled with prefab_gpu.
- See the example scenes in the Assets/Models folder for examples of how a SkinnedMesh should look before using this editor. The only thing I really did to these models was create and add an animation controller after importing.
- Additionally, you can add an optional 'GPUSkeletonLODComponent' to setup skeleton LOD.
- Skeleton LOD will stop computing animations for bones after they are a certain distance from the camera.
- Drag bone GameObjects onto the desired maximum detail LOD level you want them to animate at.
Instancing Stuff
- I highly recommend that you look through the demo scene scripts. crowddemo is a good one to look at. It will show you how to spawn many skinned mesh and give them simple paths to follow.
- The codebase is highly commented. If you don't understand how something works- then just open it up. Chances are there will be an explanation waiting for you.
- I've added some additional explanation on the crowd demo scene script below.
// Initialize character mesh list
int hierarchy_depth, skeleton_bone_count; // This function will initialize the GPUAnimationControllers and combine any that have duplicate skeletons (to save space)
var controllers = GPUSkinnedMeshComponent.PrepareControllers(characters, out hierarchy_depth, out skeleton_bone_count);

// Initialize GPU Instancer
this.m = new MeshInstancer(); // The MeshInstancer is the main object you will be using to create/modify/destroy instances
this.m.Initialize(max_parent_depth: hierarchy_depth + 2, num_skeleton_bones: skeleton_bone_count, pathCount: 2);
this.p = new PathArrayHelper(this.m); // PathArrayHelper can be used to manage & spawn paths for instances to follow

// Add all animations to GPU buffer
this.m.SetAllAnimations(controllers);

// Add all character mesh types to GPU Instancer- this must be done for each different skinned mesh prefab you have
foreach (var character in this.characters)
    this.m.AddGPUSkinnedMeshType(character);

// Everything is initialized and ready to go.. So go ahead and create instances
for (int i = 0; i < N; i++)
    for (int j = 0; j < N; j++)
    {
        var mesh = characters[Random.Range(0, characters.Count)]; // pick a random character from our character list
        var anim = mesh.anim.namedAnimations["walk"]; // pick the walk animation from the character
        instances[i, j] = new SkinnedMesh(mesh, this.m); // The SkinnedMesh struct is used to specify GPU Skinned mesh instances- It will create and manage instances for every skinend mesh & skeleton bone.
        instances[i, j].mesh.position = new Vector3(i, 0, j); // set whatever position you want for the instance
        instances[i, j].SetRadius(1.75f); // The radius is used for culling & LOD. This library uses radius aware LOD & culling. Objects with larger radius will change LOD and be culled at greater distances from the camera.
        instances[i, j].Initialize(); // Each instance must be initialized before it can be rendered. Really this just allocates some IDs for the instance.

        instances[i, j].SetAnimation(anim, speed: 1.4f, start_time: Random.Range(0.0f, 1.0f)); // set the walk animation from before

        var path = GetNewPath(); // create new path
        instances[i, j].mesh.SetPath(path, this.m); // You have to make the instance aware of any paths it should be following.
        paths[i, j] = path;

        instances[i, j].UpdateAll(); // Finnally, invoke Update(). This function will append the instance you created above to a buffer which will be sent to the GPU.
    }


// Get New Path Function. This will create a simple 2-point path.
private Path GetNewPath()
{
    // Get 2 random points which will make a path
    var p1 = RandomPointOnFloor();
    var p2 = RandomPointOnFloor();
    while ((p1 - p2).magnitude < 10) // ensure the path is atleast 10 meters long
        p2 = RandomPointOnFloor();

    // The Path Struct will specify various parameters about how you want an instance to behave whilst following a path. See Pathing.cs for more details.
    Path p = new Path(path_length: 2, this.m, loop: true, path_time: (p2 - p1).magnitude, yaw_only: true, avg_path: false, smoothing: false);

    // Initialize path- this allocates path arrays & reserves a path gpu id
    this.p.InitializePath(ref p);

    // Copy path into buffers
    var start_index = this.p.StartIndexOfPath(p); // what happening here is we're just copying the 2 random points into an array
    this.p.path[start_index] = p1;
    this.p.path[start_index + 1] = p2;
    this.p.AutoCalcPathUpAndT(p); // Auto calculate the 'up' and 'T' values for the path.

    // Each path you create requires that you specify an 'up direction' for each point on the path
    // This is necessary for knowing how to orient the instance whilst it follows the path

    // Additionally you need to specify a 'T' value. This 'T' value can be thought of as an interpolation parameter along the path.
    // Setting path[4]=0.5 will mean that the instance will be half way done traversing the path at the 4th point on the path
    // The 'T' value is used to specify how fast/slow the instance will traverse each segment in the path.

    // send path to GPU
    this.p.UpdatePath(ref p); // Finally, this function will append the path you created to a buffer which will send it to the GPU!

    return p;
}
Some performance considerations
- Try and reduce the number of multi-skinned meshes you have. Each additional mesh causes an additional DrawInstancedIndirect call- which results in more draw calls.
- You can change the animation blend quality of your models at each LOD by just changing it on the SkinnedMeshRenderer of your model prefab. I recommend 1-2 bones for lower LODS- it is pointless to have more.
- You can use different materials at different LODS. (And should). Eg, using fancy shader for LOD0 and basic diffuse for LOD4. Again, just specify this on your Skinned Mesh.
- You can toggle shadows on off for different LODS- again on your skinned mesh.
- Don't spawn more than ~50000 of the same (mesh,material) type. Instead break it up into batches by instantiating a new identical material.
- You will have much higher FPS instancing 20 objects with instantiated materials than all one million as the same type. This has to due with contention on the GPU.
- If you aren't using LODS for you skinned mesh then use them.
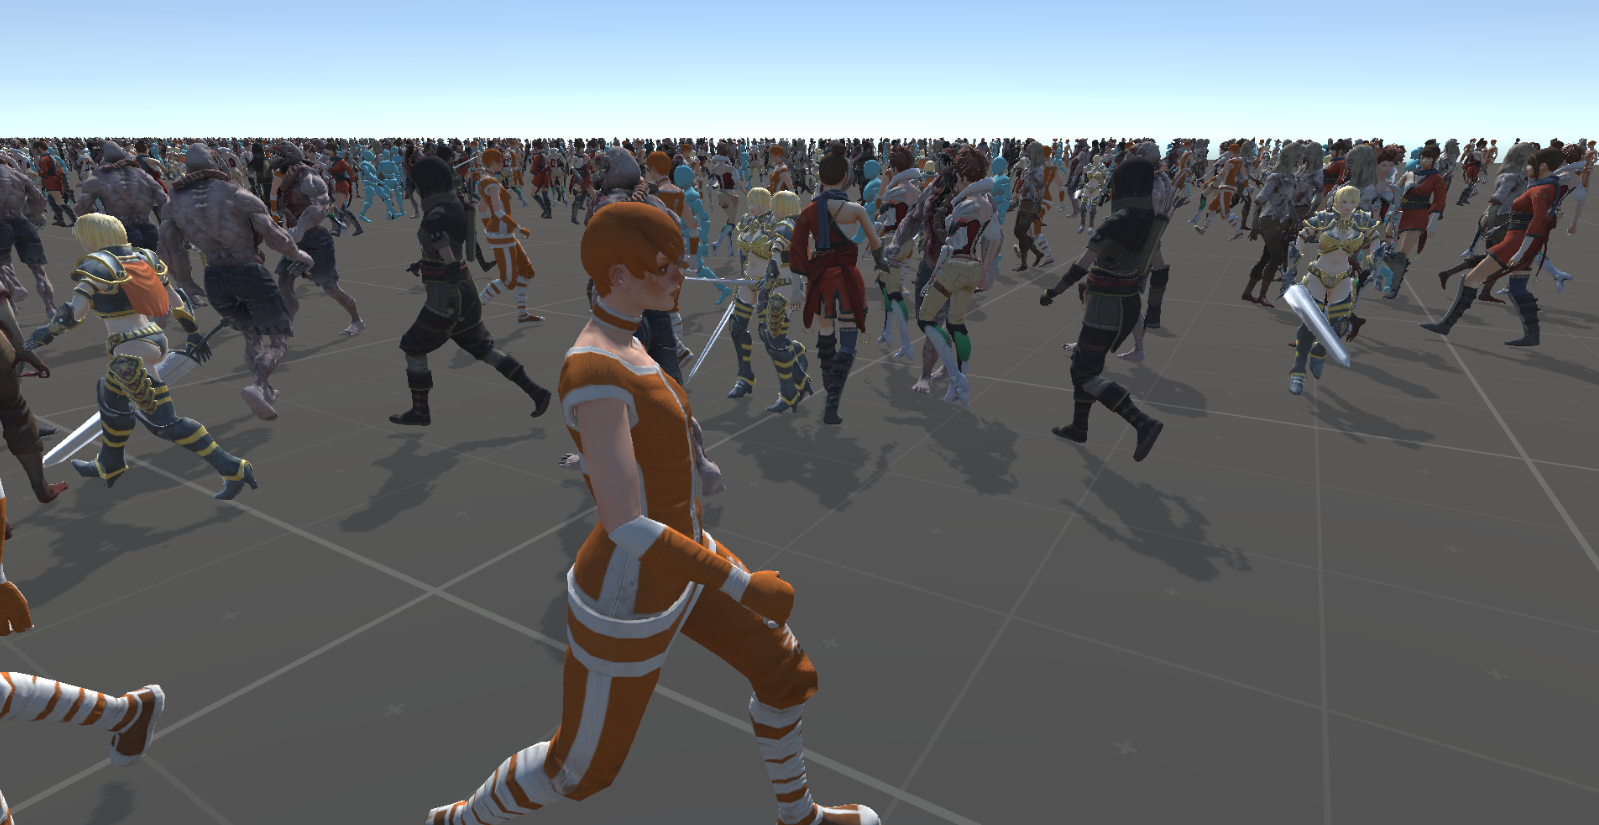
- On a GTX 10606GB- All of the demos (using 10-15000 skinned mesh) will run at above 150FPS.
- Without LOD- Maybe 20-30FPS. There is simply too many animated vertices.
- This library has very little CPU overhead. You will only really get CPU overhead from populating the buffers which send data to the GPU.
- Changing the depth of entities with many children can be expensive. If you need to reparent entities with many children, try keeping them at the same hierarchy depth before and after reparenting.
- You can create/modify/and destroy instances on different threads than the Unity Main update thread.
- That being said, thread safety for this library is implented via simple mutual exclusion locks.
Other Notes
- Some of the animations look Jank ASF because I am not an artist- I used Mixamo rigger with all my LODS at once which results in Jank
- Root animations not supported.
- Very simple animation state- No animation blending is implemented.
- If you want though, you can enable/disable animation for select bones and manually pose them yourself. Eg- Have a ragdoll control it or something.
- Tile textures are supported. You can specify the tiling & offset for the instance to use.
- There is also an optional per-instance color that you can set.
- If you want to modify the compute shader and add your own stuff- you can overwrite some of the fields in the property struct safely.
- You can overwrite the offset/tiling if you dont need them. You can overwrite the color if you dont need it. You can overwrite the pathInstanceTicks if not using a path. You can overwrite the instanceTicks if not using an animation. The pad2 field is completely unused- you can use it for whatever without any worries.
- What version of Unity is supported? Unity 2023.2 is what this project was most recently built with- but it should work for most versions. See branches for versions with explicit support.