Awesome


Table of Contents: <a class="anchor" id="contents"></a>
Introduction <a class="anchor" id="intro"></a>
pysentation is a CLI for displaying Python presentations.
pysentation, by taking a Python file written with simple but specific rules, can convert the contents of the Python file into a slide show and display it.
Follow the documentation or read <a href="#">this</a> section for more information.
 <br />
Installation <a class="anchor" id="install"></a>
You can use pip to install:
python3 -m pip install pysentation
And also to upgrade:
python3 -m pip install --upgrade pysentation
If there is a problem, install the requirement packages separately as below and then try again.
First, download the requirements.txt file with curl:
curl -o requirements.txt https://raw.githubusercontent.com/mimseyedi/pysentation/master/requirements.txt
Then install the packages in the requirements.txt using pip:
python3 -m pip install -r requirements.txt
You can still do it yourself without needing the requirements.txt file:
python3 -m pip install rich==13.4.1 getkey==0.6.5 click==8.1.3
How to use pysentation? <a class="anchor" id="usage"></a>
There are two ways to use pysentation!
The first way is the classic way of reading the document. You may be surprised, but many people live with documents and love to read them. That's why this possibility is completely available for people who belong to this category, and if you like documents, it's better to continue right now.
But there is a second way! What could be better than understanding how to work with a program while you are inside it and using it? I like documents, but believe me, this method is much more interesting! Let pysentation introduce itself to you.
There are two very simple steps for this.
First of all, download this pysentation file with the help of curl:
curl -o train_journey.py https://raw.githubusercontent.com/mimseyedi/pysentation/master/docs/guide/train_journey.py
Then after you install pysentation, run the file you downloaded with the pysentation command:
pysentation train_journey.py
pysentation file <a class="anchor" id="pysentation_file"></a>
To use pysentation, you first need a pysentation file. The pysentation file is actually a Python file or a converted file with (.pysent) suffix. But it follows rules that can be converted into a slideshow and interpreted by pysentation CLI.
<br />pysentation scope <a class="anchor" id="scope"></a>
A pysentation file consists of a pysentation scope. Specifying the scope of the pysentation is mandatory so that the interpretation can be done correctly:
#pysentation{
...
...
#pysentation}
This range specifies the presentation environment. All pysentation commands and attributes in a python file are a python comment, but they have special names so that they can be interpreted correctly.
<br />Slides <a class="anchor" id="slides"></a>
Each pysentation consists of one or more slides. To make a slide, just do the following:
#pysentation{

#>slide
...

#pysentation}
Now, after #>slide, you can define slide properties and slide elements, which we will explain below.
You can also define several slides in one scope:
#pysentation{

#>slide
...

#>slide
...

#>slide
...

#pysentation}
Properties <a class="anchor" id="props"></a>
Each slide has properties that can change the presentation of the slide. These properties are listed in the table below, which I will examine one by one in the following:
| Property | Action | Definition form | Default value |
|---|---|---|---|
| Title | You can change the title of the slide with this property. | #-title: Slide's Title | none |
| Title align | You can change the slide title align with this property. | #-title_align: left | center |
| Color | You can change the color of the slide with this property. | #-color: green | default |
| Theme | You can change the theme of syntax highlighters of the slide with this property. | #-theme: github-dark | gruvbox-dark |
| Expand | With this property, it can be specified that the slide box is the same width as the screen or stretched to the size of the slide elements. | #-expand: True | True |
| Interpretable | With this property, it is possible to determine whether the codes inside the slide are interpreted and their output is displayed or not. | #-interpretable: False | True |
Note: Properties are case sensitive and must be written as defined.
<br />Title <a class="anchor" id="title"></a>
This feature refers to the slide:
#pysentation{

#>slide
#-title: First slide

#pysentation}
Output:
┏━━━━━━━━━━━━━━━━━━━━━━━━━━━━━━━━━━━━━━━━ First slide ━━━━━━━━━━━━━━━━━━━━━━━━━━━━━━━━━━━━━━━━┓
┃                                                                                             ┃
┃                                                                                             ┃
┗━━━━━━━━━━━━━━━━━━━━━━━━━━━━━━━━━━━━━━━━━━━━ 1/1 ━━━━━━━━━━━━━━━━━━━━━━━━━━━━━━━━━━━━━━━━━━━━┛
Title align <a class="anchor" id="title_align"></a>
This property specifies the location of the slide title and it can be defined in three modes: right, center and left (The default value is center):
#pysentation{

#>slide
#-title: First slide
#-title_align: left

#pysentation}
Output:
┏━ First slide ━━━━━━━━━━━━━━━━━━━━━━━━━━━━━━━━━━━━━━━━━━━━━━━━━━━━━━━━━━━━━━━━━━━━━━━━━━━━━━━┓
┃                                                                                             ┃
┃                                                                                             ┃
┗━━━━━━━━━━━━━━━━━━━━━━━━━━━━━━━━━━━━━━━━━━━━ 1/1 ━━━━━━━━━━━━━━━━━━━━━━━━━━━━━━━━━━━━━━━━━━━━┛
Color <a class="anchor" id="color"></a>
This property refers to the color of the slide and its components (The default value is equal to default or color of the terminal font):
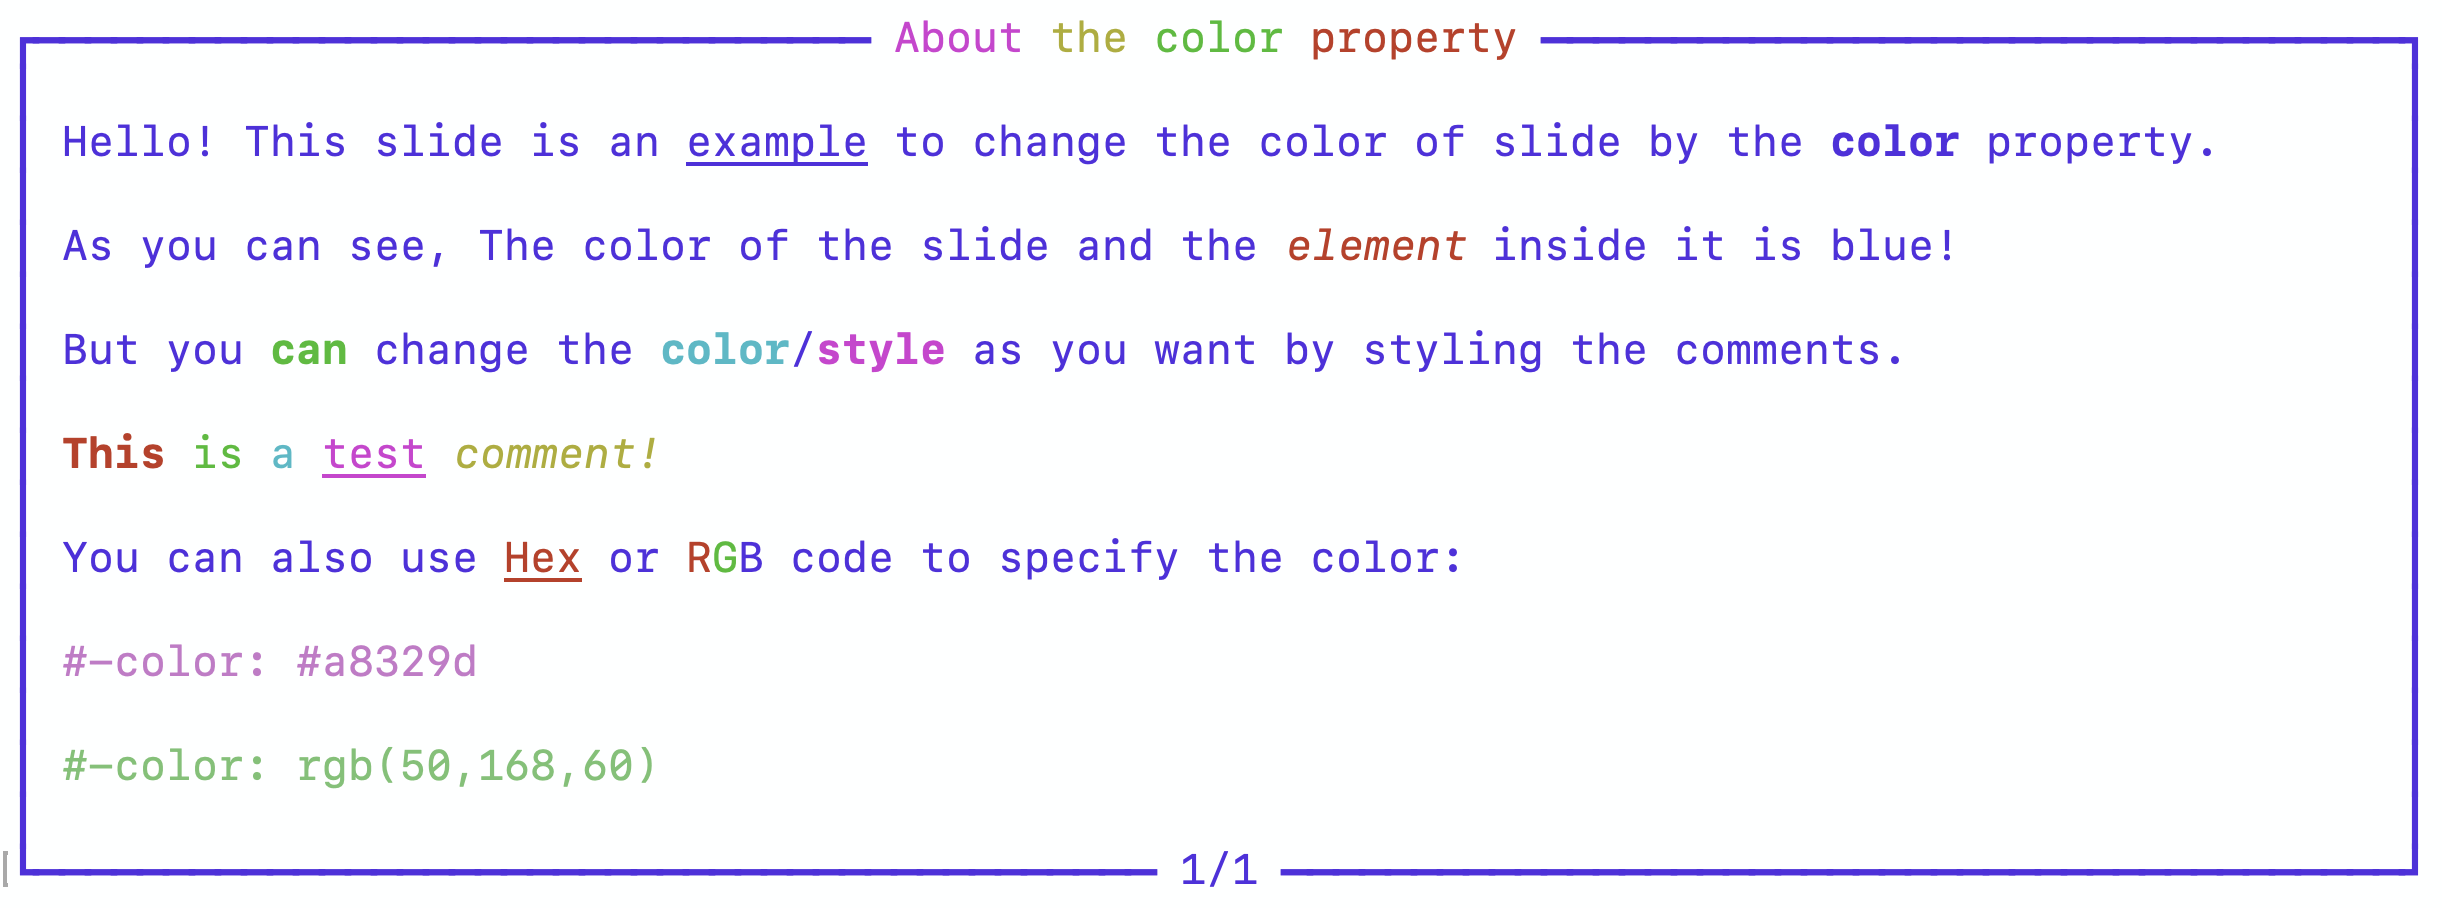
Click <a href="#colors">here</a> to view the available colors.
<br />Theme <a class="anchor" id="theme"></a>
This property refers to the theme of the syntax highlighters in the slide (The default value is gruvbox-dark):
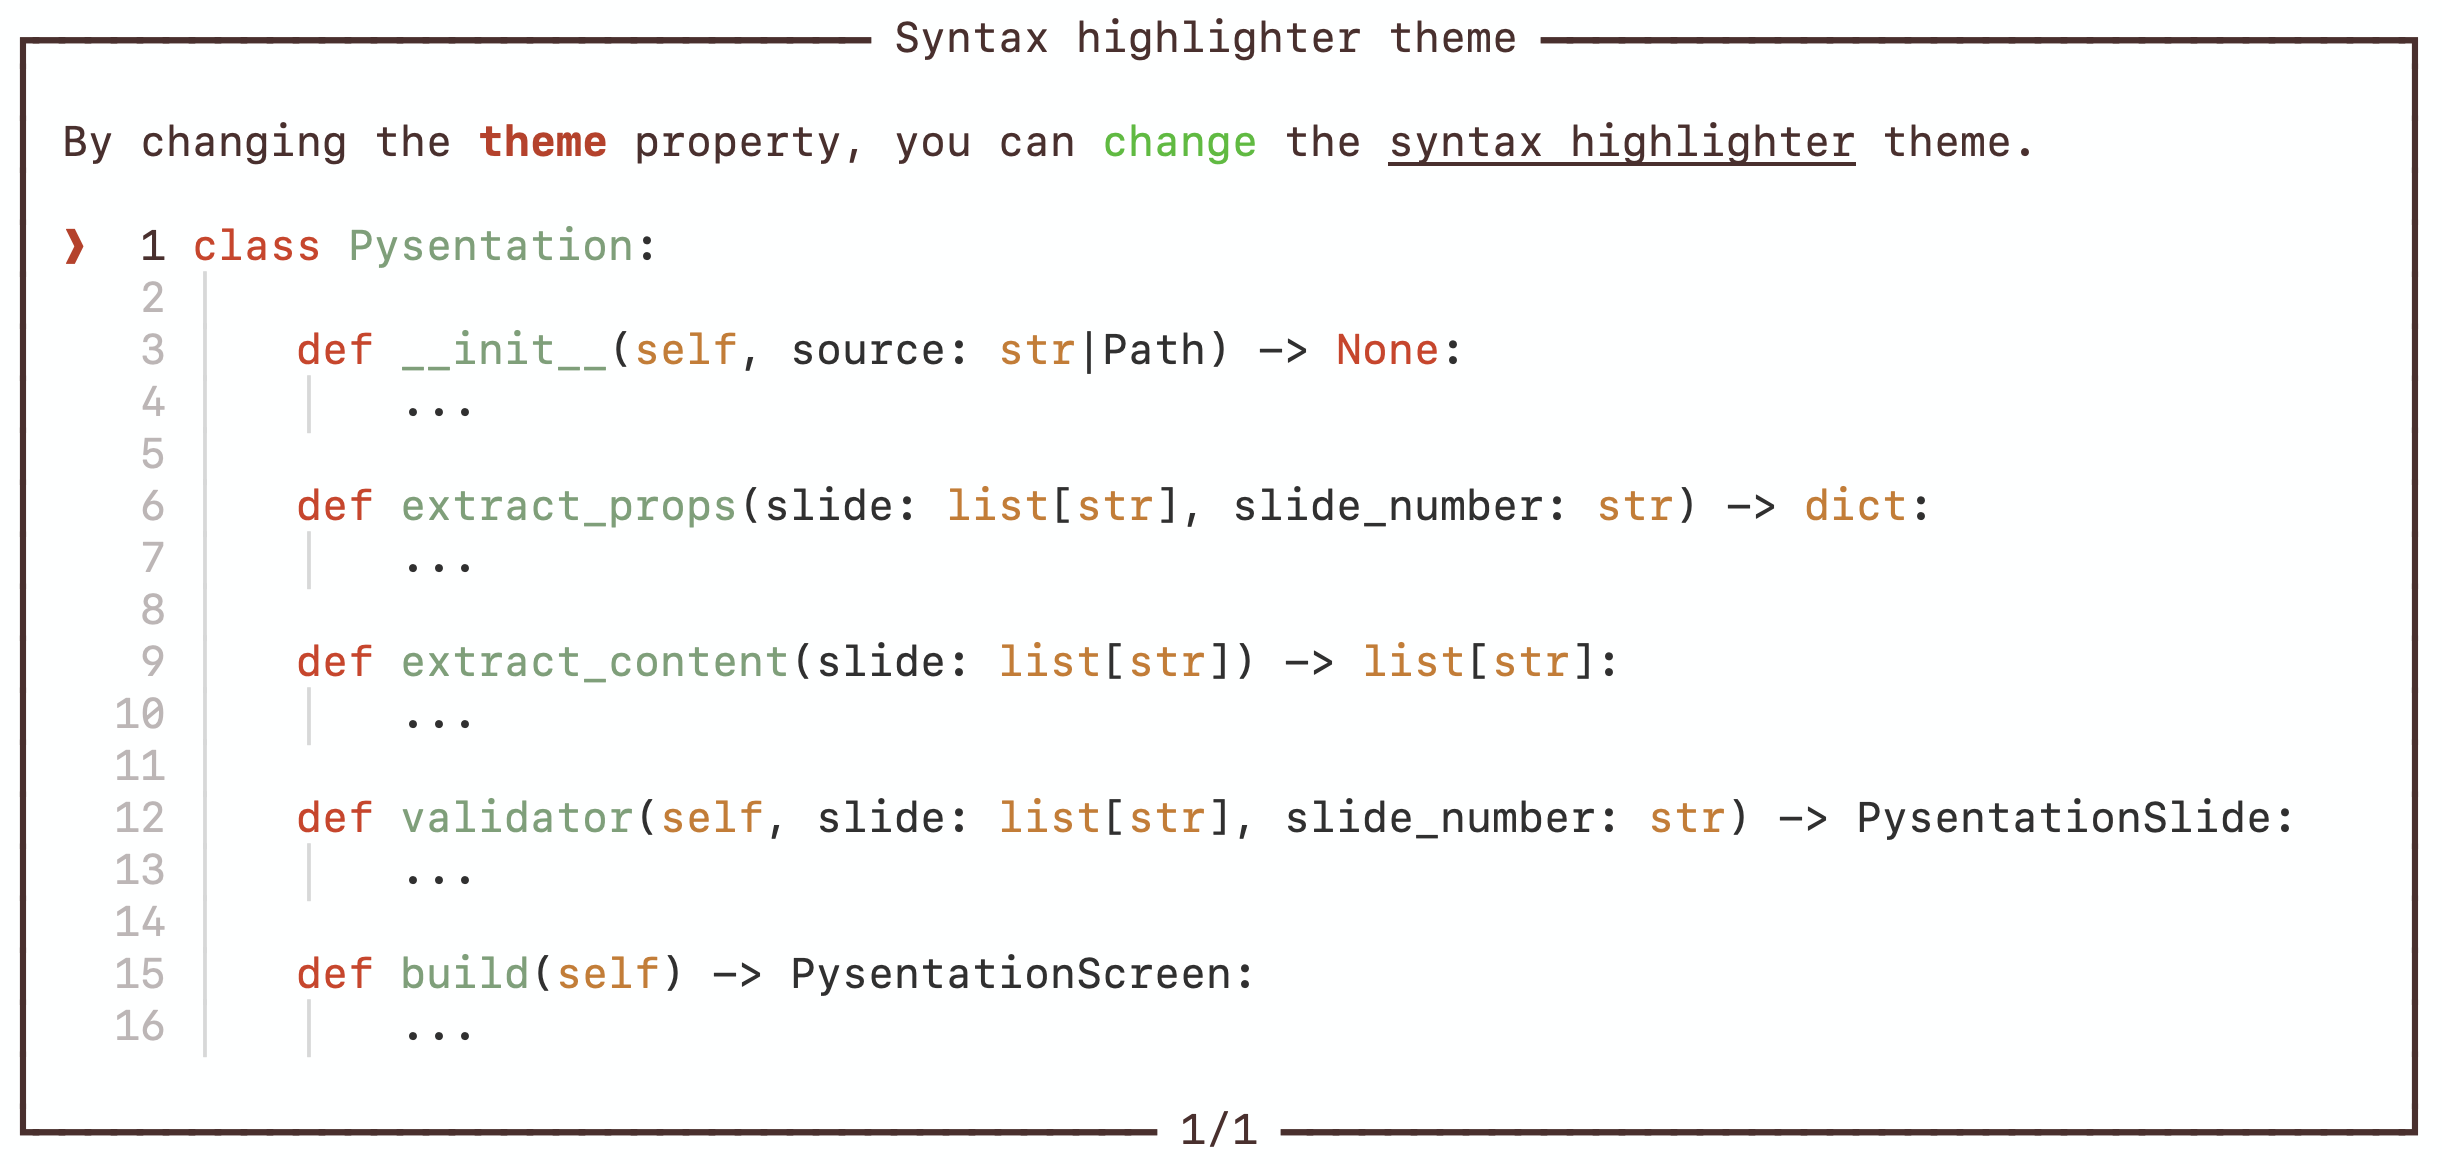
Click <a href="#themes">here</a> to view the available themes.
<br />Expand <a class="anchor" id="expand"></a>
By setting this property to True or False, you can specify whether the size of the slide is the same as the size of the screen or the size of the elements inside it (The default value is True):
#pysentation{

#>slide
#-expand: False

#pysentation}
Interpretable <a class="anchor" id="interpretable"></a>
If this property is True, all the codes inside a slide will be interpreted separately with the help of Python interpreter and the output will be displayed under them in a separate box. But if its value is False, it will not do this (The default value is True):
#pysentation{

#>slide
#-interpretable: False

#pysentation}
Comments <a class="anchor" id="comments"></a>
The comments are actually the explanations that we can see in the slides. The content of the comments can be anything and can be given different modes according to the styles of the <a href="https://github.com/Textualize/rich">rich</a> module.
Comments start with #::
#pysentation{

#>slide
#-title: Wonderful slide
#: Hello!, this is my wonderfull slide.
#: Yes, you see right! I am a comment that can be displayed!
#: Also, I can make the word [yellow]"can"[/yellow] yellow like this.

#pysentation}
Output:

Codes <a class="anchor" id="codes"></a>
The codes have no special characteristics and can be easily written and interpreted if needed:
#pysentation{

#>slide
#-title: Legal age
#: Here is a simple example of if and else statements:
age = 19
if age >= 18:
    print("Access Granted!")
else:
    print("Access Denied! Underage")

#pysentation}
Output:
┏━━━━━━━━━━━━━━━━━━━━━━━━━━━━━━━━━━━━━━━━━ Legal age ━━━━━━━━━━━━━━━━━━━━━━━━━━━━━━━━━━━━━━━━━┓
┃                                                                                             ┃
┃  Here is a simple example of if and else statements:                                        ┃
┃                                                                                             ┃
┃ ❱ 1 age = 19                                                                                ┃
┃   2 if age >= 18:                                                                           ┃
┃   3 │   print("Access Granted!")                                                            ┃
┃   4 else:                                                                                   ┃
┃   5 │   print("Access Denied! Underage")                                                    ┃
┃   6                                                                                         ┃
┃                                                                                             ┃
┃ ╭─ Output ────────────────────────────────────────────────────────────────────────────────╮ ┃
┃ │ Access Granted!                                                                         │ ┃
┃ ╰─────────────────────────────────────────────────────────────────────────────────────────╯ ┃
┃                                                                                             ┃
┗━━━━━━━━━━━━━━━━━━━━━━━━━━━━━━━━━━━━━━━━━━━━ 1/1 ━━━━━━━━━━━━━━━━━━━━━━━━━━━━━━━━━━━━━━━━━━━━┛
Even if the code raises an exception, the error message will be displayed:
#pysentation{

#>slide
#-title: About [italic]ERRORS[/italic] and how to display them
#: Pay attention to the following example of how errors are displayed:
def div(a, b):
    return a / b

print(div(4, 0))
#pysentation}
Output:
┏━━━━━━━━━━━━━━━━━━━━━━━━━━━ About ERRORS and how to display them ━━━━━━━━━━━━━━━━━━━━━━━━━━━━┓
┃                                                                                             ┃
┃  Pay attention to the following example of how errors are displayed:                        ┃
┃                                                                                             ┃
┃ ❱ 1 def div(a, b):                                                                          ┃
┃   2 │   return a / b                                                                        ┃
┃   3                                                                                         ┃
┃   4 print(div(4, 0))                                                                        ┃
┃                                                                                             ┃
┃ ╭─ <Error> ───────────────────────────────────────────────────────────────────────────────╮ ┃
┃ │ Exception Type: ZeroDivisionError                                                       │ ┃
┃ │ Exception Message: division by zero                                                     │ ┃
┃ │ Scope <module>, Line 4                                                                  │ ┃
┃ ╰─────────────────────────────────────────────────────────────────────────────────────────╯ ┃
┃                                                                                             ┃
┗━━━━━━━━━━━━━━━━━━━━━━━━━━━━━━━━━━━━━━━━━━━━ 1/1 ━━━━━━━━━━━━━━━━━━━━━━━━━━━━━━━━━━━━━━━━━━━━┛
Lines <a class="anchor" id="lines"></a>
Lines are the simplest elements of slides. The task of these line elements is to draw a horizontal line to separate the screen, and its sign is #_line.
#pysentation{

#>slide
#-title: About lines with merge sort
#-interpretable: False

#:Create sub_array2 ← A[start..mid] and sub_array2 ← A[mid+1..end]
def mergeSort(arr):
    mid = len(arr)//2
    sub_array1 = arr[:mid]
    sub_array2 = arr[mid:]
#_line
#:Sort the two halves:
    mergeSort(sub_array1)
    mergeSort(sub_array2)
    # Initial values for pointers that we use to keep track of where we are in each array
    i = j = k = 0
#_line
#:Until we reach the end of either start or end, pick larger among elements start and end and place them in the correct position in the sorted array:
    while i < len(sub_array1) and j < len(sub_array2):
        if sub_array1[i] < sub_array2[j]:
            arr[k] = sub_array1[i]
            i += 1
        else:
            arr[k] = sub_array2[j]
            j += 1
        k += 1
#_line
#:When all elements are traversed in either arr1 or arr2, pick up the remaining elements and put in sorted array:
    while i < len(sub_array1):
        arr[k] = sub_array1[i]
        i += 1
        k += 1

    while j < len(sub_array2):
        arr[k] = sub_array2[j]
        j += 1
        k += 1
#pysentation}
Output:
┏━━━━━━━━━━━━━━━━━━━━━━━━━━━━━━━━ About lines with merge sort ━━━━━━━━━━━━━━━━━━━━━━━━━━━━━━━━┓
┃                                                                                             ┃
┃ Create sub_array2 ← A and sub_array2 ← A                                                    ┃
┃                                                                                             ┃
┃ ❱ 1 def mergeSort(arr):                                                                     ┃
┃   2 │   mid = len(arr)//2                                                                   ┃
┃   3 │   sub_array1 = arr[:mid]                                                              ┃
┃   4 │   sub_array2 = arr[mid:]                                                              ┃
┃                                                                                             ┃
┃ ─────────────────────────────────────────────────────────────────────────────────────────── ┃
┃                                                                                             ┃
┃ Sort the two halves:                                                                        ┃
┃                                                                                             ┃
┃   1 │   mergeSort(sub_array1)                                                               ┃
┃   2 │   mergeSort(sub_array2)                                                               ┃
┃   3 │   # Initial values for pointers that we use to keep track of where we are in each ... ┃
┃   4 │   i = j = k = 0                                                                       ┃
┃                                                                                             ┃
┃ ─────────────────────────────────────────────────────────────────────────────────────────── ┃
┃                                                                                             ┃
┃ Until we reach the end of either start or end, pick larger among elements start and end and ┃
┃ place them in the correct position in the sorted array:                                     ┃
┃                                                                                             ┃
┃   1 │   while i < len(sub_array1) and j < len(sub_array2):                                  ┃
┃   2 │   │   if sub_array1[i] < sub_array2[j]:                                               ┃
┃   3 │   │   │   arr[k] = sub_array1[i]                                                      ┃
┃   4 │   │   │   i += 1                                                                      ┃
┃   5 │   │   else:                                                                           ┃
┃   6 │   │   │   arr[k] = sub_array2[j]                                                      ┃
┃   7 │   │   │   j += 1                                                                      ┃
┃   8 │   │   k += 1                                                                          ┃
┃                                                                                             ┃
┃ ─────────────────────────────────────────────────────────────────────────────────────────── ┃
┃                                                                                             ┃
┃ When all elements are traversed in either arr1 or arr2, pick up the remaining elements and  ┃
┃ put in sorted array:                                                                        ┃
┃                                                                                             ┃
┃   1 │   while i < len(sub_array1):                                                          ┃
┃   2 │   │   arr[k] = sub_array1[i]                                                          ┃
┃   3 │   │   i += 1                                                                          ┃
┃   4 │   │   k += 1                                                                          ┃
┃   5 │                                                                                       ┃
┃   6 │   while j < len(sub_array2):                                                          ┃
┃   7 │   │   arr[k] = sub_array2[j]                                                          ┃
┃   8 │   │   j += 1                                                                          ┃
┃   9 │   │   k += 1                                                                          ┃
┃                                                                                             ┃
┗━━━━━━━━━━━━━━━━━━━━━━━━━━━━━━━━━━━━━━━━━━━━━ 1/1 ━━━━━━━━━━━━━━━━━━━━━━━━━━━━━━━━━━━━━━━━━━━┛
Slideshow screen <a class="anchor" id="slideshow"></a>
The slideshow screen is the main screen for displaying slides. When we have prepared a pysentation file, we can run the slides with the help of the following command and manage it with the help of special keys:
pysentation my_file.py | my_file.pysent
Hot keys <a class="anchor" id="hot_keys"></a>
The following table introduces the hot keys:
| Key | Action |
|---|---|
| Right → | Next slide. |
| Left ← | Previous slide. |
| Up ↑ | Highlight top line. |
| Down ↓ | Highlight bottom line. |
| f | Go to first slide. |
| l | Go to last slide. |
| r | Reset the current slide. |
| shift + r | Reset the screen. |
| j | jump to a slide by slide number |
| shift + s | Search by slide title |
| shift + k | Display The hot-keys guide. |
| q | Quit. |
Options <a class="anchor" id="options"></a>
Options are settings that can be set before running the screen and slides.
You can use -h or --help to see them:
pysentation --help
Output:
Options:
  -f, --from INTEGER      Start showing the screen from the selected slide.
  -c, --color TEXT        Set color for all slides.
  -t, --theme TEXT        Set syntax highlighter theme for all slides.
  -d, --disable           Disable code interpretation for all slides.
  -p, --property INTEGER  Display the properties of the selected slide.
  -s, --slides            Display the slides on the screen with their
                          position.
  -e, --export PATH       Export a Python file to an encrypted file with a
                          .pysent suffix.
  -o, --output PATH       Writing all slides in order in a text file.
  -v, --version           Display the current version of pysentation installed
                          on the system.
  -h, --help              Show this message and exit.
Colors and themes <a class="anchor" id="colors_and_themes"></a>
There are many colors and themes to use in pysentation that all follow the <a href="https://github.com/Textualize/rich">rich</a> module. They are mentioned below.
<br />Colors <a class="anchor" id="colors"></a>
This is a list of 16 main colors that you can use in pysentation. You can see the information of more diverse colors from <a href="https://rich.readthedocs.io/en/stable/appendix/colors.html#appendix-colors">here</a>.
Note: To use any color, you can mention its name, number, hex code and rgb number.
| Color | Name | Number | Hex | RGB |
|---|---|---|---|---|
 | "black" | 0 | - | - |
 | "red" | 1 | - | - |
 | "green" | 2 | - | - |
 | "yellow" | 3 | - | - |
 | "blue" | 4 | - | - |
 | "magenta" | 5 | - | - |
 | "cyan" | 6 | - | - |
 | "white" | 7 | - | - |
 | "bright_black" | 8 | - | - |
 | "bright_red" | 9 | - | - |
 | "bright_green" | 10 | - | - |
 | "bright_yellow" | 11 | - | - |
 | "bright_blue" | 12 | - | - |
 | "bright_magenta" | 13 | - | - |
 | "bright_cyan" | 14 | - | - |
 | "bright_white" | 15 | - | - |
Themes <a class="anchor" id="themes"></a>
Popular and high-quality themes are listed so that you can use them. Visit <a href="https://pygments.org/styles/">here</a> for more.
Note: To use these themes, you must mention its full name, and in case of mistake, the default theme will be selected.
| Name | Light | Dark |
|---|---|---|
| bw | :heavy_check_mark: | |
| sas | :heavy_check_mark: | |
| staroffice | :heavy_check_mark: | |
| xcode | :heavy_check_mark: | |
| default | :heavy_check_mark: | |
| monokai | :heavy_check_mark: | |
| lightbulb | :heavy_check_mark: | |
| github-dark | :heavy_check_mark: | |
| rrt | :heavy_check_mark: | |
| gruvbox-dark | :heavy_check_mark: | |
| gruvbox-light | :heavy_check_mark: | |
| solarized-light | :heavy_check_mark: | |
| solarized-dark | :heavy_check_mark: | |
| nord | :heavy_check_mark: | |
| paraiso-light | :heavy_check_mark: | |
| paraiso-dark | :heavy_check_mark: | |
| autumn | :heavy_check_mark: | |
| vim | :heavy_check_mark: | |
| vs | :heavy_check_mark: | |
| one-dark | :heavy_check_mark: | |
| dracula | :heavy_check_mark: |
Bugs/Requests <a class="anchor" id="bugs_requests"></a>
Please send bug reports and feature requests through <a href="https://github.com/mimseyedi/pysentation/issues">github issue tracker</a>.
<br />License <a class="anchor" id="license"></a>
pysentation is a free and open source project under the GPL-3 LICENSE. Any contribution is welcome. You can do this by registering a pull request.
<br />