Awesome
boundary-attack
Implementation of the Boundary Attack algorithm as described in:
The algorithm is also implemented in Foolbox as part of a toolkit of adversarial techniques.
Grumpy Cat's secret identity is Doge
<div> <img src="https://raw.githubusercontent.com/greentfrapp/boundary-attack/master/images/sample_4_label273_dingo/20180422_231253_dingo.png" alt="doge_1" width="100px" height="whatever" style="display: inline-block;"> <img src="https://raw.githubusercontent.com/greentfrapp/boundary-attack/master/images/sample_4_label273_dingo/20180422_231254_dingo.png" alt="doge_2" width="100px" height="whatever" style="display: inline-block;"> <img src="https://raw.githubusercontent.com/greentfrapp/boundary-attack/master/images/sample_4_label273_dingo/20180422_231307_dingo.png" alt="doge_3" width="100px" height="whatever" style="display: inline-block;"> <img src="https://raw.githubusercontent.com/greentfrapp/boundary-attack/master/images/sample_4_label273_dingo/20180422_231453_dingo.png" alt="doge_4" width="100px" height="whatever" style="display: inline-block;"> <img src="https://raw.githubusercontent.com/greentfrapp/boundary-attack/master/images/sample_4_label273_dingo/20180422_232244_dingo.png" alt="doge_5" width="100px" height="whatever" style="display: inline-block;"> <img src="https://raw.githubusercontent.com/greentfrapp/boundary-attack/master/images/sample_4_label273_dingo/20180422_234213_dingo.png" alt="doge_6" width="100px" height="whatever" style="display: inline-block;"> </div>All of the above images are classified as 273: 'dingo, warrigal, warragal, Canis dingo' by the Keras ResNet-50 model pretrained on ImageNet.
Instructions
For starters, just run:
$ python boundary-attack-resnet.py
This will create adversarial images using the Bad Joke Eel and Awkward Moment Seal images, for attacking the Keras ResNet-50 model (pretrained on ImageNet). You can also change the files to other images in the images/original folder or add your own images. All input images will be reshaped to 224 x 224 x3 arrays.
The script will take ~10 minutes to create a decent adversarial image (similar to the second last image in the above series of images) on a 1080 Ti GPU.
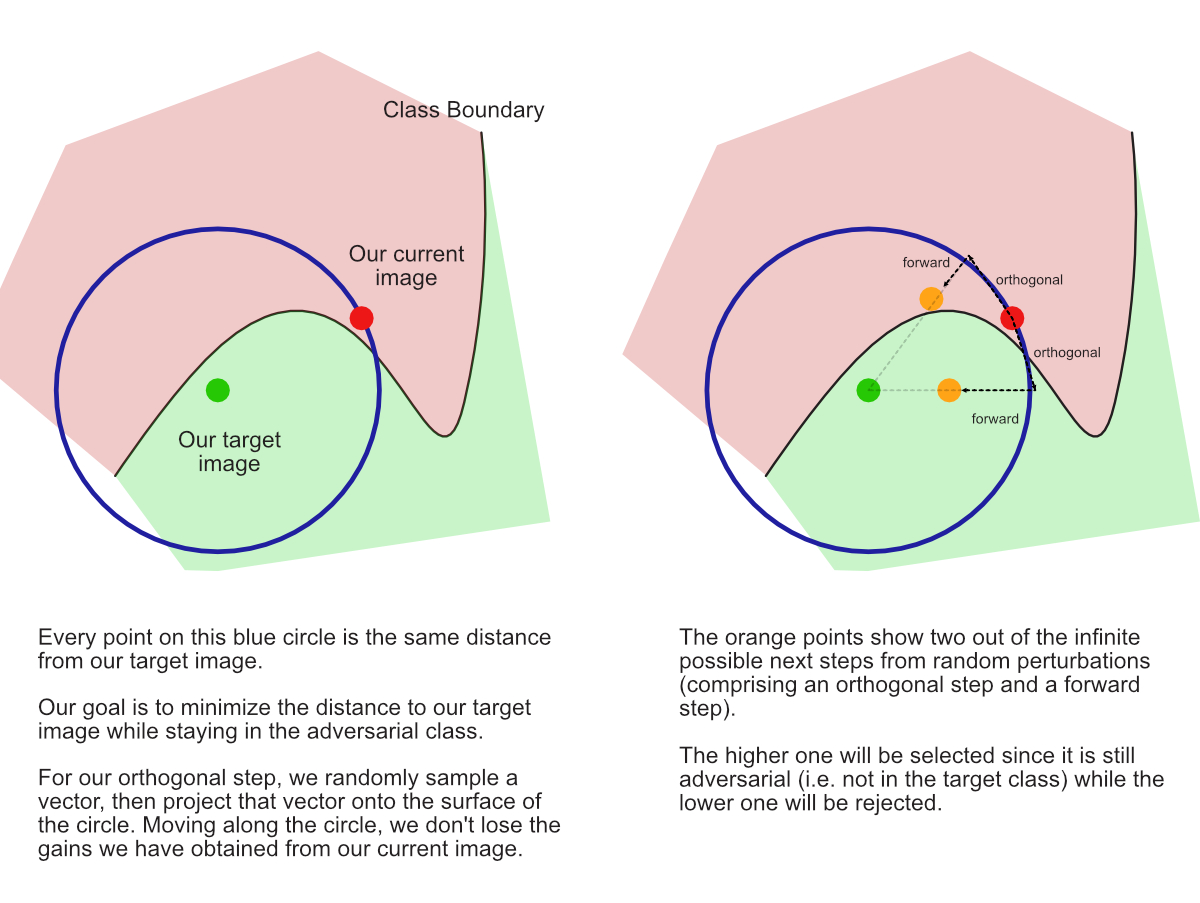
Primer to "Orthogonal Perturbation" / "Projecting onto Sphere"
Here is a brief explanation about the orthogonal perturbation step and why we
draw a new random direction by drawing from an iid Gaussian and projecting on a sphere
(See Figure 2 in Wieland et al.)

MNIST Demo
<img src="https://raw.githubusercontent.com/greentfrapp/boundary-attack/master/demo/demo_screenshot.png" alt="Demo Screenshot" width="500px" height="whatever">There is also a GUI demo (uses Python3) for MNIST images, using a local convolutional model that follows the architecture described here, which achieved 98% accuracy on the MNIST test set.
To run the demo, run the following commands:
$ cd demo
$ open index.html
$ python3 -m server
Wait for the following message to appear:
* Running on http://0.0.0.0:8080/ (Press CTRL+C to quit)
Then enter the labels for the attack and target and hit Enter. Wait for the MNIST images to load then click on the Attack! button.
This is much faster than the above script and will take far less than a minute to generate an adequate adversarial image on a Macbook Pro.