Awesome
Stable Diffusion in Docker
Run the official Stable Diffusion releases on Huggingface in a GPU accelerated Docker container.
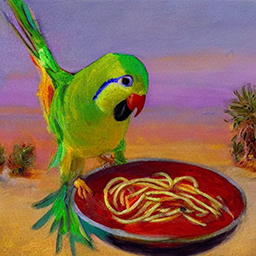
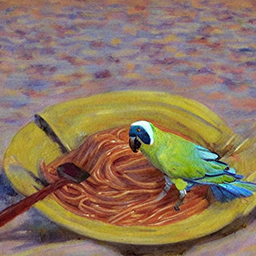
./build.sh run 'An impressionist painting of a parakeet eating spaghetti in the desert'
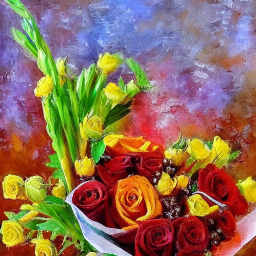
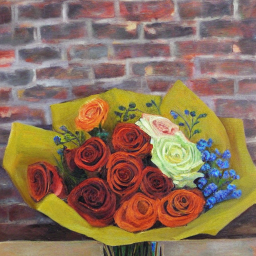
./build.sh run --image parakeet_eating_spaghetti.png --strength 0.6 'Bouquet of roses'
Before you start
Minimum requirements
By default, the pipeline uses the full model and weights which requires a CUDA
capable GPU with 8GB+ of VRAM. It should take a few seconds to create one image.
On less powerful GPUs you may need to modify some of the options; see the
Examples section for more details. If you lack a suitable GPU you
can set the options --device cpu and --onnx instead.
Huggingface token
Since it uses the official model, you will need to create a user access token
in your Huggingface account. Save the
user access token in a file called token.txt and make sure it is available
when building the container. The token content should begin with hf_...
Quickstart
The pipeline is managed using a single build.sh script.
Pull the latest version of stable-diffusion-docker using ./build.sh pull.
You will need to use the option --token to specify a valid user access token
when using ./build run.
Alternately, build the image locally before running it.
Build
Make sure your user access token is saved in a file called
token.txt.
To build:
./build.sh build # or just ./build.sh
Run
Text-to-Image (txt2img)
Create an image from a text prompt.
To run:
./build.sh run 'Andromeda galaxy in a bottle'
Image-to-Image (img2img)
Create an image from an existing image and a text prompt.
First, copy an image to the input folder. Next, to run:
./build.sh run --image image.png 'Andromeda galaxy in a bottle'
Depth-Guided Diffusion (depth2img)
Modify an existing image with its depth map and a text prompt.
First, copy an image to the input folder. Next, to run:
./build.sh run --model 'stabilityai/stable-diffusion-2-depth' \
  --image image.png 'A detailed description of the objects to change'
Instruct Pix2Pix (pix2pix)
Modify an existing image with a text prompt.
First, copy an image to the input folder. Next, to run:
./build.sh run --model 'timbrooks/instruct-pix2pix' \
  --image image.png 'A detailed description of the objects to change'
Stable UnCLIP Variations (unclip)
Create different versions of an image with a text prompt.
First, copy an image to the input folder. Next, to run:
./build.sh run --model 'stabilityai/stable-diffusion-2-1-unclip-small' \
  --image image.png 'A detailed description of the image'
Image Upscaling (upscale4x)
Create a high resolution image from an existing image with a text prompt.
First, copy an image to the input folder. Next, to run:
./build.sh run --model 'stabilityai/stable-diffusion-x4-upscaler' \
  --image image.png 'Andromeda galaxy in a bottle'
Diffusion Inpainting (inpaint)
Modify specific areas of an existing image with an image mask and a text prompt.
First, copy an image and an image mask to the input folder. White areas of the
mask will be diffused and black areas will be kept untouched. Next, to run:
./build.sh run --model 'runwayml/stable-diffusion-inpainting' \
  --image image.png --mask mask.png 'Andromeda galaxy in a bottle'
Options
The following are the most common options:
--prompt [PROMPT]: the prompt to render into an image--model [MODEL]: the model used to render images (default isCompVis/stable-diffusion-v1-4)--height [HEIGHT]: image height in pixels (default 512, must be divisible by 64)--width [WIDTH]: image width in pixels (default 512, must be divisible by 64)--iters [ITERS]: number of times to run pipeline (default 1)--samples [SAMPLES]: number of images to create per run (default 1)--scale [SCALE]: how closely the image should follow the prompt (default 7.5)--scheduler [SCHEDULER]: override the scheduler used to denoise the image (defaultNone)--seed [SEED]: RNG seed for repeatability (default is a random seed)--steps [STEPS]: number of sampling steps (default 50)
Other options:
--attention-slicing: use less memory but decrease inference speed (default is no attention slicing)--device [DEVICE]: the cpu or cuda device to use to render images (defaultcuda)--half: use float16 tensors instead of float32 (defaultfloat32)--image [IMAGE]: the input image to use for image-to-image diffusion (defaultNone)--image-scale [IMAGE_SCALE]: how closely the image should follow the original image (defaultNone)--mask [MASK]: the input mask to use for diffusion inpainting (defaultNone)--negative-prompt [NEGATIVE_PROMPT]: the prompt to not render into an image (defaultNone)--onnx: use the onnx runtime for inference (default is off)--skip: skip safety checker (default is the safety checker is on)--strength [STRENGTH]: diffusion strength to apply to the input image (default 0.75)--token [TOKEN]: specify a Huggingface user access token at the command line instead of reading it from a file (default is a file)--vae-slicing: use less memory when creating large batches of images (default is no vae slicing)--vae-tiling: use less memory when creating ultra-high resolution images but massively decrease inference speed (default is no vae tiling)--xformers-memory-efficient-attention: use less memory but require the xformers library (default is that xformers is not required)
Some of the original txt2img.py options have been renamed
for easy-of-use and compatibility with other pipelines:
| txt2img | stable-diffusion-docker |
|---|---|
--H | --height |
--W | --width |
--n_iter | --iters |
--n_samples | --samples |
--ddim_steps | --steps |
Examples
These commands are both identical:
./build.sh run 'abstract art'
./build.sh run --prompt 'abstract art'
Set the seed to 42:
./build.sh run --seed 42 'abstract art'
Options can be combined:
./build.sh run --scale 7.0 --seed 42 'abstract art'
Many popular models are supported out-of-the-box:
| Model Name | Option using --model |
|---|---|
| Stable Diffusion 1.4 | 'CompVis/stable-diffusion-v1-4' |
| Stable Diffusion 1.5 | 'runwayml/stable-diffusion-v1-5' |
| Stable Diffusion 2.0 | 'stabilityai/stable-diffusion-2' |
| Stable Diffusion 2.1 | 'stabilityai/stable-diffusion-2-1' |
| Stable Diffusion XL | 'stabilityai/stable-diffusion-xl-base-1.0' |
| OpenJourney 1.0 | 'prompthero/openjourney' |
| Dreamlike Diffusion 1.0 | 'dreamlike-art/dreamlike-diffusion-1.0' |
| and more! | ... |
./build.sh run --model 'prompthero/openjourney' --prompt 'abstract art'
On systems without enough GPU VRAM, you can try mixing and matching options:
- Give Docker Desktop more resources by increasing the CPU, memory, and swap in the Settings -> Resources section if the container is terminated
- Make images smaller than 512x512 using
--heightand--widthto decrease memory use and increase image creation speed - Use
--halfto decrease memory use but slightly decrease image quality - Use
--attention-slicingto decrease memory use but also decrease image creation speed - Use
--xformers-memory-efficient-attentionto decrease memory use if the pipeline and the hardware supports the option - Decrease the number of samples and increase the number of iterations with
--samplesand--itersto decrease overall memory use - Skip the safety checker with
--skipto run less code
./build.sh run --height 256 --width 256 --half \
  --attention-slicing --xformers-memory-efficient-attention \
  --samples 1 --iters 1 --skip --prompt 'abstract art'
On Windows, if you aren't using WSL2 and instead use MSYS, MinGW, or Git Bash,
prefix your commands with MSYS_NO_PATHCONV=1 (or export it beforehand):
MSYS_NO_PATHCONV=1 ./build.sh run --half --prompt 'abstract art'
Outputs
Model
The model and other files are cached in a volume called huggingface. The
models are stored in <volume>/diffusers/<model>/snapshots/<githash>/unet/<weights>.
Checkpoint files (ckpts) are unofficial versions of the official models, and
so these are not part of the official release.
Images
The images are saved as PNGs in the output folder using the prompt text. The
build.sh script creates and mounts this folder as a volume in the container.
Contributing
See the CONTRIBUTING.md file for more details. In short, follow the style guidelines, agree to the Developer Certificate of Origin, and submit a PR.