Awesome
Day Planner (OG)
The Day Planner plugin is your pomodoro-like assistant for managing daily tasks in Obsidian. Set specific blocks of time for various activities, and the plugin keeps track, offering you real-time updates, impending block-end notifications, and a visual gauge of your day's progress. Not only does it help in planning, but it also actively marks off the blocks as the day progresses and highlights the current block, keeping you on track.
This plugin is a fork of the early Obsidian Day Planner plugin written by James Lynch. The Day Planner Plugin has evolved with new features like drag-and-drop task creation and a weekly view. This "OG" version holds onto the essence of the original. In the interest of stability, I have disabled the Mermaid Gantt chart feature. Reach out if you're interested in this feature, and we can work towards reintegrating it.
This plugin will change your notes
The Day Planner plugin manages pomodoro timers from a task list in a Markdown note.
When day planner is associated with a note and "Complete past planner items" is enabled, Day planner will update the contents of that note.
This may cause issues if you have the plugin (and that setting) enabled on multiple active devices with sync functionality (of any kind). To avoid this issue, I usually have Day Planner active only one device (e.g. my Desktop). That one device updates the time, and the sync utility handles forwarding and merging the updates to other devices.
Please try the plugin in a test vault first, and, most importantly, make sure you have your notes backed up in cloud storage or Git.
Features
- Generate a day planner for you each day or create a day planner in any note you choose.
- Status bar updates on progress with information on your current and next tasks. You can click on the status bar to access the note for today's day planner.
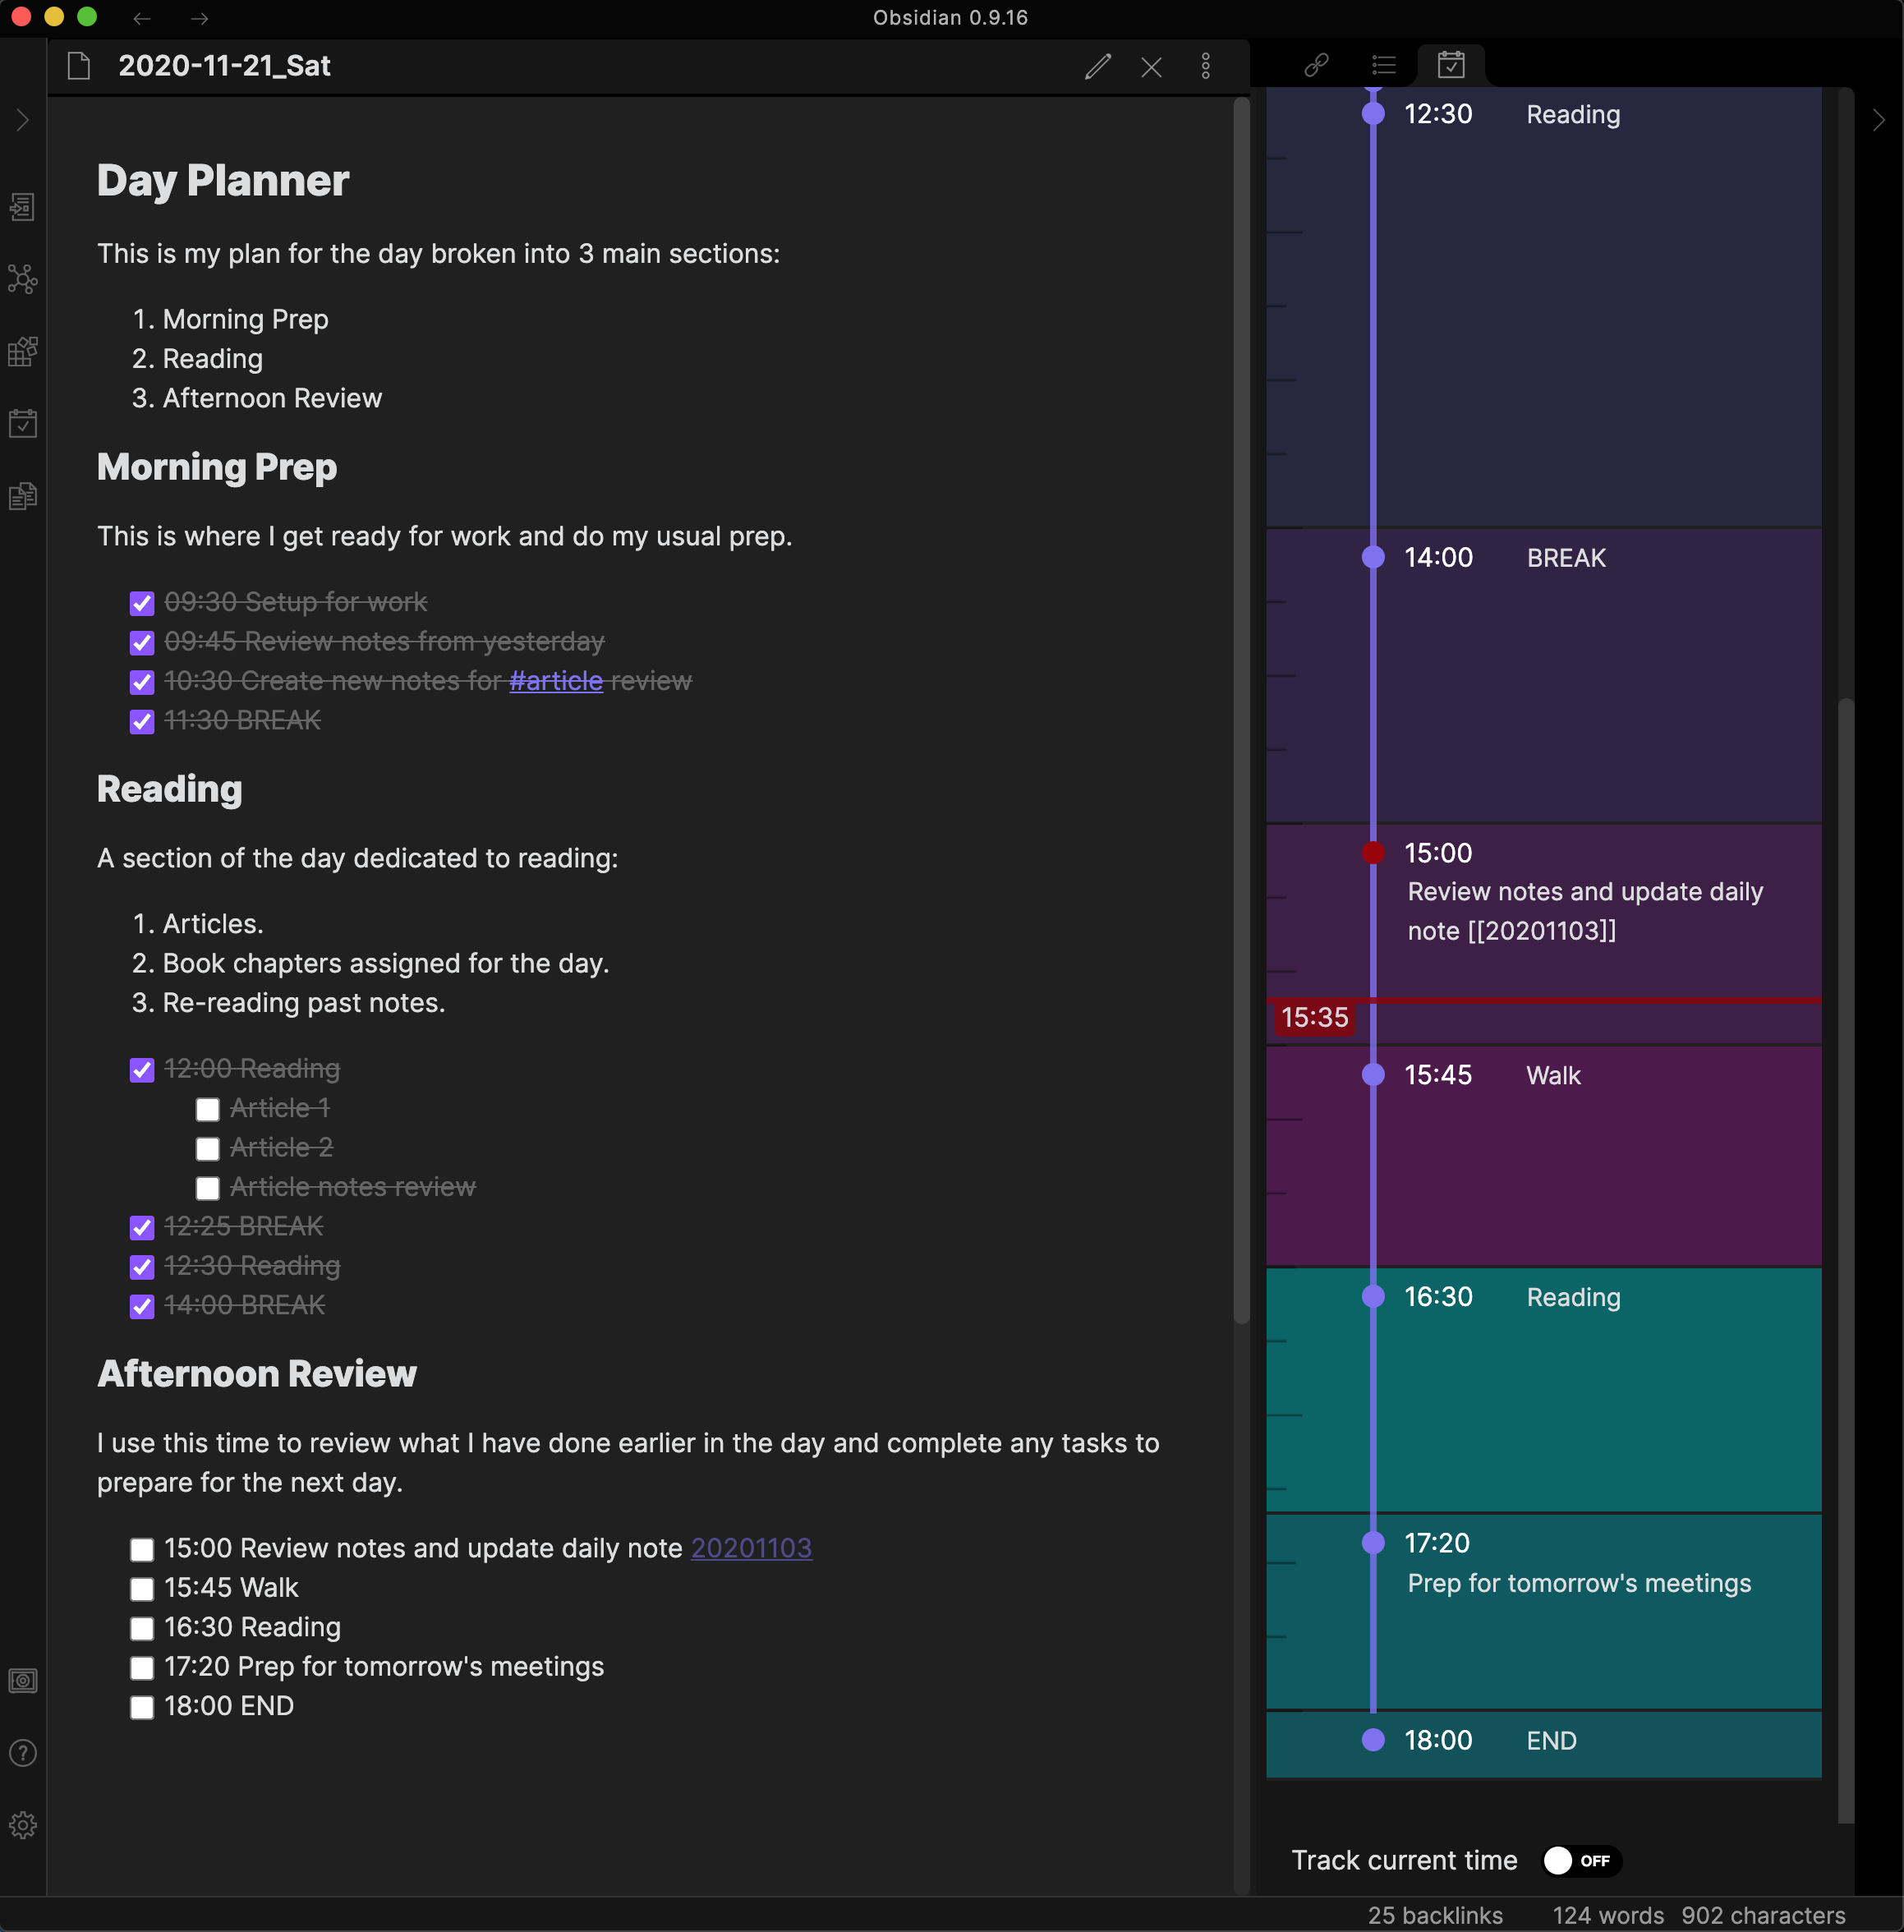
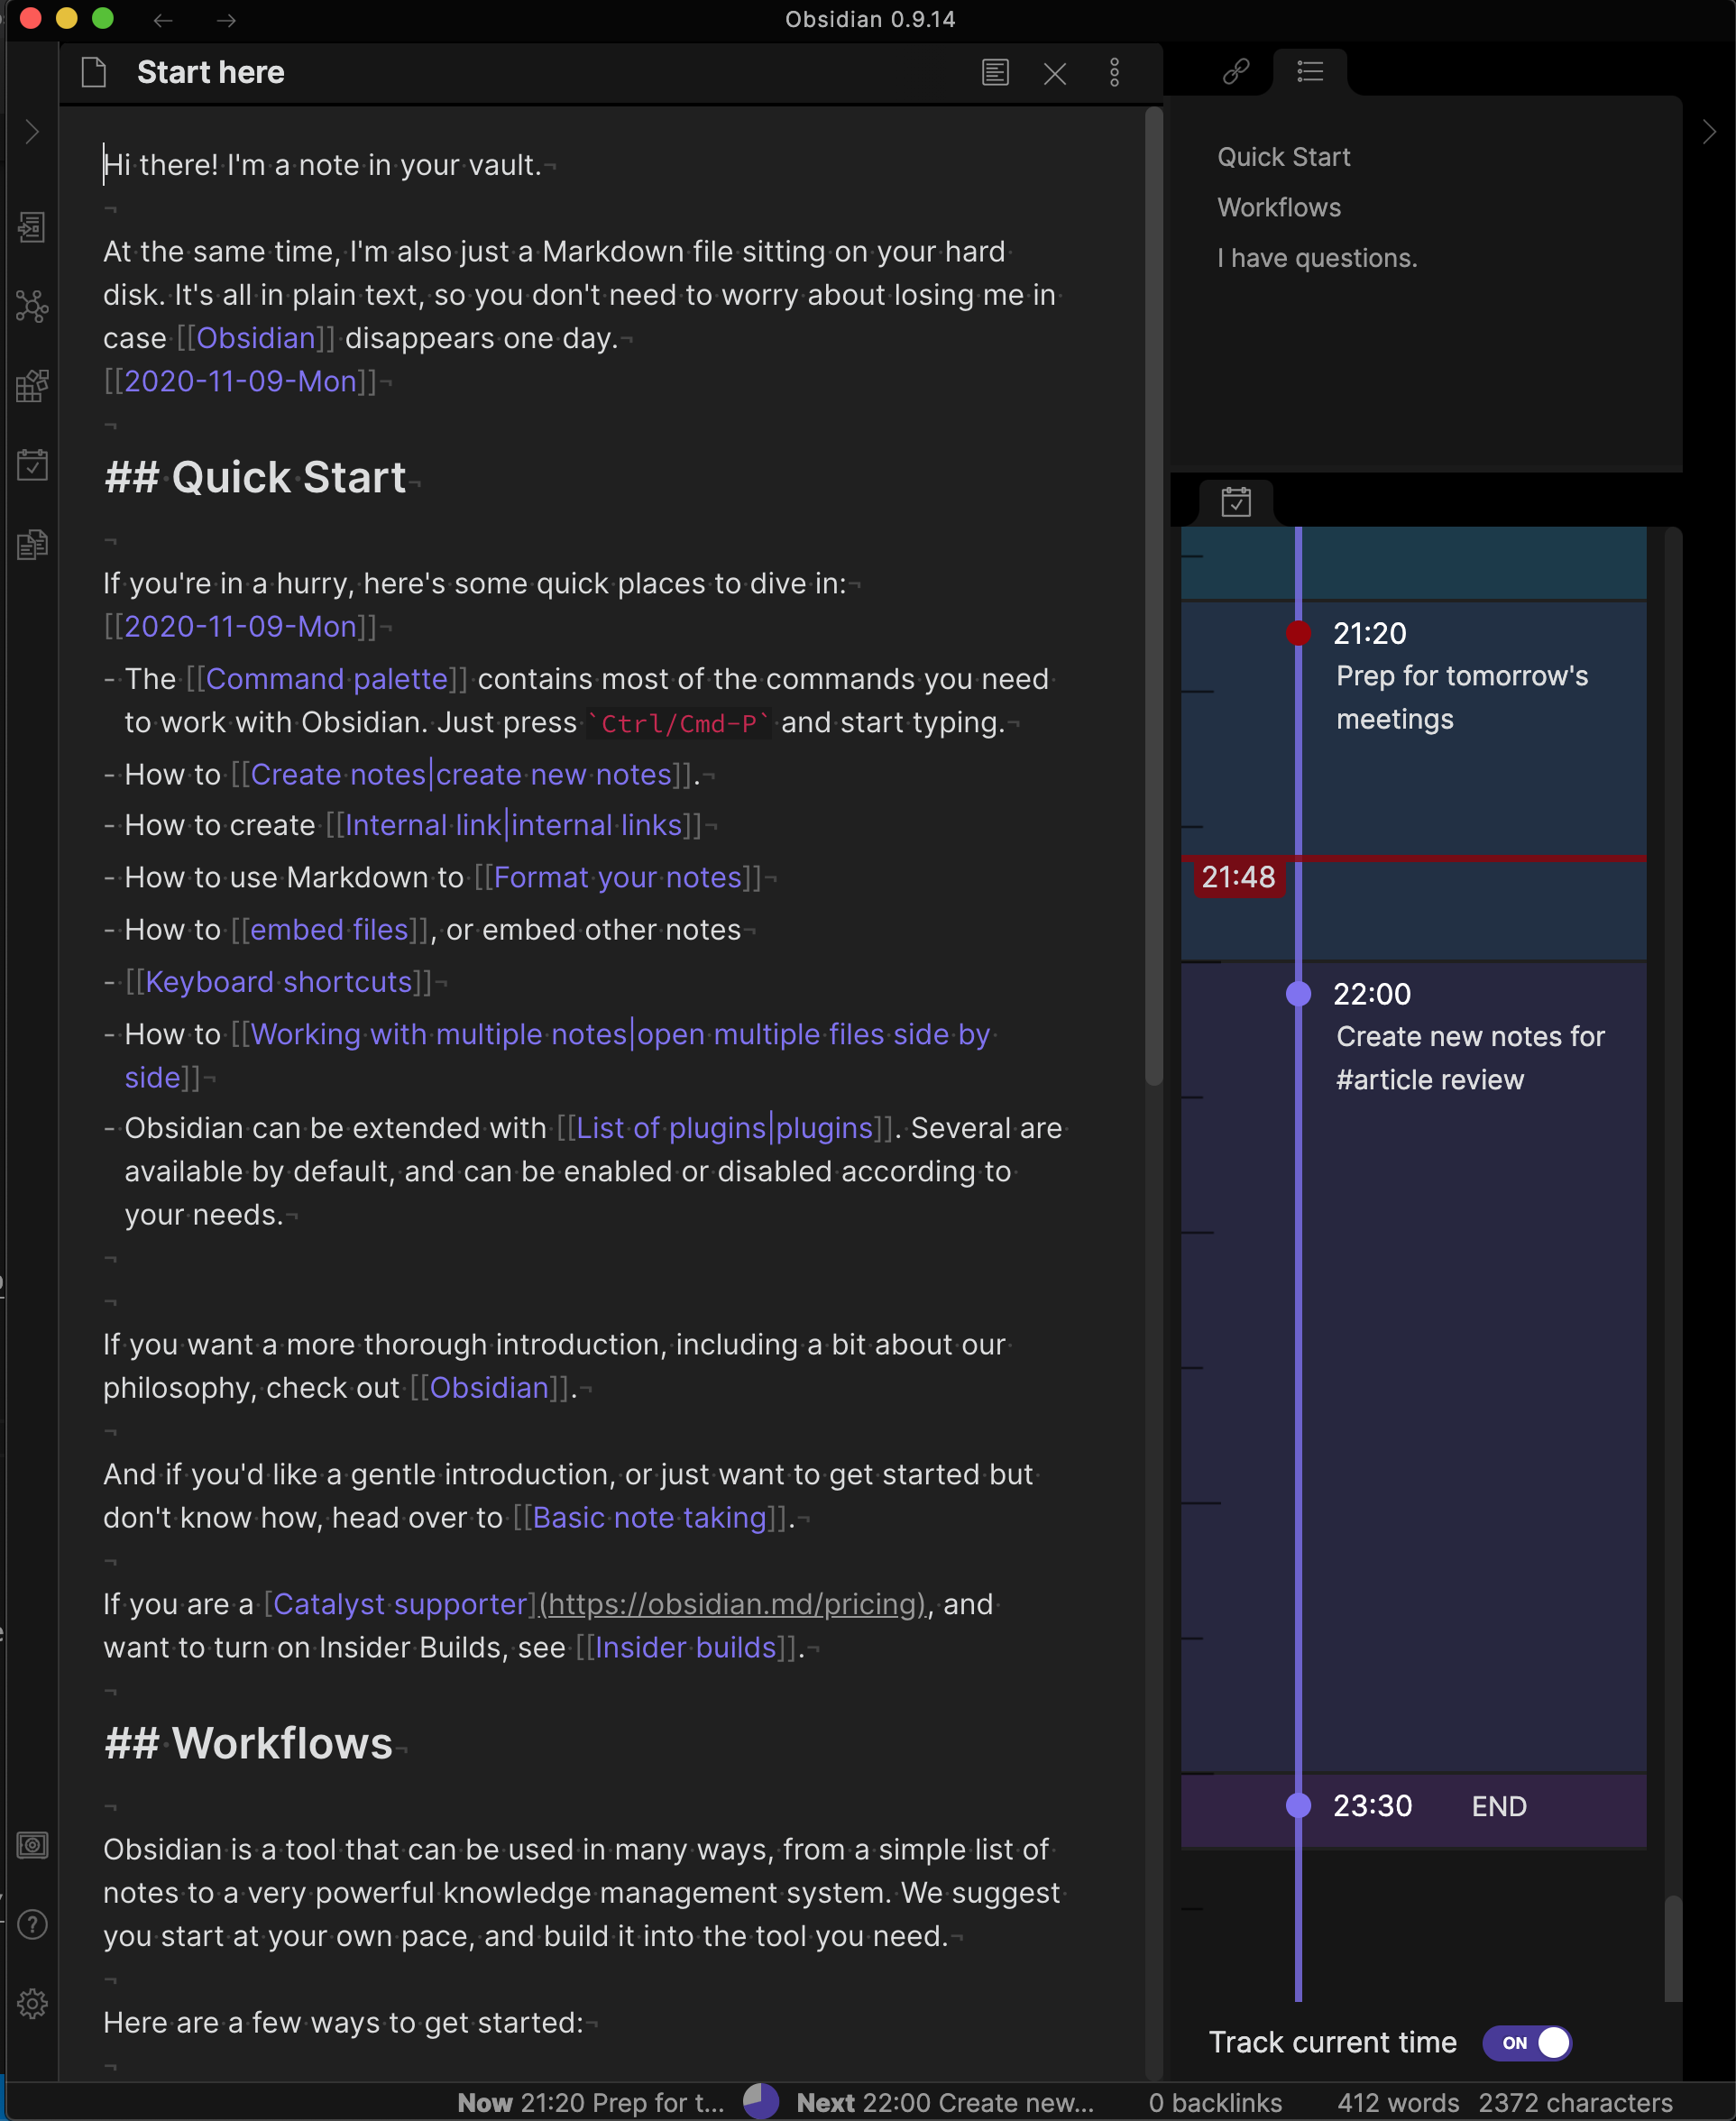
- Timeline view showing your tasks laid out on a vertical timeline.

Usage
Once installed, the plugin will create a folder called Day Planners in the root of your vault. A note for today will automatically be created with the file name format Day Planners/Day Planner-YYYYMMDD.md.
You can choose to use the Command Mode instead to add a Day Planner for the current day to any note.
Day Planner Note
Within the note, create a checklist with time blocks and tasks, which will be automatically tracked as the day progresses. You can include headers and other content between tasks for better organization.
Here’s an example of a Day Planner note:
## Day Planner

This is my plan for the day broken into 3 main sections:
1. Morning Prep
2. Reading
3. Afternoon Review

### Morning Prep

This is where I get ready for work and do my usual prep.

- [ ] 09:30 Setup for work
- [ ] 09:45 Review notes from yesterday
- [ ] 10:30 Create new notes for #article review
- [ ] 11:30 BREAK

### Reading

A section of the day dedicated to reading:

1. Articles.
2. Book chapters assigned for the day.
3. Re-reading past notes.

- [ ] 12:00 Reading
  - [ ] Article 1
  - [ ] Article 2
  - [ ] Article notes review
- [ ] 12:25 BREAK
- [ ] 12:30 Reading
- [ ] 14:00 BREAK

### Afternoon Review

I use this time to review what I have done earlier in the day and complete any tasks to prepare for the next day.

- [ ] 15:00 Review notes and update daily note [[20201103]]
- [ ] 15:45 Walk
- [ ] 16:30 Reading
- [ ] 17:20 Prep for tomorrow's meetings
- [ ] 18:00 END
This is also provided as a file in day-planner-example.md.
Day Planner Note structure
-
The
# Day Plannerheading marks the beginning of the Day Planner in a note. This heading can be#,##,###or####. -
Tasks are defined as
- [ ] HH:mm Task textThe HH:mm syntax is crucial as it designates the specific block timings. 24 hour times should be used.
Nested checklist items or bullets are now also supported to capture sub-tasks of a timed task. Timed tasks must be at the top level of the checkbox list.
-
BREAKandENDare essential keywords defining breaks and the conclusion of the day's tracking. You can customize these in the Day Planner's settings, to replaceBREAKorENDwith phrases of your choice.ENDserves two purposes:- It provides an end to the last task of the day, so the duration alloted to that task is accurate.
- It marks the end of the Day Planner. If your note has content after the
ENDkeyword, it will not be updated by the plugin.
Task updating
If the Day Planner is linked to a note, and "Complete past planner items" is enabled, the plugin will update the note as the day progresses: tasks in the past will be checked and marked as complete.
Using the example above, at 14:30 the note would have automatically updated to:
## Day Planner

This is my plan for the day broken into 3 main sections:
1. Morning Prep
2. Reading
3. Afternoon Review

### Morning Prep

This is where I get ready for work and do my usual prep.

- [x] 09:30 Setup for work
- [x] 09:45 Review notes from yesterday
- [x] 10:30 Create new notes for #article review
- [x] 11:30 BREAK

### Reading

A section of the day dedicated to reading:

1. Articles.
2. Book chapters assigned for the day.
3. Re-reading past notes.

- [x] 12:00 Reading
  - [ ] Article 1
  - [ ] Article 2
  - [ ] Article notes review
- [x] 12:25 BREAK
- [x] 12:30 Reading
- [ ] 14:00 BREAK

### Afternoon Review

I use this time to review what I have done earlier in the day and complete any tasks to prepare for the next day.

- [ ] 15:00 Review notes and update daily note [[20201103]]
- [ ] 15:45 Walk
- [ ] 16:30 Reading
- [ ] 17:20 Prep for tomorrow's meetings
- [ ] 18:00 END
Timeline View
The Show the Day Planner Timeline command can be used to add a vertical timeline view display the tasks for today's Day Planner with a line showing the current time.

Status Bar
The status bar in Obsidian will also show the current progress on the task or break with the time remaining. Clicking on the status bar item will take you to the Day Planner note.
Task Status
The status displayed when there is an active task:

Break Status
The status displayed during a break:

End Status
The status displayed when the end of the tasks is reached:

Configuration
Day Planner Mode
There are 3 modes to use the Day Planner plugin:
-
File mode
The plugin automatically generates day planner notes for each day within a Day Planners folder.
-
Command mode
Commands are used to
- insert a Day Planner within any note
- unlink the Day Planner from the active note (stop updating)
- link the Day Planner to a note (start updating)
To monitor the Day Planner section of a note you need to link the Day Planner to it. Open the note (active leaf), and run one of the following commands from the command palette:
- "Day Planner: Link today's Day Planner to the current Note"
- "Day Planner: Add a Day Planner template for today to the current note"
The Day Planner can be placed anywhere within a note as long as the format provided is used. Only the Day Planner section of the note will be updated as time progresses.
-
Daily mode
The plugin automatically looks for the day planner in daily notes. The Daily notes plugin must be enabled.
Complete Past Planner Items
You can choose whether the plugin will automatically mark planner items in the past as complete or allow you to tick them off yourself.
Status Bar - Circular Progress
You can choose to display progress in the status bar with a circular pie chart progress bar to save horizontal space.

Status Bar - Now and Next
You can choose to display the time and start of the text for the current and next task.

Task Notification
You can choose to have an in-app notification display when a new task starts.
Timeline Zoom Level
This is the zoom level to dispaly the timeline. The higher the number, the more vertical space each task will take up.
Commands
Using the plugin in command mode, 2 commands are available to link and unlink a Day Planner.

Installation
- Go to Community Plugins in your Obsidian settings and disable Safe Mode
- Click on Browse and search for "day planner og"
- Click install
- Use the toggle on the community plugins tab to enable the plugin.
Preview with Beta Reviewers Auto-update Tester (BRAT)
- Install BRAT
- Open
Settings->Community Plugins - Disable safe mode
- Browse, and search for "BRAT"
- Install the latest version of Obsidian 42 - BRAT
- Open
- Open BRAT settings (
Settings->Obsidian 42 - BRAT)- Scroll to the
Beta Plugin Listsection Add Beta Plugin- Specify this repository:
ebullient/obsidian-day-planner-og
- Scroll to the
- Enable the plugin (
Settings->Community Plugins)
Manual installation
- Download the latest release
- Extract the obsidian-day-planner-og folder from the zip to your vault's plugins folder:
<vault>/.obsidian/plugins/
Note: On some machines the.obsidianfolder may be hidden. On MacOS you should be able to pressCommand+Shift+Dotto show the folder in Finder. - Reload Obsidian
- If prompted about Safe Mode, you can disable safe mode and enable the plugin.
- Enable the plugin (
Settings->Community Plugins)
For developers
Pull requests are both welcome and appreciated. 😀
If you would like to contribute to the development of this plugin, please follow the guidelines provided in CONTRIBUTING.md.

