Awesome
Flutter Todo App Tutorial
Quickly learn how to setup
a Todo list management app
using Flutter and Riverpod
for app state management.
What? 💡
This is a simple Todo list application that allows you to track todo items that you create and edit. You can check your current active todo items, check the completed ones and also have an overview of every task you've created. Oh! And it's also fully tested! 😃
We also show you a bonus feature,
where this app connects to an API
implemented with Phoenix
to persist the todo list items.
Why? 🤷
As we are focused on building our mvp,
we are looking to have the frontend counterpart
that is cross-platform and easily iterable.
Setting this walk-through will help you
understand better the fundamentals
of having an app with a robust state management library
that can be used in real-world applications.
It also helps us to have a detailed guide of a fully tested app that is documented and is something we can go back to. 😊
How? 💻
0. Prerequisites and preview
It's advisable to have a basic understanding
of the Dart-lang and of Flutter.
If this is your first tutorial with Flutter,
we highly advise you to check our
learning repositories to get started!
https://github.com/dwyl/learn-dart
https://github.com/dwyl/learn-flutter
If you want a walk-through on two simpler applications, we highly recommend going through the following in order, so you can understand the ins and outs better.
- https://github.com/dwyl/flutter-counter-example
- https://github.com/dwyl/flutter-stopwatch-tutorial/pulls
This tutorial will sacrifice
some setup steps that are found in the aforementioned,
so make sure to check these out
if you feel like you are lost
or this is your first time using Flutter.
We will focus more on shared state
and data management
instead of styling.
So Riverpod and fetching data from API
will get the spotlight here. 🔦
Right! Before building this app, let's check out the final result! After cloning this repository and travelling to the directory you cloned the repo in, run the following command to install the dependencies.
flutter pub get
To run the app, plug your phone or start the emulator and run the following.
flutter devices
If you find the wanted device, run:
flutter run
And you should get your app running!
If you want a more in-depth guide
of how to get a Flutter app running
on a real device or emulator,
check our learn-flutter
tutorial.
We will get you sorted in no time!
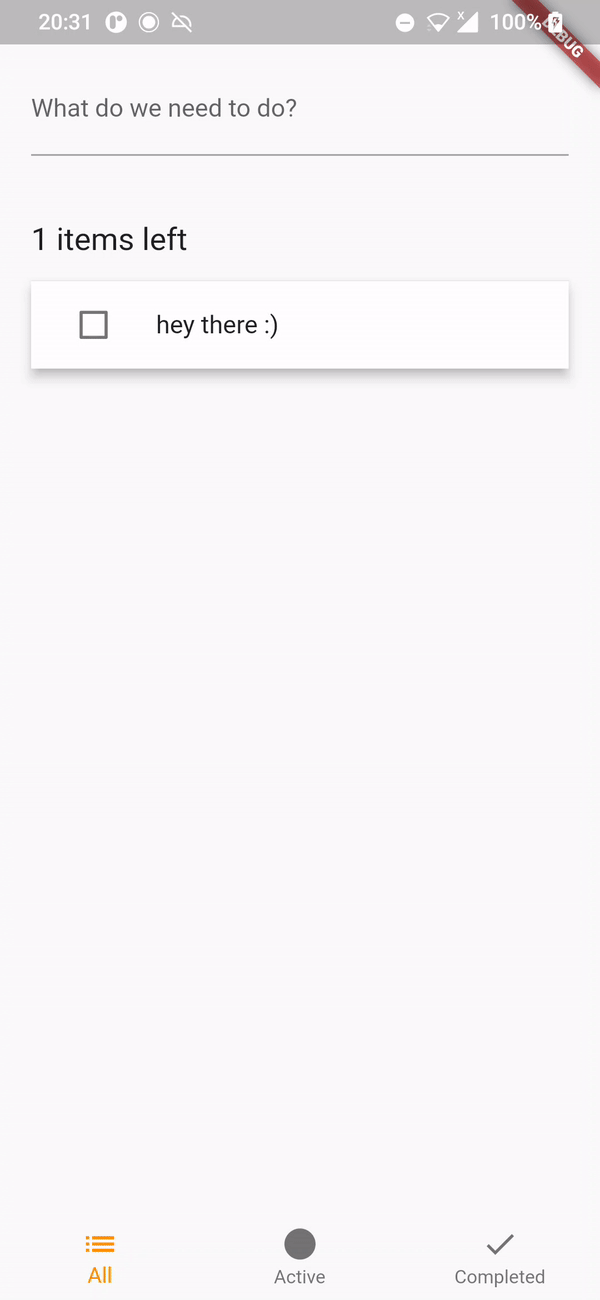
If you open the app, you should be able to see the following.
All the tests should also pass.
If you want to check this,
you can run flutter test.
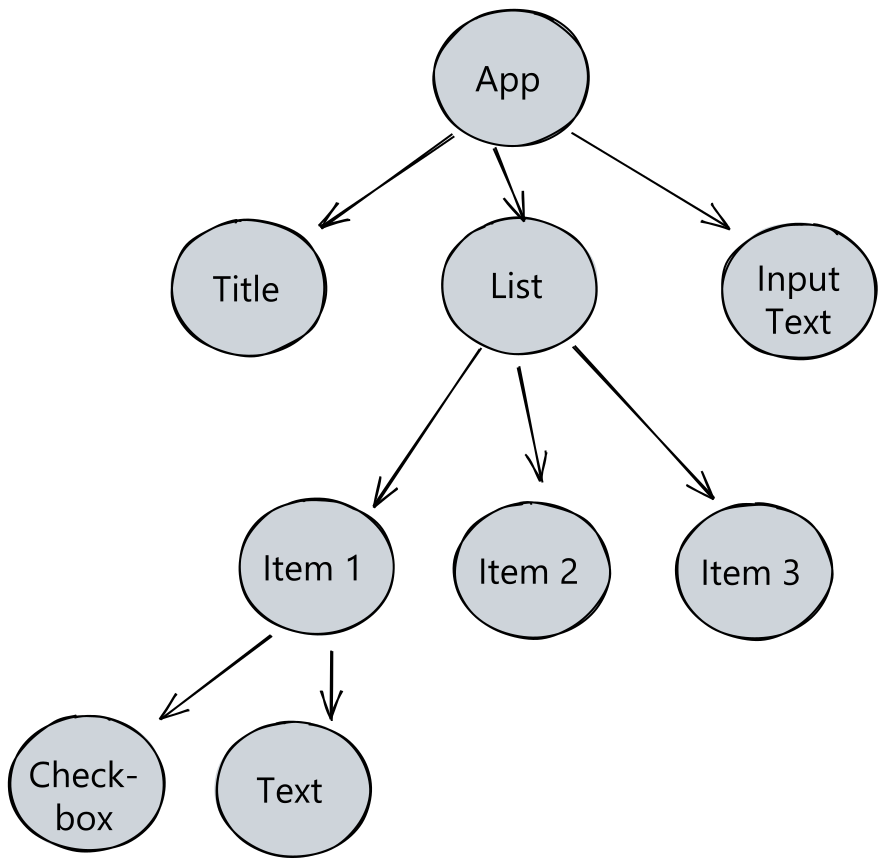
This app uses Riverpod
for state management inside the widget tree.
This library will allow us to declare
and use shared state from anywhere
and have a greater control on UI rebuilds.
Here is how our widget tree will look like.
1. Project setup
In this walk-through we are going to use Visual Studio Code. We will assume you have this IDE installed, as well as the Flutter and Dart extensions installed.
After restarting Visual Studio Code,
let's create a new project!
Click on View > Command Palette,
type Flutter
and click on Flutter: New Project.
It will ask you for a name of the new project.
We are going to name it "todo_app".
After generating the project,
let's now add all the needed dependencies.
As it was stated before,
we are going to be using Riverpod for state management
and accessing shared data across the widget tree.
Along side this library,
are going to also use
uuid
to generate ids for newly created todo items.
Additionally, we are going to use
flutter_hooks to make widget life-cycle management easier.
Head over to pubspec.yaml file
and add the following dependencies.
environment:
  sdk: ">=2.17.0 <3.0.0"
  flutter: ">=3.0.0"

dependencies:
  flutter:
    sdk: flutter

  cupertino_icons: ^1.0.2
  flutter_riverpod: ^2.0.2
  riverpod_annotation: ^1.0.4
  hooks_riverpod: ^2.1.1
  flutter_hooks: ^0.18.5+1
  uuid: ^3.0.6

dev_dependencies:
  flutter_test:
    sdk: flutter

  flutter_lints: ^2.0.0
  build_runner: ^2.3.2
  riverpod_generator: ^1.0.4
After adding these,
run flutter pub get to
fetch the dependencies.
We now have everything we need to start developing!
2. Creating Todo class and TodoList
Since we are dealing with
Todo items in this app,
let's start by doing that.
Let's create a file in
lib/todo.dart
and add the following piece of code.
import 'package:flutter/foundation.dart' show immutable;
import 'package:riverpod/riverpod.dart';
import 'package:uuid/uuid.dart';

@immutable
class Todo {
  const Todo({
    required this.description,
    required this.id,
    this.completed = false,
  });

  final String id;
  final String description;
  final bool completed;
}
We just created our Todo model class.
Each todo item has an id, a description
and a boolean completed field
that toggles between the todo item being done or not.
Pretty simple, right? 😉
You might have noticed there is an
@immutable annotation being used for this class.
This is directly related to code-generation.
You might have noticed the build_runner
dependency we added earlier.
This is the tool that will generate code for us.
In short, code generation allows us to
work with Riverpod with a friendlier syntax
and reduce boilerplate code.
If you want to learn more about code generation in Riverpod
and how it is useful,
check the follow link ->
https://docs-v2.riverpod.dev/docs/about_code_generation
Let's move on.
We are going to be storing our todo items
in a list - TodoList.
We want this list to be accessible
anywhere within the widget tree.
But before that, let's clear some concepts.
2.1. Riverpod Provider
When using Riverpod,
you are going to see the word "Provider"
tossed around a lot.
And for good reason, because it's important!
A provider is an object that encapsulates
a piece of state and allows listening to that state..
By wrapping a piece of state in a provider,
you will make it so that:
- it is accessible from multiple locations within the widget tree.
- enable performance optimizations, like caching the value.
- increase testability of your application.
- among others...
We have access to
different types of providers
that are suitable for different use cases.
In our application,
we are going to be using Provider,
StateProvider and StateNotifierProvider.
We are going to get to these when we implement them. 😉
If you want to learn more about Providers, check the official docs -> https://docs-v2.riverpod.dev/docs/concepts/providers/
2.2.Adding TodoList using the StateNotifierProvider
Now that we know a bit about what a Provider is,
let's start using one.
Don't worry if you are still confused,
you will see how it works!
Let's create our TodoList.
In the lib/todo.dart file,
add the following code.
const _uuid = Uuid();

class TodoList extends StateNotifier<List<Todo>> {
  TodoList([List<Todo>? initialTodos]) : super(initialTodos ?? []);

  /// Adds `todo` item to list.
  void add(String description) {
    // Since our state is immutable, we are not allowed to do `state.add(todo)`.
    state = [
      ...state,
      Todo(
        id: _uuid.v4(),
        description: description,
      ),
    ];
  }

  /// Toggles `todo` item between completed or not completed.
  void toggle(String id) {
    final newState = [...state];
    final todoToReplaceIndex = state.indexWhere((todo) => todo.id == id);

    if (todoToReplaceIndex != -1) {
      newState[todoToReplaceIndex] = Todo(
        id: newState[todoToReplaceIndex].id,
        completed: !newState[todoToReplaceIndex].completed,
        description: newState[todoToReplaceIndex].description,
      );
    }

    state = newState;
  }

  /// Edits a `todo` item.
  void edit({required String id, required String description}) {
    final newState = [...state];
    final todoToReplaceIndex = state.indexWhere((todo) => todo.id == id);

    if (todoToReplaceIndex != -1) {
      newState[todoToReplaceIndex] = Todo(
        id: newState[todoToReplaceIndex].id,
        completed: !newState[todoToReplaceIndex].completed,
        description: description,
      );
    }

    state = newState;
  }
}
It's breakdown time! 🎉
The first thing we notice is that
TodoList is extending
StateNotifier<List<Todo>>.
We are using a
StateNotifierProvider!
StateNotifierProvideris a provider that is used to listen to and expose aStateNotifier.StateNotifierProvideralong withStateNotifieris Riverpod's recommended solution for managing immutable state which may change in reaction to a user interaction.https://docs-v2.riverpod.dev/docs/providers/state_notifier_provider
Let's dissect this.
We are using StateNotifierProvider
because it fits our use case.
Our list of todos are going to change
according to what the user does:
we will add a todo item if he creates one
and update a todo item if he decides to edit one.
If he marks a todo item as completed,
we need to update that in our todolist.
In the code above, we are using StateNotifier,
which is what StateNotifierProvider will expose to the widgets.
Think of StateNotifier as an object
that is going to change over time.
Inside the TodoList class,
we define three methods:
one that adds a todo to the list;
one that toggles a todo item inside the list;
and one that edits a todo item inside the list
(e.g. update the description).
Notice that we are not changing the object in these functions.
We are creating copies of the state,
changing the copy and assigning it to the state.
That makes sense, right?
So, in the add function,
we add a todo item to the list
and use the uuid package
to create an id to the newly created item.
In the toggle function,
we find the todo item we want
to mark as completed/uncompleted and update it.
In the edit function we do something similar,
except we change the description of the todo item.
Again, in all of these methods we don't change the list. We create a new updated one (because the state is immutable).
3. Adding providers
Now that we added the blocks to create our providers,
let's do that!
In a new file lib/providers.dart,
add the following code.
import 'package:flutter_riverpod/flutter_riverpod.dart';
import 'package:todo_app/todo.dart';

final todoListProvider = StateNotifierProvider<TodoList, List<Todo>>((ref) {
  return TodoList(const [
    Todo(id: '0', description: 'hey there :)'),
  ]);
});
We have stated before
that we were going to be using StateNotifierProvider
to hold the TodoList
so it could be shared everywhere in the application.
But StateNotifierProvider exposes StateNotifier object,
which we already created (it is our TodoList).
Now here we are just creating it and exposing it ☺️.
In this case,
we are creating a TodoList with a single todo item by default.
3.1 - Filtering the TodoList
We want to be able to check all the todo items,
the active ones (created but not completed)
and the completed ones.
For that, the application is going to need to be able to filter the TodoList
and know what the current filter is currently being on
(if the screen is showing all,
or completed or active items).
Let's do this.
Add the following code to the same
lib/providers.dart file.
/// Enum with possible filters of the `todo` list.
enum TodoListFilter {
  all,
  active,
  completed,
}

/// The currently active filter.
final todoListFilter = StateProvider((_) => TodoListFilter.all);

/// The list of todos after applying a [todoListFilter].
final filteredTodos = Provider<List<Todo>>((ref) {
  final filter = ref.watch(todoListFilter);
  final todos = ref.watch(todoListProvider);

  switch (filter) {
    case TodoListFilter.completed:
      return todos.where((todo) => todo.completed).toList();
    case TodoListFilter.active:
      return todos.where((todo) => !todo.completed).toList();
    case TodoListFilter.all:
      return todos;
  }
});
We are firstly defining an enum with all the possible filters.
We added three: all, active and completed.
The todoListFilter refers
to the currently active filter that is shown on screen.
For this we are using the
State Provider
provider type.
This provider type is actually a much simpler StateNotifierProvider.
We don't need to create a StateNotifier object like we did before,
so it's meant for very simple use-cases.
Just like this one!
We just want to know the value of the current filter,
and that is it!
The filteredTodos will return the TodoList filtered according to a specific filter.
If the all filter is applied,
we just show all the todo items.
If the completed filter is applied,
we return the TodoList with only the completed todo items.
It uses the
Provider
type provider - which is the most basic of all of them.
It just creates a value - in this case, an array of todo items.
It's useful because this value
(the todo items that is returned by this provider)
only rebuilds whenever we want it to update.
So, in this case, it only updates when todoListFilter (the current filter)
and todoListProvider (the list of todo items) change.
Hence why these lines exist.
final filter = ref.watch(todoListFilter);
final todos = ref.watch(todoListProvider);
3.2. Showing how many todo items are left
We also want the user to know
how many todo items are still
left to be completed.
For this, add the following code.
final uncompletedTodosCount = Provider<int>((ref) {
  return ref.watch(todoListProvider).where((todo) => !todo.completed).length;
});
Similarly to what we did before,
we are using the Provider type of provider.
uncompletedTodosCount is only recomputated
when todoListProvider changes.
4. Creating the app
Now that all the providers we need are set up, we just now need to create our app, style it to our liking and access this shared state we just created accordingly!
We will now add all the code needed for this to work and we'll walk you through it and explain it in sections.
For now, let's add our code.
In the lib/main.dart file,
add the following.
import 'package:flutter/material.dart';
import 'package:flutter_hooks/flutter_hooks.dart';
import 'package:hooks_riverpod/hooks_riverpod.dart';

import 'providers.dart';
import 'todo.dart';

/// Keys for components for testing
final bottomNavigationBarKey = UniqueKey();
final addTodoKey = UniqueKey();

// coverage:ignore-start
void main() {
  runApp(const ProviderScope(child: App()));
}
// coverage:ignore-end

class App extends StatelessWidget {
  const App({Key? key}) : super(key: key);

  @override
  Widget build(BuildContext context) {
    return const MaterialApp(
      home: Home(),
    );
  }
}

class Home extends HookConsumerWidget {
  const Home({Key? key}) : super(key: key);

  @override
  Widget build(BuildContext context, WidgetRef ref) {
    final todos = ref.watch(filteredTodos);
    final newTodoController = useTextEditingController();

    return GestureDetector(
      onTap: () => FocusScope.of(context).unfocus(),
      child: Scaffold(
        body: ListView(
          padding: const EdgeInsets.symmetric(horizontal: 20, vertical: 40),
          children: [
            TextField(
              key: addTodoKey,
              controller: newTodoController,
              decoration: const InputDecoration(
                labelText: 'What do we need to do?',
              ),
              onSubmitted: (value) {
                ref.read(todoListProvider.notifier).add(value);
                newTodoController.clear();
              },
            ),

            const SizedBox(height: 42),

            Padding(
              padding: const EdgeInsets.only(bottom: 16.0),
              child: Text(
                '${ref.watch(uncompletedTodosCount)} items left',
                style: const TextStyle(fontSize: 20),),
            ),

            if (todos.isNotEmpty) const Divider(height: 0),
            for (var i = 0; i < todos.length; i++) ...[

              if (i > 0) const Divider(height: 0),
              ProviderScope(
                  overrides: [
                    _currentTodo.overrideWithValue(todos[i]),
                  ],
                  child: const TodoItem(),
              ),

            ],
          ],
        ),
        bottomNavigationBar: const Menu(),
      ),
    );
  }
}

/// Bottom menu widget
class Menu extends HookConsumerWidget {
  const Menu({super.key});

  @override
  Widget build(BuildContext context, WidgetRef ref) {
    final filter = ref.watch(todoListFilter);

    int currentIndex() {
      switch (filter) {
        case TodoListFilter.completed:
          return 2;
        case TodoListFilter.active:
          return 1;
        case TodoListFilter.all:
          return 0;
      }
    }

    return BottomNavigationBar(
      key: bottomNavigationBarKey,
      elevation: 0.0,
      onTap: (value) {
        if (value == 0) ref.read(todoListFilter.notifier).state = TodoListFilter.all;
        if (value == 1) ref.read(todoListFilter.notifier).state = TodoListFilter.active;
        if (value == 2) ref.read(todoListFilter.notifier).state = TodoListFilter.completed;
      },
      items: const <BottomNavigationBarItem>[
        BottomNavigationBarItem(
          icon: Icon(Icons.list),
          label: 'All',
          tooltip: 'All'
        ),
        BottomNavigationBarItem(
          icon: Icon(Icons.circle),
          label: 'Active',
          tooltip: 'Active',
        ),
        BottomNavigationBarItem(
          icon: Icon(Icons.done),
          label: 'Completed',
          tooltip: 'Completed',
        ),
      ],
      currentIndex: currentIndex(),
      selectedItemColor: Colors.amber[800],
    );
  }
}


/// A provider which exposes the [Todo] displayed by a [TodoItem].
///
/// By retrieving the [Todo] through a provider instead of through its
/// constructor, this allows [TodoItem] to be instantiated using the `const` keyword.
///
/// This encapsulation ensures that when adding/removing/editing todos,
/// only what the impacted widgets rebuilds, instead of the entire list of items.
final _currentTodo = Provider<Todo>((ref) => throw UnimplementedError());

class TodoItem extends HookConsumerWidget {
  const TodoItem({Key? key}) : super(key: key);

  @override
  Widget build(BuildContext context, WidgetRef ref) {
    final todo = ref.watch(_currentTodo);
    final itemFocusNode = useFocusNode();
    final itemIsFocused = useIsFocused(itemFocusNode);

    final textEditingController = useTextEditingController();
    final textFieldFocusNode = useFocusNode();

    return Material(
      color: Colors.white,
      elevation: 6,
      child: Focus(
        focusNode: itemFocusNode,
        onFocusChange: (focused) {
          if (focused) {
            textEditingController.text = todo.description;
          } else {
            // Commit changes only when the textfield is unfocused, for performance
            ref.read(todoListProvider.notifier).edit(id: todo.id, description: textEditingController.text);
          }
        },
        child: ListTile(
          onTap: () {
            itemFocusNode.requestFocus();
            textFieldFocusNode.requestFocus();
          },
          leading: Checkbox(
            value: todo.completed,
            onChanged: (value) => ref.read(todoListProvider.notifier).toggle(todo.id),
          ),
          title: itemIsFocused
              ? TextField(
                  autofocus: true,
                  focusNode: textFieldFocusNode,
                  controller: textEditingController,
                )
              : Text(todo.description),
        ),
      ),
    );
  }
}

bool useIsFocused(FocusNode node) {
  final isFocused = useState(node.hasFocus);

  useEffect(
    () {
      void listener() {
        isFocused.value = node.hasFocus;
      }

      node.addListener(listener);
      return () => node.removeListener(listener);
    },
    [node],
  );

  return isFocused.value;
}
Whoa, that's a lot! But that's all we need! Don't worry, we'll go through it and explain what we just did!
4.1. TodoItem
If we look at the Todo item,
we see that it extends HookConsumerWidget.
To access the state within the providers we created beforehand,
we need our widgets to extend ConsumerWidget.
The difference between
ConsumerWidget and HookConsumerWidget
is that the latter just allows us to use hooks.
Hooks, as mentioned prior,
aren't Riverpod-related at all.
They just allow us to write code
regarding the widget lifecycle and state.
This concept is borrowed from React
and you can learn more about them
here: https://docs-v2.riverpod.dev/docs/about_hooks.
As we stated,
to access the provider value,
we extend with ConsumerWidget.
By extending with this,
the widget will have access to a ref in the build()
function which is what we can use to access the providers.
Hence why the
final todo = ref.watch(_currentTodo);
line inside TodoItem.
The _currentTodo is a small provider
that refers to the local state of the TodoItem.
We did this just for optimization purposes.
We could have a StatefulWidget
in which we pass the Todo object
when creating this TodoItem widget.
If you check the code,
the TodoItem will allow users
to edit the Todo item by tapping it.
When it taps/focusing,
the description becomes editable.
They can edit by changing
the text and then unfocusing
(e.g. tapping away from the TodoItem widget).
onFocusChange: (focused) {
  if (focused) {
    textEditingController.text = todo.description;
  } else {
    // Commit changes only when the textfield is unfocused, for performance
    ref.read(todoListProvider.notifier).edit(id: todo.id, description: textEditingController.text);
  }
},
ref.read(todoListProvider.notifier)
returns the TodoList
(remember that the TodoList
StateNotifier object?)
in which we can call the edit() function
to edit the todo item.
The TodoItem also has a Checkbox,
that shows if the todo item is
completed or not.
leading: Checkbox(
  value: todo.completed,
  onChanged: (value) => ref.read(todoListProvider.notifier).toggle(todo.id),
),
Similarly to before,
we call the toggle() function inside the TodoList
to toggle the todo item between "completed" or not.
And that's how we access and effectively change the shared state we defined through providers prior! Heck yeah! 🎉
4.2. The Menu
Let's go over the menu.
The menu is located
in the bottom of the screen.
It has three buttons,
each one referring to the filter
we want to apply to the
TodoList.
By default, the All is chosen,
which shows the TodoList without filters.
But we can also show the Active todos
and Completed todos!
So, it makes sense to make use
of the todoListFilter provider
we defined earlier,
which gives us information about the
current filter we need to be displaying.
We access it by
final filter = ref.watch(todoListFilter);
When a user wants to change filter,
we want to change todoListFilter.
For that, we simply change it like
so:
onTap: (value) {
  if (value == 0) ref.read(todoListFilter.notifier).state = TodoListFilter.all;
  if (value == 1) ref.read(todoListFilter.notifier).state = TodoListFilter.active;
  if (value == 2) ref.read(todoListFilter.notifier).state = TodoListFilter.completed;
},
4.3. Home
Here's the last piece of the puzzle! 🧩
In the Home widget,
we are doing three things:
- creating a
todoitem. - showing the number of
todoitems left that aren't completed. - displaying the filtered
todoList.
Let's go over each of these.
4.3.1. Creating a todo item
On top of the page,
you might notice there is
Textfield with a placeholder
saying "What do we need to do?".
This is where the user creates
a todo item.
Luckily, to create a todo item
is simple and it follows the same
pattern as editing
and toggling a todo item.
TextField(
  key: addTodoKey,
  controller: newTodoController,
  decoration: const InputDecoration(
    labelText: 'What do we need to do?',
  ),
  onSubmitted: (value) {
    ref.read(todoListProvider.notifier).add(value);
    newTodoController.clear();
  },
)
By calling ref.read(todoListProvider.notifier).add(value);,
we take the value of the textfield
and create a new todo item
by using the add() function
of the TodoList class.
A Textfield
necessitates a controller,
which is created using the
useTextEditingController.
A controller, as the name suggests,
manages the state of the Textfield.
In this case,
we use it to clear the text
after adding the todo item to the list.
This piece of information is outside of the scope
but it shows how easy it is to use hooks
and allows us to write less code
to achieve the same thing 😃.
4.3.2. Displaying number of incomplete todo items
It is as easy as pie
to display the number of
incomplete todo items!
We just need to access
the uncompletedTodosCount provider
we defined earlier.
It only holds an integer value,
so we can simply print it.
Text(
'${ref.watch(uncompletedTodosCount)} items left',
style: const TextStyle(fontSize: 20)
),
4.3.3. Displaying the filtered todoList
The most important part
is showing the todo items, isn't it?
For that,
we make use of the filteredTodos
provider we defined in the
lib/provider.dart file.
We just need to go over
the filtered list and
show it to the user!
filteredTodos already knows
which items they need to show for us
because they change whenever
todoListFilter changes
(we explained this beforehand).
We access the filteredTodos
like so:
final todos = ref.watch(filteredTodos);
Afterwards, in the build() function,
we go over the todos variable
and create TodoItem widgets like so.
for (var i = 0; i < todos.length; i++) ...[

  if (i > 0) const Divider(height: 0),
  ProviderScope(
      overrides: [
        _currentTodo.overrideWithValue(todos[i]),
      ],
      child: const TodoItem(),
  ),

]
Remember when we used the
_currentTodo provider in the TodoItem?
We are the using ProviderScope
function to override the value inside
the TodoItem.
With this, the TodoItem now pertains
correctly to a given todo item and shows
the information correctly.
And that should be it!
You just leveraged Riverpod and
created shared data that is
reusable across all the widgets
within the application!
But we don't stop here. We want to persist these todo items in an API and fetch accordingly.
Let's roll. 🏃
(Bonus) 5. Calling REST API
As it stands, you already grasped great knowledge using Riverpod. We've learn how to use providers and set-up shared data so it can be used along the widget tree.
However, most apps call external REST APIs and manage data according to these. So it's crucial to know how to manage shared data when the latter comes from a server.
And this is what we are going to be doing in this chapter. 😉
We are going to be using the API provided by
our phoenix-todo-list tutorial.
If you follow the instructions,
install the dependencies.
mix deps.get
and run the server
mix phx.server
you should be sorted for this part of the guide. However, you can use your own API! Just make sure it returns a list of todo items and you're good to go!
Let's get cracking!
5.1 Making calls to our API
If you're running the Phoenix server,
it should be serviceable at localhost:4000.
Before adding a service to fetch from an API,
we need to add a function to our Todo class
so we can create one instance of it
from the returned JSON from the API.
For this,
head on to lib/todo.dart
and add the following functions
to the class.
  factory Todo.fromJson(Map<String, dynamic> json) {
    return Todo(id: json['id'].toString(), description: json['text'], completed: json['status'] == 0 ? false : true);
  }
As the name suggest,
fromJson simply converts a JSON object
to a Todo class instance.
Now we can start creating API requests!
Firstly, install the http
package so we can make HTTP requests.
http: ^0.13.5
And run flutter pub get to fetch this dependency.
Add the following line to android/app/src/debug/AndroidManifest.xml
to enable internet access in Android devices.
<uses-permission android:name="android.permission.INTERNET" />
Now let us create a service
to make API requests.
Create a file inside lib/repository/todoRepository.dart
and add the following code.
import 'dart:convert';

import 'package:todo_app/todo.dart';
import 'package:http/http.dart' show Client;

const baseUrl = 'http://192.XXX.X.XXX:4000/api';

class TodoRepository {
  Client client = Client();

  Future<List<Todo>> fetchTodoList() async {
    final response = await client.get(Uri.parse('$baseUrl/items/'));

    if (response.statusCode == 200) {
      Iterable l = json.decode(response.body);
      return List<Todo>.from(l.map((model) => Todo.fromJson(model)));
    } else {
      throw Exception('Failed to load Todo\'s.');
    }
  }

  Future<Todo> createTodo(String description) async {
    final response = await client.post(Uri.parse('$baseUrl/items/'), body: {"text": description, "status": "0", "person_id": "0"});

    if (response.statusCode == 200) {
      return Todo.fromJson(jsonDecode(response.body));
    } else {
      throw Exception('Failed to create Todo.');
    }
  }

  Future<Todo> updateTodoText(String id, String text) async {
    final response = await client.put(Uri.parse('$baseUrl/items/$id'), body: {"text": text});

    if (response.statusCode == 200) {
      return Todo.fromJson(jsonDecode(response.body));
    } else {
      throw Exception('Failed to update Todo text.');
    }
  }

  Future<Todo> updateTodoStatus(String id, bool completed) async {
    final response = await client.put(Uri.parse('$baseUrl/items/$id/status'), body: {"status": completed == true ? "1" : "0"});

    if (response.statusCode == 200) {
      return Todo.fromJson(jsonDecode(response.body));
    } else {
      throw Exception('Failed to update Todo text.');
    }
  }
}
Let's unpack what we've done here.
To make API requests from an emulator
or from a real device to a server running on localhost,
there are a couple of things we ought to do.
- if you are running on an iOS emulator,
instead of
localhost, you ought to access127.0.0.1. - if you are running on an Android emulator,
instead of
localhost, you ought to access10.0.2.2. - if you are running on a real device,
make sure the computer running the server
and the device are on the same network
and use the
IPv4 addressinstead oflocalhost.
Change the baseUrl variable
according to the scenario
you're in and you should be able
to make requests.
The reason we are using client
as a field inside TodoRepository
is so we are able to mock it
when testing.
If you are stuck, try to follow this video - https://www.youtube.com/watch?v=cDYCWdkbJI4&ab_channel=PodCoder. If you are still stuck, open an issue so we can help you!
If you are running our Phoenix server and trying to make requests from a real device, you have to stop it and change
config/dev.exs.Locate the line
http: [ip: {127, 0, 0, 1}, port: 4000]and change it tohttp: [ip: {0, 0, 0, 0}, port: 4000].This will make it so the server is reachable from devices running in the same network.
We have a function
for each action the user does:
creating todo, editing text,
toggling todo and listing todos.
In each one, we use http
to make a HTTP request
and serialize the response from the server.
A Todo item (or list) is returned
in case the request is successful.
Don't use
JsonDecodeinside theUri.parse(:body). It already encodes the object. You'd just encode it twice and it wouldn't work.
5.2 Riverpod changes
Now that we have created a way
to fetch our data,
we now need to change our Riverpod providers.
By fetching data from API,
we have introduced the concept
of [asynchronicity](https://en.wikipedia.org/wiki/Asynchrony_(computer_programming),
which our app is not capable of handling, currently.
But let's fix that! However, before that, let's refresh how our providers are being called.
- Inside
main.dart, in_HomeState, this widget is looking at any change from thefilteredTodosprovider insideproviders.dart. filteredTodosprovider changes whenevertodoListProviderprovider changes.todoListProviderprovider returns aTodoListobject, which the user can add and edit items within.
Let's bubble up and start making changes
to TodoList.
5.2.1 TodoList StateNotifier class
If we open todo.dart
and check the TodoList class,
we will notice the following lines of code.
class TodoList extends StateNotifier<List<Todo>> {
  TodoList([List<Todo>? initialTodos]) : super(initialTodos ?? []);

}
We are initializing an instance of this class with an empty array by default. We want automatically fetch the data on startup. We are going to do this on the constructor, like so.
class TodoList extends StateNotifier<AsyncValue<List<Todo>>> {
  final TodoRepository;

  TodoList(this.TodoRepository) : super(const AsyncValue.loading()) {
    fetchTodos();
  }
TodoList is now a StateNotifier
which now wraps a List<Todo>
with AsyncValue.
This is an utility for manipulating asynchronous data.
With this, we are guaranteed that we are not going to forget
to handle loading and error state of this async operation.
We will see that it exposes utilities
that will convert an AsyncValue to a different object
inside the widget (e.g. show the data,
or render a loading animation while loading
or showing an error screen when an error occurs).
The TodoList now also receives
a TodoRepository object in its constructor.
This is so we are able to mock HTTP requests
when testing through dependency injection.
In the previous snippet
we are assigning a loading state before fetchTodos.
Speaking of which, we should implement that function.
Below, add the function.
 Future<void> fetchTodos() async {
    state = const AsyncValue.loading();
    try {
      final data = await TodoRepository.fetchTodoList();
      state = AsyncValue.data(data);
    } catch (err, stack) {
      state = AsyncValue.error(err, stack);
    }
  }
This function is pretty simple.
We set the state of TodoList to AsyncValue.loading
while fetching the todos from the API.
Whether the request is successful or not,
the state is set accordingly with the data
or an error.
Do notice that the data/error
is set with AsyncValue.data/error.
The TodoList (List<Todo>) is wrapped
with AsyncValue (as we have stated before).
We can make this function easier to read though. We can convert it to the following.
  Future<void> fetchTodos() async {
    state = const AsyncValue.loading();
    state = await AsyncValue.guard(() async {
      return await TodoRepository.fetchTodoList();
    });
  }
AsyncValue.guard is just syntactic sugar.
It simplifies the try/catch so we don't have to repeat it
throughout the application.
Now let's change the other three functions
(add, toggle and edit)
so it conforms to having AsyncValue.
  /// Adds `todo` item to list.
  Future<void> add(String description) async {
    state = await AsyncValue.guard(() async {
      Todo returned_todo = await TodoRepository.createTodo(description);
      return [...?state.value, returned_todo];
    });
  }

  /// Toggles `todo` item between completed or not completed.
  Future<void> toggle(Todo todo) async {
    state = await AsyncValue.guard(() async {
      Todo returned_todo = await TodoRepository.updateTodoStatus(todo.id, !todo.completed);

      final newState = [...?state.value];
      final todoToReplaceIndex = newState.indexWhere((todo) => todo.id == returned_todo.id);

      if (todoToReplaceIndex != -1) {
        newState[todoToReplaceIndex] = Todo(
          id: returned_todo.id,
          completed: returned_todo.completed,
          description: returned_todo.description,
        );
      }

      return newState;
    });
  }

  /// Edits a `todo` item.
  Future<void> edit({required String id, required String description}) async {
    state = await AsyncValue.guard(() async {
      Todo returned_todo = await TodoRepository.updateTodoText(id, description);

      final newState = [...?state.value];
      final todoToReplaceIndex = newState.indexWhere((todo) => todo.id == id);

      if (todoToReplaceIndex != -1) {
        newState[todoToReplaceIndex] = Todo(
          id: returned_todo.id,
          completed: returned_todo.completed,
          description: returned_todo.description,
        );
      }

      return newState;
    });
  }
In each function, we've just converted it
so it uses the AsyncValue.guard
and returns the data from the API,
whether it is fetching a list
or updating an item.
Notice that we still create a new array
and assign it to the state,
instead of mutating it directly.
For example, inside the add() function,
inside the AsyncValue.guard,
we return:
return [...?state.value, returned_todo];
We are returning a new array.
Also, don't be confused about ?state.value.
state is an AsyncValue that wraps Todo<List>.
To access the list, we need to access the value.
However, since this is now async, value might be null.
Hence why we are using a null-aware spread operator (...?).
You can also use state.error or state.loading
to check if there is an error
or the state is loading.
Your file should now look like the following.
5.2.2 Providers
We need to make changes to our providers
declared inside providers.dart.
Don't worry, it's quite simple.
Since TodoList class
returns AsyncValue<List<Todo>>
instead of List<Todo>,
we ought to do the same for the providers.
Open providers.dart
and locate the final todoListProvider variable.
Let's change it to the following.
final repositoryProvider = Provider((ref) => TodoRepository());

final todoListProvider = StateNotifierProvider<TodoList, AsyncValue<List<Todo>>>((ref) {
  final repository = ref.read(repositoryProvider);

  return TodoList(repository);
});
As we've stated before,
we are now returning AsyncValue<List<Todo>>.
We now return a normal TodoList class instance.
(remember that in the constructor of TodoList
we call fetchTodos()).
We also created a repositoryProvider,
which will expose an instance of TodoRepository
so it can be used in todoListProvider.
This is because we want to mock repositoryProvider
when writing unit and integration tests.
This way we can mock the HTTP requests easily.
Let's change the final uncompletedTodosCount provider.
Locate it and change the code.
final uncompletedTodosCount = Provider<int>((ref) {
  final count = ref.watch(todoListProvider).value?.where((todo) => !todo.completed).length;
  return count ?? 0;
});
We check if the AsyncValue returned by todoListProvider
is not null, using the ternary ? operator - value?.
We return the uncompleted todos count
if count is not null.
If it is, we just return 0.
On to the last one!
Locate the final filteredTodos provider
and change it.
final filteredTodos = Provider<List<Todo>>((ref) {
  final filter = ref.watch(todoListFilter);
  final todos = ref.watch(todoListProvider).valueOrNull;

  if (todos != null) {
    switch (filter) {
      case TodoListFilter.completed:
        return todos.where((todo) => todo.completed).toList();
      case TodoListFilter.active:
        return todos.where((todo) => !todo.completed).toList();
      case TodoListFilter.all:
        return todos;
    }
  } else {
    return [];
  }
});
It's pretty much the same.
We've only added a verification to check
if the todos returned by the todoListProvider
is null or not.
We are using AsyncValue.valueOrNull
so it returns null if there is no data
(it's still loading or it errored).
Your file should now look like the following.
And we are done here!
We just basically made changes
wrapping the List<Todo> with AsyncValue
and checked if the AsyncValue.value
is defined or undefined.
This is the simplest way to have async operations while retaining the work we've done.
We could have changed
AsyncNotifier, however [it is still not yet properly documented](https://codewithandrea.com/articles/flutter-riverpod-async-notifier/ https://github.com/rrousselGit/riverpod/issues/1767).Using
FutureProviderwas also an option. However it's only suitable for simple scenarios, which is not the case.
5.3 Handling async inside widgets
Currently, the Home widget
extends HookConsumerWidget,
which is Riverpod's wrapper of a
Stateless Consumer Widget with hooks.
However, now that the underlying data TodoList
can change overtime,
we need to convert this stateless widget
to a stateful widget.
For this, we change:
class Home extends HookConsumerWidget {
  const Home({Key? key}) : super(key: key);

  @override
  Widget build(BuildContext context, WidgetRef ref) {
  }
}
To:
class Home extends StatefulHookConsumerWidget {
  const Home({super.key});

  @override
  ConsumerState<Home> createState() => _HomeState();
}

class _HomeState extends ConsumerState<Home> {
  @override
  void initState() {
    super.initState();
  }

  @override
  Widget build(BuildContext context) {
  }
}
StatefulHookConsumerWidget is the stateful equivalent
of HookConsumerWidget.
Since we are creating a stateful widget,
we need to create a state, as well -
ConsumerState<Home>.
And that's it!
We need to make some small changes
to the TodoItem widget
because we've changed the toggle function
inside TodoList to receive a Todo class
instead of just an id.
Locate the Checkbox inside TodoItem widget,
and change it to this.
leading: Checkbox(
  value: todo.completed,
  onChanged: (value) => ref.read(todoListProvider.notifier).toggle(todo),
),
We are now passing the todo object
instead of todo.id.
The other thing we need to change
is to only make a request to edit the todo
only if the text input value is different from the todo value.
In other words, only update the item
if the text was effectively changed.
For this, inside the same widget TodoItem,
we change the onFocusChange to the following.
onFocusChange: (focused) {
  if (focused) {
    textEditingController.text = todo.description;
  } else {

    // Only call for todo text change if a value is actually different
    if (todo.description != textEditingController.text) {
      // Commit changes only when the textfield is unfocused, for performance
      ref.read(todoListProvider.notifier).edit(id: todo.id, description: textEditingController.text);
    }
  }
},
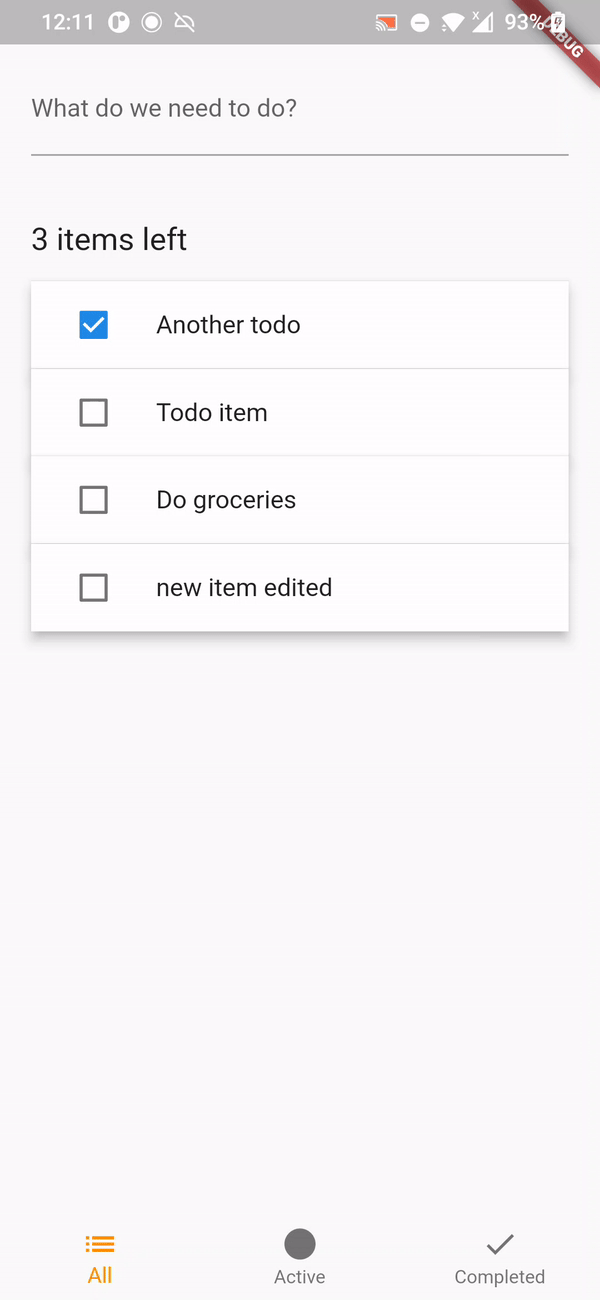
Your file should now look like the following.
If you run the server on your computer and run the application, it should look like so!

5.4 Showing loading animation while fetching todos
We have previously used AsyncValue
but haven't used its utilities for the most important feature:
giving user feedback that an API request is occurring.
We should show a loading animation
while the app is fetching the items from the API.
For this,
since we wrapped the todoListProvider return value with AsyncValue,
we can use the .when function inside the widget
to conditionally render according to its state:
has data, is loading or has error.
Locate the ListView inside Scaffold(body:)
inside the _HomeState widget and build() function,
and wrap it with the following.
child: Scaffold(
  body: todosProvider.when(
      loading: () => const Center(child: Center(child: CircularProgressIndicator())),
      error: (error, stack) =>
      const Center(
          child: Center(
            child: Text('Could\'nt make API request. Make sure server is running.'),
          )
      ),
      data: (_) => ListView (...)
We are now showing a CircularProgressIndicator
every time AsyncValue is at a loading state.
If there's an error, we show a Text.
If the data fetch is successful,
we show the ListView containing the items, as normal.
If you run the app now, you should see a loading animation on startup, like so.

5.5 Refreshing list of items
As it stands,
the user has no way to refresh the list of todos.
We can use the RefreshIndicator
to fetch the list of todos from the API
by swiping from above the mobile device.
For this, inside _HomeState and build(),
we need to wrap the Scaffold
with a RefreshIndicator.
We are also going to need access to todoListProvider
so we can fetch the todos.
For this, change the beginning of the build() function
to look like so.
class _HomeState extends ConsumerState<Home> {
  @override
  void initState() {
    super.initState();
  }

  Future<void> onRefresh() {
    return ref.read(todoListProvider.notifier).fetchTodos();
  }

  @override
  Widget build(BuildContext context) {
    final AsyncValue<List<Todo>> todosProvider = ref.watch(todoListProvider); // this is only used for the loading animation

    final todos = ref.watch(filteredTodos);
    final newTodoController = useTextEditingController();

    return GestureDetector(
        onTap: () => FocusScope.of(context).unfocus(),
        child: RefreshIndicator(
            onRefresh: onRefresh,
            child: Scaffold(

  ...
We have successfully wrapped the Scaffold
with a RefreshIndicator.
Once the swipe movement is completed,
onRefresh() is called.
Inside this function, we simply fetch the todos!
And that's a wrap! If you run the server and the application, you should be able to refresh the list of todos!
I need help! ❓
If you have some feedback or have any question, do not hesitate and open an issue! We are here to help and are happy for your contribution!