Awesome
Dell PowerEdge T30/Precision T3620 Hackintosh
**** NOTE: I've switched to a Z170-based custom Hackintosh and M1 Macbook Air so this repository is unlikely to receive updates past Monterrey. ****

Index
- Overview
- Installation:
- BIOS Settings
- Download and create the installer
- Copy EFI folder
- Editing config.plist
- First boot!
- UEFI Modifications
- Installing macOS
- Post-install
- Sleep
- Sleep
- Power management
- USB
- Portmap
- Others
- iGPU
- dGPU
- SMBIOS
- Fan curve move like a Mac (TODO)
- SIP
- Security
- Issues
- Notes
- Credits
Overview
Almost everything works properly and is very stable:
- audio (onboard, via dGPU's DP, and via Fenvi BT)
- nightshift
- App Store and iServices
- CPU PM
- wifi
- bluetooth
- handoff
- continuity
- instant hotspot
- DRM (except for Apple TV)
- Intel Quicksync
- sleep (HDR toggles itself on sometimes upon resume which sucks because it looks like garbage on my monitor when not viewing actual HDR content; haven't tried to fix yet); wakes up from sleep via BT keyboard or mouse quickly and reliably
- restarts/shutdowns
- recovery
- NVRAM
- extra sensors and fan speed controls via apps
- thunderbolt 3
Editing config.plist
Inside the EFI/OC folder on your installer open config.plist and edit/populate the following fields:
PlatformInfo -> Generic -> MLB
PlatformInfo -> Generic -> ROM
PlatformInfo -> Generic -> SystemSerialNumber
PlatformInfo -> Generic -> SystemUUID
You can generate the MLB/Serial/UUID serials with GenSMBIOS. Use option 3 and enter iMac17,1 when asked for the type of SMBIOS to create. If you need to change the model in the future you also need to re-generate a new set of serials, UUID and USB portmap.
Put your ethernet mac address in the ROM field without semicolons. Fixing this post-install is also an option, but is important so don't skip it.
For more information on setting up OpenCore please refer to this very well written guide that has helped realise this very setup.
Please use ProperTree to edit the OpenCore config.
System Specs

| Part | Model Number |
|---|---|
| CPU | Intel(R) Xeon(R) CPU E3-1225 v5 @ 3.30GHz (Quad Core) |
| PSU | Corsair 500W 80 Plus Gold w/ 24-pin to 8-pin adapter |
| Motherboard | Dell 07T4MC |
| BIOS | 1.6.0 |
| Chipset | Intel C236 |
| Memory | Corsair Vengeance LPX 32GB DDR4-2400MHz non-ECC 16GB x 4 (PN: CMK32GX4M2B2400C16) |
| GPU | Intel HD P530 iGPU |
| Thunderbolt | Asus ThunderboltEX 3 AIC |
| Monitors | LG 27UK650-W 27" 4K IPS w/ HDR10 |
| LG Ultrafine 22MD4KA-B 21.5" 4k IPS LED monitor (219 PPI, thunderbolt 3) | |
| Display Cable | included LG DP cable for 27", LG Thunderbolt 3 cable for 21.5" |
| Storage | Crucial P5 M.2 NVME 2280 SSD |
| Samsung SSD 860 EVO 1TB | |
| Toshiba MQ01ABD100 1TB HDD | |
| Bluetooth | Fenvi FV-HB1200 (1200M) PCI-e wifi/bluetooth card ( be sure to buy a genuine card w/ the following ID: 14E4:43A0 ; this is especially imporant if you need Linux support ) |
| Wifi | Fenvi FV-HB1200 (1200M) PCI-e wifi/bluetooth card ( be sure to buy a genuine card w/ the following ID: 14E4:43A0 ; this is especially imporant if you need Linux support ) |
| Ethernet | Intel I219LM2 (onboard) |
| USB | Intel 100 Series/C230 Series USB 3.00 xHCI Controller |
| Asus ThunderboltEX 3 xHCI Controller | |
| Sound | Realtek ALC899 (Layout ID: 3) |
| Keyboard | Logitech MX Keys (connected using Logitech Unified receiver) |
| Mouse | Logitech M590 (connected using Logitech Unified receiver on a USB extension to prevent lag from RF interference) |
| Bootloader | Clover |
BIOS Configuration
- optimized defaults
- storage to AHCI mode
- enable USB powershare
- set preferred graphics to AMD (if using dGPU) or auto
- disable TPM (should be by default)
- disable Secure Boot (should be by default)
- enable Thunderbolt 3 and set security disabled if you have an add-in card
The rest of the recommended settings are already the defaults used by this BIOS. DVMT is 32MB for the iGPU and setup doesn't expose a means to change this. I modified it via setup_var and the modified GRUB shell while trying to get an iGPU-only setup working with a 4k display.
[add screenshots]
UEFI Modifications
These are MY settings given BIOS version 1.6.0 and board 07T4MC. You need to check these offsets and make sure that they're correct for your machine before trying to change things.
| BIOS Updater filename | SHA256 | Resources |
|---|---|---|
| PowerEdge_T30_1.0.0.exe | a5e631a7767c219847258bbdef7f9bae9fccc0c8d1db6e1100cecc8433f84ca1 | Extracted Files, Plaintext |
| PowerEdge_T30_1.0.11.exe | 9d3a2240158113b4dc342656b8cd1f2efa492feb35996305a1f3473bc4c54eb1 | Extracted Files, Plaintext |
| PowerEdge_T30_1.0.12.exe | 74054d490109ee2fd2a92e0983a4048ac92952086ddc6bec2a16b67412a0de8d | Extracted Files, Plaintext |
| PowerEdge_T30_1.0.14.exe | 9b0571a7ee96a8df3d3d2e938b68989f9b8b4d0f1fc72065f65681a0ffc6deb8 | Extracted Files, Plaintext |
| PowerEdge_T30_1.0.15.exe | 3297886d1586c679f3dd39d10c109db36388a6f35e45b2c768e6dd4f1658a579 | Extracted Files, Plaintext |
| PowerEdge_T30_1.1.0.exe | 7ed2ce092848855ee1ce91ee08e7464eac0c6194af3e073a00f61a2ea3ae929f | Extracted Files, Plaintext |
| PowerEdge_T30_1.2.0.exe | c2093f2c06516d1cb9af3ac3b5b5cddd752bcfbc41fe493deaab506e40676cbe | Extracted Files, Plaintext |
| PowerEdge_T30_1.3.1.exe | 66fbf51641861ee068903acd0a6128d2faf2364c34f84fae8cb04fbf019e306b | Extracted Files, Plaintext |
| PowerEdge_T30_1.4.1.exe | e5c4e94b6209c4da18c1d5de829a8e219b2f2df417b37d61685ebb2ac91d54f8 | Extracted Files, Plaintext |
| PowerEdge_T30_1.5.0.exe | 5709e52815db704af7d2e858a66d267da6534d7720f72c67270cdd71cccea133 | Extracted Files, Plaintext |
Dell has not changed the offsets for MSR2, DVMT pre-alloc, or Above 4GB MMIO so far in any BIOS release that I've extracted and analyzed from 1.0.0 through to 1.6.0. That said, it is unwise to assume that this will continue to be the case and with each release you should extract the firmware and ensure the locations are still correct prior to making changes with modified GRUB shell.
- Disable CFG Lock
setup_var 0xAF 0x0
0x35970 				One Of: CFG lock, VarStoreInfo (VarOffset/VarName): 0xAF, VarStore: 0x1, QuestionId: 0x1E2, Size: 1, Min: 0x0, Max 0x1, Step: 0x0 {05 91 25 01 26 01 E2 01 01 00 AF 00 10 10 00 01 00}
0x35981 					   One Of Option: Disabled, Value (8 bit): 0x0 {09 07 25 02 00 00 00}
0x35988 					   One Of Option: Enabled, Value (8 bit): 0x1 (default) {09 07 24 02 30 00 01}
0x3598F 				End One Of {29 02}
- Enable Above 4GB MMIO BIOS Assignment
setup_var 0x355 0x1
- Set DVMT pre-alloc to 64MB (or greater)
setup_var 0x350 0x2
0x3A119 			One Of: DVMT Pre-Allocated, VarStoreInfo (VarOffset/VarName): 0x350, VarStore: 0x1, QuestionId: 0x275A, Size: 1, Min: 0x1, Max 0xFE, Step: 0x0 {05 91 D5 06 F8 06 5A 27 01 00 50 03 14 10 01 FE 00}
0x3A12A 				   One Of Option: 32M, Value (8 bit): 0x1 (default) {09 07 D6 06 30 00 01}
0x3A131 				   One Of Option: 64M, Value (8 bit): 0x2 {09 07 D7 06 00 00 02}
0x3A138 				   One Of Option: 96M, Value (8 bit): 0x3 {09 07 D8 06 00 00 03}
0x3A13F 				   One Of Option: 128M, Value (8 bit): 0x4 {09 07 D9 06 00 00 04}
0x3A146 				   One Of Option: 160M, Value (8 bit): 0x5 {09 07 DA 06 00 00 05}
0x3A14D 				   One Of Option: 192M, Value (8 bit): 0x6 {09 07 DB 06 00 00 06}
0x3A154 				   One Of Option: 224M, Value (8 bit): 0x7 {09 07 DC 06 00 00 07}
0x3A15B 				   One Of Option: 256M, Value (8 bit): 0x8 {09 07 DD 06 00 00 08}
0x3A162 				   One Of Option: 288M, Value (8 bit): 0x9 {09 07 DE 06 00 00 09}
0x3A169 				   One Of Option: 320M, Value (8 bit): 0xA {09 07 DF 06 00 00 0A}
0x3A170 				   One Of Option: 352M, Value (8 bit): 0xB {09 07 E0 06 00 00 0B}
0x3A177 				   One Of Option: 384M, Value (8 bit): 0xC {09 07 E1 06 00 00 0C}
0x3A17E 				   One Of Option: 416M, Value (8 bit): 0xD {09 07 E2 06 00 00 0D}
0x3A185 				   One Of Option: 448M, Value (8 bit): 0xE {09 07 E3 06 00 00 0E}
0x3A18C 				   One Of Option: 480M, Value (8 bit): 0xF {09 07 E4 06 00 00 0F}
0x3A193 				   One Of Option: 512M, Value (8 bit): 0x10 {09 07 E5 06 00 00 10}
0x3A19A 				   One Of Option: 1024M, Value (8 bit): 0x20 {09 07 E6 06 00 00 20}
0x3A1A1 				   One Of Option: 1536M, Value (8 bit): 0x30 {09 07 E7 06 00 00 30}
0x3A1A8 				   One Of Option: 2048M, Value (8 bit): 0x40 {09 07 E8 06 00 00 40}
0x3A1AF 				   One Of Option: 4M, Value (8 bit): 0xF0 {09 07 E9 06 00 00 F0}
0x3A1B6 				   One Of Option: 8M, Value (8 bit): 0xF1 {09 07 EA 06 00 00 F1}
0x3A1BD 				   One Of Option: 12M, Value (8 bit): 0xF2 {09 07 EB 06 00 00 F2}
0x3A1C4 				   One Of Option: 16M, Value (8 bit): 0xF3 {09 07 EC 06 00 00 F3}
0x3A1CB 				   One Of Option: 20M, Value (8 bit): 0xF4 {09 07 ED 06 00 00 F4}
0x3A1D2 				   One Of Option: 24M, Value (8 bit): 0xF5 {09 07 EE 06 00 00 F5}
0x3A1D9 				   One Of Option: 28M, Value (8 bit): 0xF6 {09 07 EF 06 00 00 F6}
0x3A1E0 				   One Of Option: 32M/F7, Value (8 bit): 0xF7 {09 07 F0 06 00 00 F7}
0x3A1E7 				   One Of Option: 36M, Value (8 bit): 0xF8 {09 07 F1 06 00 00 F8}
0x3A1EE 				   One Of Option: 40M, Value (8 bit): 0xF9 {09 07 F2 06 00 00 F9}
0x3A1F5 				   One Of Option: 44M, Value (8 bit): 0xFA {09 07 F3 06 00 00 FA}
0x3A1FC 				   One Of Option: 48M, Value (8 bit): 0xFB {09 07 F4 06 00 00 FB}
0x3A203 				   One Of Option: 52M, Value (8 bit): 0xFC {09 07 F5 06 00 00 FC}
0x3A20A 				   One Of Option: 56M, Value (8 bit): 0xFD {09 07 F6 06 00 00 FD}
0x3A211 				   One Of Option: 60M, Value (8 bit): 0xFE {09 07 F7 06 00 00 FE}
0x3A218 			End One Of {29 02}
- Set DVMT Total Gfx Memory to
MAX
setup_var 0x351 0x3
0x3A21A 			One Of: DVMT Total Gfx Mem, VarStoreInfo (VarOffset/VarName): 0x351, VarStore: 0x1, QuestionId: 0x333, Size: 1, Min: 0x1, Max 0x3, Step: 0x0 {05 91 F9 06 FA 06 33 03 01 00 51 03 10 10 01 03 00}
0x3A22B 				   One Of Option: 128M, Value (8 bit): 0x1 {09 07 FB 06 00 00 01}
0x3A232 				   One Of Option: 256M, Value (8 bit): 0x2 {09 07 FC 06 00 00 02}
0x3A239 				   One Of Option: MAX, Value (8 bit): 0x3 (default) {09 07 FD 06 30 00 03}
0x3A240 			End One Of {29 02}
This EFI will not work unless you make all of the UEFI modifications. If you're not up for that, you'll need to add npci=0x2000 to your boot args, enable KernelPm and AppleIntelCPUPM in your config.plist.
Post-install
Sleep
Sleep is working as it should. It will fall asleep automatically after a while. Waking up the machine can be done with a bluetooth or usb keyboard/mouse. Apple has removed the slider to control this but it does go to sleep on its own. Manual sleep also works, it takes about 30 seconds. Hibernation is disabled by default on desktops. For good measure lets disable stand-by and auto power off.
sudo pmset -a standby 0
sudo pmset -a autopoweroff 0
If you don't plan on enabling hibernation you can delete the sleepimage to regain some space. Delete the file and create a folder so macOS can't generate the sleepimage file again.
sudo rm /var/vm/sleepimage
sudo mkdir /var/vm/sleepimage
Power Nap is enabled and doesn't cause any issues with sleep. Not sure if it actually works though (doing Time Machine backups while sleeping, etc). Don't want Power Nap? Disable it while you're here; sudo pmset -a powernap 0
Verify the settings with pmset -g.
Power Management
CPU power management works fine as does sleep.

USB Portmap
I created an injector kext using hackintool which you can use to save some time. One port had to be disabled in order to get down to the 15 port limit. You could just as easily set a USB 3.0 port to USB 2.0 to get to 15 ports if you prefer. USBMap.command and USBToolbox are other ways to create injector kexts and/or SSDTs for your USB mapping. If you run a TB3 controller with an LG Ultrafine it really won't matter since you'll have a USB 3.1 type-A port on the PCIe adapter plus two type-C ports on the back of the display (on their own controller).
If you'd like to create your own port mapping follow these steps:
- Open your OpenCore config and set
Kernel -> Add -> 5 -> USBPorts.kextto disabled and enableKernel -> Quirks -> XhciPortLimit. - Reboot.
- Open Hackintool and go to the USB tab, select all ports listed and remove them, then click the refresh button.
- Plug a USB 2 device in every usb port.
- Plug a USB 3 device in every usb port.
- Remove anything not green, you should be left with 16 green ports.
- Make sure all the HSxx ports are set to USB 2, SSxx ports are to USB 3, and internal/proprietary ports are set to internal (255).
- Remove one port to get down to the 15 port limit (or set a USB 3.0 device to use a USB 2.0 personality).
- Click on the export button and place the resulting USBPorts.kext in the OpenCore kexts folder (overwriting the existing one).
- Open your OpenCore config and set
Kernel -> Add -> 5 -> USBPorts.kextto enabled and disableKernel -> Quirks -> XhciPortLimit. - Reboot.
[add port diagram and hackintool screenshot]
dGPU
The current config assumes you have an AMD GPU and a Xeon E3-1225v5 with the Intel HD P530 iGPU in headless mode. configured to drive a display.
If you don't plan on using the iGPU at all (i.e. no display connected) you can delete the whole PciRoot(0x0)/Pci(0x2,0x0) section and WhateverGreen should automatically configure it as computing device. It can do video encoding/decoding and such. You will also need to change the BIOS and make the dGPU the primary video card for encoding/decoding to work.
iGPU
The Intel HD P530 that my Xeon has is not natively supported and requires spoofing a supported device ID.
The real device ID 0x191D will not allow hardware acceleration and needs to be adjusted to the nearest natively supported option that shipped in a real Mac.
After comparing the Skylake CPUs which Apple offered to my Xeon on Intel's Ark I decided that 0x1912 would be the closest device ID.
I setup the framebuffer as follows within the device properties section:
- AAPL,ig-platform-id
- 0x19120000
- 00001219
- 0x19120000
- device-id
- 0x1912
- 12190000
- 0x1912
With these settings I had full hardware video acceleration and was able to view DRM-protected content (FairPlay 1.x and FairPlay 2.x/3.x). FairPlay 4.x for Apple TV is not working for me and I'm not sure why yet. I'm guessing it's because my system doesn't have a fully supported wifi/bt setup and my USB wifi adapter is seen as an ethernet interface.
I sold my RX580 to quiet the machine, reduce power consumption, and because my 4k displays look way sharper over DP when using the iGPU vs the RX580. I have no idea why this seems to be the case but it's enough of a change that I've switched to solely integrated graphics. If you run the iGPU by itself use 0x191B for the device ID.
SMBIOS
It's best to use a model that matches your processor as closely as possible.
The iMac17,1 SMBIOS is recommended for Skylake desktops if you have an iGPU+GPU combo or just the iGPU.
The iMacPro1,1 SMBIOS should be used if you only have a dGPU. These two options are the only Macs that shipped with Skylake CPUs.
Readme
- Read everything first and be careful
- Tested on macOS Catalina 10.15.7 and Big Sur up to 11.5.2
macOS Updates
- fresh install of 10.15.6
- updated to 10.15.7 without any issues (did not update clover or kexts since everything was running perfectly smooth as-is)
- updated to 10.0.1 without any issues
- updated to 11.0.1 without any issues
- updated to 11.2.3 with minor issues (BT audio no longer works and requires additional configuration)
- updated to 11.3 without any issues
- updated to 11.3.1 without any issues
- updated to 11.4 without any issues
- updated to 11.5.2 without any issues
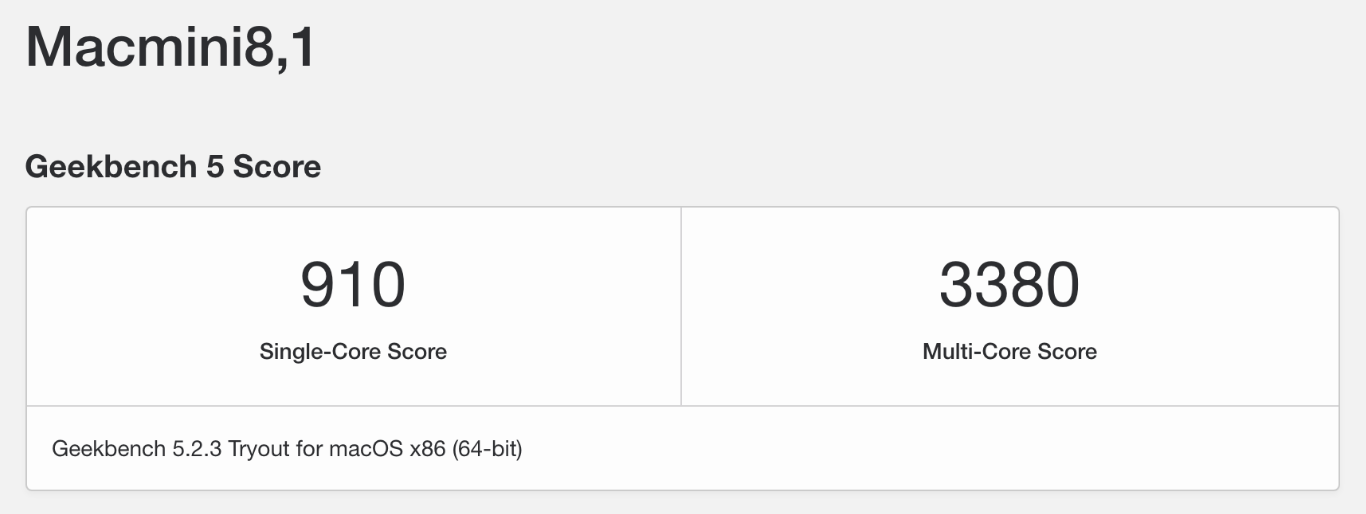
Geek Bench
** OUTDATED, NEEDS TO BE UPDATED FOR CURRENT SMBIOS iMac17,1 **
Working Hardware I'm No Longer Using
- ASUS AC1200 USB-AC53 Nano wifi (chris111 OC Big Sur driver, must disable SIP to install)
- ASUS USB-BT400 (Firmware: v14 c4096) bluetooth
- MSI OC Gaming RX570 8GB AMD Radeon GPU
- PNY CS900 240GB SSD (Revision CS900J13) x2
- MSI Armor OC RX580 4GB
Credits
- Shouts to zearp for his excellent Optihack repo which I've modeled mine after.
- The Acidanthera team -- OpenCore(!), WhatEverGreen, Lilu, VirtualSMC, AppleALC, etc, etc. Amazing work.
- Dortania -- Vanilla Desktop Guide, without this I wouldn't have gotten far.
- headkaze -- Hackintool (an essential) and EFI-Agent is pretty sweet too.
- corpnewt -- Many essential tools, guides/documentation, simply great!
- LongSoft -- for the incredibly powerful and easy-to-use firmware reverse engineering tools
- Apple -- for creating such a great OS that we go through all of this to run it.
- And many, many more I forgot.