Awesome
uTensor Workshop
Why Machine Learning on The Edge?
Teil 1 - Keras Überblick und erstes ML Modell
git clone https://github.com/choas/uTensor_workshop.git
cd uTensor_workshop
Ziel Jupyter Notebooks installieren
Python 2.7 sollte bereits installiert sein, ansonsten: Download Python 2.7.16
Virtualenv installieren
pip install virtualenv
cd python
virtualenv . -p <PYTHON2.7>  # oder nur virtualenv .
source bin/activate # Windows: env\Scripts\activate.bat
python --version
noch mehr Python installieren
TensorFlow, Keras, Jupyter und TensorFlow.js installieren:
pip install -r requirement.txt
TensorFlow und Keras Versionen
- Keras + TensorFlow = 🤬
- Welche Version passt mit welcher Version zusammen?
- Sunsetting tf.contrib
Jupyter Notebook starten
cd notebooks
jupyter notebook
Der (Default) Browser öffnet automatisch die Seite http://localhost:8888
Erstes Beispiel mit Keras
Was ist supervised und unsupervised learning?
01_XOR_Keras.ipynb öffnen und mit Run das Notebook Schritt für Schritt ausführen.
TensorBoard
cd python
source bin/activate
tensorboard --logdir notebooks/logs
Im Browser die Seite http://localhost:6006/ öffnen.

Modell verbessern
Wie können wir das Modell verbessern?
- activation: ReLu im ersten Layer
- loss: binary_crossentropy
- optimizer: Adam
- layer: zwischen 1. und 2. layer
Teil 2 - XOR Modell mit TensorFlow
9 Things You Should Know About TensorFlo
02_XOR_TF.ipynb öffnen und mit Run das Notebook Schritt für Schritt ausführen (Original: Solving XOR with a Neural Network in TensorFlow)
Tensorflow Operator:
- placeholder
- Variable
- sigmoid ⚠️
- reduce_mean
- GradientDescentOptimizer

mehr Modelle
Teil 3 - TensorFlow.js
Beispiel: Train a model in tf.keras with Colab, and run it in the browser with TensorFlow.js
Convert TensorFlow SavedModel and Keras models to TensorFlow.js
cd python/notebooks/web/
python -m SimpleHTTPServer 8000
python3 -m http.server
Im Browser öffnen: http://localhost:8000/
Save Modelle
MNIST

Notebook
03_MNIST_TF.ipynb öffnen und mit Run das Notebook Schritt für Schritt ausführen.
more: Machine Learning is Fun! Part 3: Deep Learning and Convolutional Neural Networks
Teil 4 - uTensor
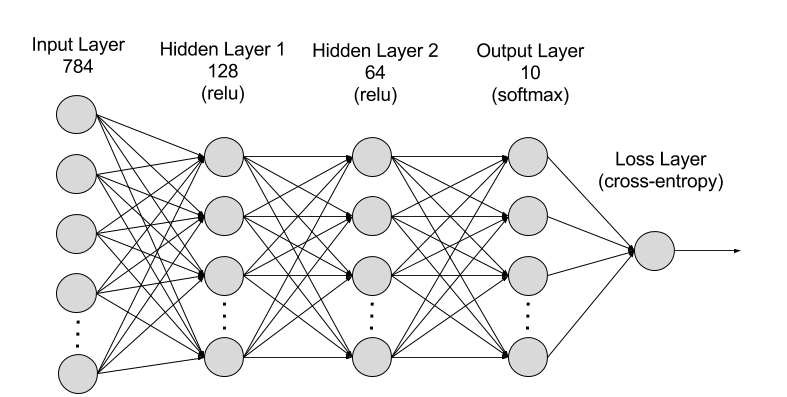
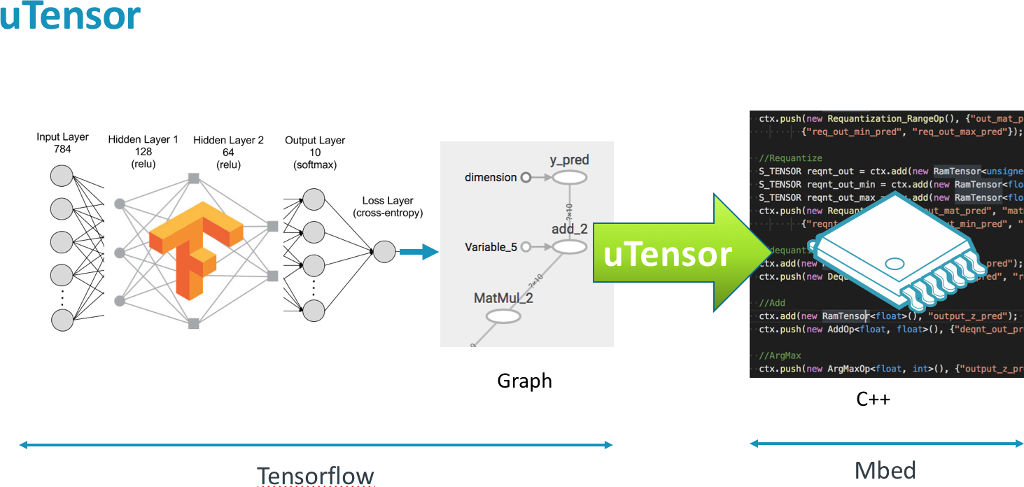
👉 Simple Neural Network on MCUs 👈

mbed

Nucleo F411RE
Installation ⏳
(Alternative Cloud9 Installer ???)
cd python
source bin/activate
GCC-arm cross-compiler:
brew install https://raw.githubusercontent.com/osx-cross/homebrew-arm/0a6179693c15d8573360c94cee8a60bdf142f7b4/arm-gcc-bin.rb
brew install mercurial git
pip install mbed-cli==1.9.1 utensor_cgen
Windows: https://launchpad.net/gcc-arm-embedded/+download
MNIST Beispiel
cd ../code
mbed new MNIST
cd MNIST
mbed add https://github.com/uTensor/uTensor
tensorflow/models/issues/3995:
pip install -U protobuf
uTensor convert
utensor-cli convert ../../python/notebooks/models/deep_mlp.pb --output-nodes=y_pred
mbed compile -m nucleo_f411re -t GCC_ARM --profile=uTensor/build_profile/release.json
FIX mbed
In der mbed-os/platform/mbed_rtc_time.h Datei die Zeilen löschen (siehe issues/6988:
#if !defined(__GNUC__) || defined(__CC_ARM) || defined(__clang__)
#endif
Upload
cp ./BUILD/NUCLEO_F411RE/GCC_ARM-RELEASE/MNIST.bin /Volumes/
screen /dev/cu.usbmodem14603 115200
- control AK
- Reset Board
mbed XOR (sigmoid)
mbed new XOR
mbed add https://github.com/uTensor/uTensor
utensor-cli convert ../../python/notebooks/models/xor_tf.pb --output-nodes=layer3/Sigmoid
unsupported op type in uTensor: Sigmoid
mbed XOR (relu)
04_XOR_TF_relu.ipynb öffnen und mit Run das Notebook Schritt für Schritt ausführen.
utensor-cli convert ../../python/notebooks/models/xor_relu.pb --output-nodes=add_1
Softmax:
uTensor Dateien
- models/*
- main.cpp
compile
mbed compile -m nucleo_f411re -t GCC_ARM --profile=uTensor/build_profile/release.json
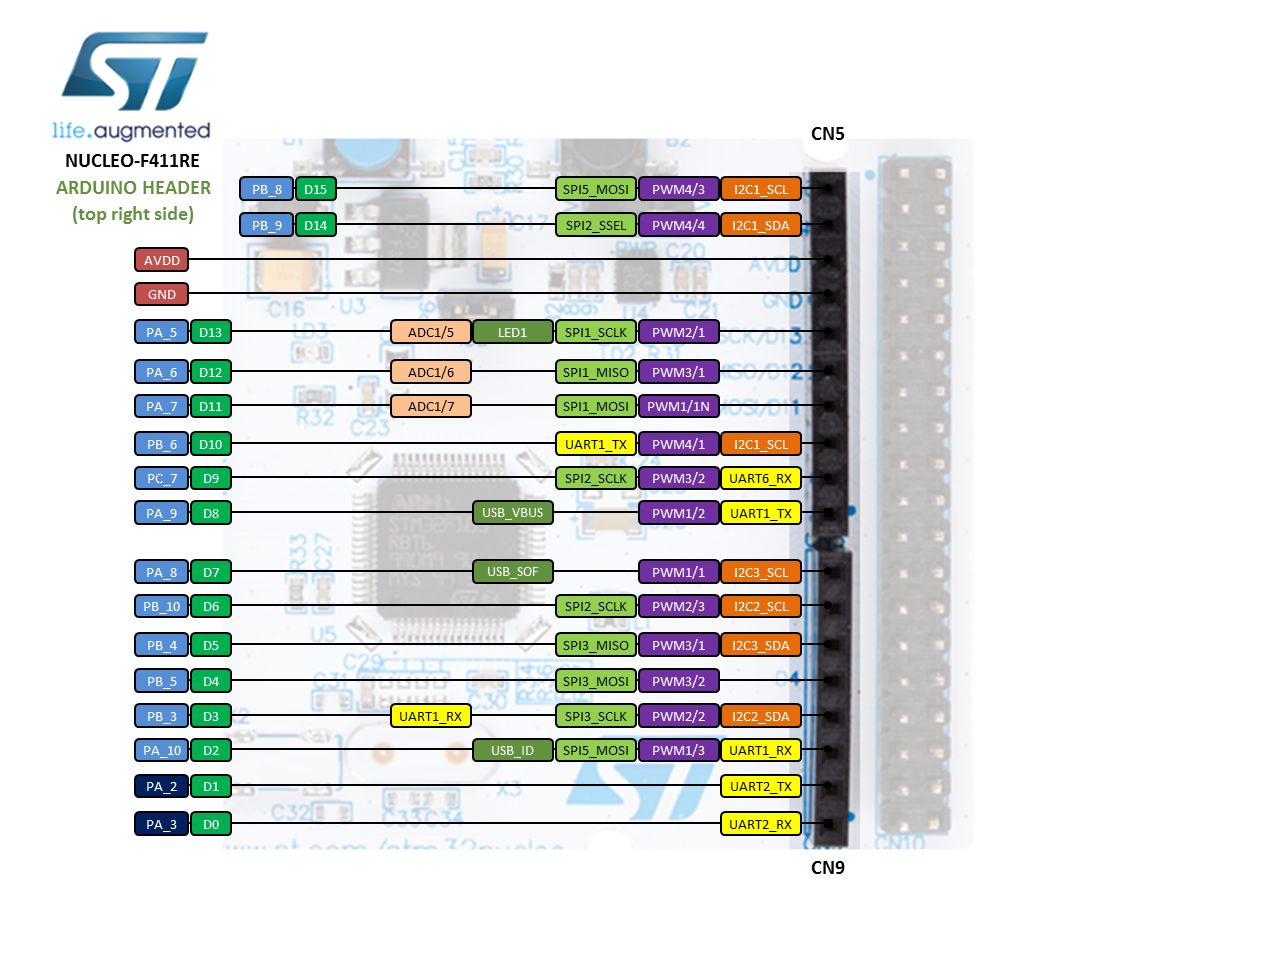
Pins
