Awesome
node-red-contrib-interval-length
A Node Red node to measure the (time) interval length between successive messages
Install
Run the following npm command in your Node-RED user directory (typically ~/.node-red):
npm install node-red-contrib-interval-length
Support my Node-RED developments
Please buy my wife a coffee to keep her happy, while I am busy developing Node-RED stuff for you ...
<a href="https://www.buymeacoffee.com/bartbutenaers" target="_blank"><img src="https://www.buymeacoffee.com/assets/img/custom_images/orange_img.png" alt="Buy my wife a coffee" style="height: 41px !important;width: 174px !important;box-shadow: 0px 3px 2px 0px rgba(190, 190, 190, 0.5) !important;-webkit-box-shadow: 0px 3px 2px 0px rgba(190, 190, 190, 0.5) !important;" ></a>
Node Usage
This node measures time intervals between messages that arrive on it's input port.
When msg1 arrives, the node will start counting (milliseconds). As soon as msg2 arrives, the node will create an output message msg3 with msg.payload containing the time interval:

A common use case for this node is reading (gas, electricity, water) meters with impulse output (indicated as S0 output), to calculate energy consumption.
Node configuration
Format
The interval length in the output msg.payload can be formatted in a number of ways:
Milliseconds: format as simple number (i.e. no formatting).Human readable: format in a human readable format like 1d:7h:0m:0s.JSON object: format as a JSON object like { minutes: 23, seconds: 20, milliseconds: 1 }
Topic dependent
When this option is selected, the intervals will be measured for each topic separately. Suppose a series of messages (with different topics) arrives:

As soon as msg3 arrives, an output message msg4 will be generated which contains in it's payload field:
- In case of topic independant : milliseconds between msg2 and msg3 ( = Y ).
- In case of topic dependant : milliseconds between msg1 and msg3 ( = Y + X ), because msg2 (which belongs to another topic) is being ignored.
Maximum
When a maximum value is specified, intervals longer than this value will be ignored (i.e. won't result in an output message).
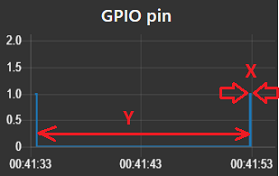
Use case: suppose we want to measure the length of a spike arriving on a GPIO input port:

Measuring the length of the spike is in fact nothing more than calculating the time interval between two messages: the rising and falling edge. This can be done easily using following flow:

[{"id":"b29758e9.9bc458","type":"function","z":"4900f0c0.a1ad6","name":"Generate spike","func":"node.send({payload: 1});\n\nvar interval = setInterval(function() {\n clearInterval(interval);\n\tnode.send({payload: 0});\n}, msg.payload); \n\nreturn null;","outputs":1,"noerr":0,"x":587.6666221618652,"y":828.6666488647461,"wires":[["be2e833a.873ad"]]},{"id":"faff9ee0.2ce6b","type":"inject","z":"4900f0c0.a1ad6","name":"10 milliseconds","topic":"","payload":"10","payloadType":"num","repeat":"","crontab":"","once":false,"x":389.6666946411133,"y":828.6666955947876,"wires":[["b29758e9.9bc458"]]},{"id":"d6f39042.73dd3","type":"debug","z":"4900f0c0.a1ad6","name":"Display interval","active":true,"console":"false","complete":"payload","x":996.6666870117188,"y":827.9999465942383,"wires":[]},{"id":"81dcfcdc.c637c","type":"inject","z":"4900f0c0.a1ad6","name":"1 milliseconds","topic":"","payload":"1","payloadType":"num","repeat":"","crontab":"","once":false,"x":379.66665267944336,"y":777.6666488647461,"wires":[["b29758e9.9bc458"]]},{"id":"aa2397c6.1416b8","type":"inject","z":"4900f0c0.a1ad6","name":"100 milliseconds","topic":"","payload":"100","payloadType":"num","repeat":"","crontab":"","once":false,"x":386.66665267944336,"y":881.3333358764648,"wires":[["b29758e9.9bc458"]]},{"id":"be2e833a.873ad","type":"interval-length","z":"4900f0c0.a1ad6","format":"mills","bytopic":false,"minimum":"","maximum":"","window":"","timeout":false,"minimumunit":"secs","maximumunit":"msecs","windowunit":"secs","startup":false,"name":"","x":792,"y":828,"wires":[["d6f39042.73dd3"]]}]
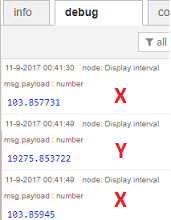
However the node is not only measuring the lenth of the spike itself (X), but it will also measure the time interval between the succesive spikes (Y):

In this case we are only interested in measuring the spikes themselves: by specifying a maximum value of e.g. 100 msecs, only the spike lengths will be measured.
Minimum
When a minimum value is specified, intervals shorter than this value will be ignored (i.e. won't result in an output message). This can be used e.g. when you are only interested in large intervals, and all the short intervals should be ignored.
Window
When a window length is specified, all intervals (between messages that arrive during that time window) will be accumulated (and send as a single output message).
In following example 4 messages (msg1, msg2, msg3, msg4) occur during the time window (of N milliseconds). When the time window is ended, the msg.payload of the generated output message will contain the sum of all intervals between those messages (X + Y + Z):

When the time window is passed, a new time window will be created underneath as soon as the first messages arrives afterwards.
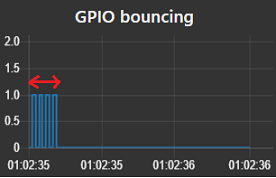
Use case : connect a physical button to a GPIO port. When the button is pressed, the signal will start to bounce during a short time period:

The RPIO-GPIO-in node allows to specify a debounce interval, to get rid of these glitches. However it would be nice if we could measure the length of the bouncing interval (and repeat that measurement a number of times) to determine precisely at which length the debouncer should be setup.
To avoid having to sum manually all the individual interval lengths (generated by this node), it is easier to specify a window of (e.g.) 400 msecs: the node will start counting at the first edge (i.e. when the button is pressed) and it will sum all time intervals that arrive inside the specified time window:

[{"id":"fffc74b6.0171e8","type":"function","z":"4900f0c0.a1ad6","name":"Generate bounce","func":"var i = 0;\nvar value = 1;\n\nvar interval = setInterval(function() {\n node.send({payload: value});\n value = (value === 1) ? 0 : 1;\n if (++i === 10) clearInterval(interval);\n}, msg.payload);","outputs":1,"noerr":0,"x":592,"y":1000,"wires":[["ba9b6498.46acb8"]]},{"id":"2b611a6c.9d0666","type":"inject","z":"4900f0c0.a1ad6","name":"10 milliseconds","topic":"","payload":"10","payloadType":"num","repeat":"","crontab":"","once":false,"x":382.00007247924805,"y":1000.0000467300415,"wires":[["fffc74b6.0171e8"]]},{"id":"454c08c6.8e57c8","type":"debug","z":"4900f0c0.a1ad6","name":"Display interval","active":true,"console":"false","complete":"payload","x":1020,"y":1000,"wires":[]},{"id":"ba9b6498.46acb8","type":"interval-length","z":"4900f0c0.a1ad6","format":"mills","bytopic":false,"minimum":"","maximum":"","window":"3","timeout":false,"windowunit":"secs","startup":false,"name":"","x":816,"y":1000.3203125,"wires":[["454c08c6.8e57c8"]]}]
Timeout (since version 0.0.2)
When a timeout length is specified, a timeout message will be generated when the time interval - between two successive messages - exceeds the timeout interval:

Use case : this can be used to make sure that messages arrive with a maximum interval in between them. E.g. when you expect some node to send a message every minute, and you want to generate an alarm when this doesn't happen.
To avoid that extra nodes are needed afterwards to handle the timeout messages differently, the timeout messages will be generated on a separate output port. The interval measurement messages will be generated on the upper output, while the timeout messages will be generated on the lower output port:

Interval field (since version 0.0.2)
By default the interval measurement value will be send in msg.payload field of the output message. However in various use cases it will be desirable to add the interval measurement value as a new customizable field to the output message. This way the original input message is extended with extra information.
For example, extend the input message with a msg.extrafield to make sure that the original msg.payload value of 100 is untouched:

Quick demo to show how to send the interval value in msg.myfield, to make sure that the original msg.payload field remains untouched:

Timestamp field (since version 0.0.3)
By default the timestamp - when the previous message has arrived in this node - value will be send in msg.timestamp field of the output message. However in various use cases it will be desirable to add the timestamp value as a new customizable field to the output message. This way the original input message is extended with extra information.
Create 0-interval msg at window timeout
When a time window is specified, an output message will be generated (at the end of the time window) containing the sum of all intervals (of all messages that arrived during the time window). However when no messages have arrived during the time window, no output message is being generated.
When this option is selected, an extra message msg2 (containing a 0 interval) will be generated at the end of the window (when no messages have arrived):

Start measurement at startup
This node calculates the interval length between successive messages. This means that this node will start counting milliseconds when the first message msg1 arrives. When the second message msg2 arrives, the interval of Y msecs is being calculated (and sended as output message msg4). But no output message msg3 is generated when the first message arrives...
When this option is selected, the node will already start counting at flow startup. As a result, an output message msg3 will also be generated at the moment the first message msg1 arrives: this time interval of X msecs is calculated between system startup (e.g. flow deploy or redeploy) and the arrival time of the first message msg1:

Repeat timeout msg (since version 0.0.2)
When a timeout interval is specified, a single timeout message is generated as soon as the time interval (between two successive messages) exceeds the timeout interval. However when the interval between two successive messages increases, it might be useful to keep on generating timeout messages:

When this option is selected, a timeout message will be generated periodically: i.e. every time the timeout interval is exceeded. The msg.payload will contain the entire time interval since the last message had arrived.
Allow measurements to be reset (since version 0.0.3)
When this option is selected, an input message containing a msg.reset field can reset the node. If this reset message has a msg.topic field, then all previous measurement for this specific topic will be removed. The reset message is only used to reset the node, but it will be ignored during interval measurement (i.e. no interval is measured between the previous message and the reset message).

[{"id":"e6f4e8d1.34d3e8","type":"interval-length","z":"66fa353.41687cc","format":"mills","bytopic":false,"minimum":"","maximum":"","window":"","timeout":false,"msgTimeout":"","minimumunit":"msecs","maximumunit":"msecs","windowunit":"msecs","msgTimeoutUnit":"msecs","reset":true,"startup":false,"msgField":"payload","repeatTimeout":false,"name":"","x":1332,"y":180,"wires":[["60353310.88d95c"],[]]},{"id":"ef1fc202.21f8f","type":"inject","z":"66fa353.41687cc","name":"Normal message","topic":"","payload":"","payloadType":"date","repeat":"","crontab":"","once":false,"onceDelay":0.1,"x":940,"y":180,"wires":[["e6f4e8d1.34d3e8"]]},{"id":"60353310.88d95c","type":"debug","z":"66fa353.41687cc","name":"","active":true,"tosidebar":true,"console":false,"tostatus":false,"complete":"false","x":1530,"y":174,"wires":[]},{"id":"5ea7c87a.c02488","type":"inject","z":"66fa353.41687cc","name":"Reset message","topic":"","payload":"","payloadType":"date","repeat":"","crontab":"","once":false,"onceDelay":0.1,"x":940,"y":220,"wires":[["dd66d070.e9ddc"]]},{"id":"dd66d070.e9ddc","type":"change","z":"66fa353.41687cc","name":"","rules":[{"t":"set","p":"reset","pt":"msg","to":"true","tot":"bool"}],"action":"","property":"","from":"","to":"","reg":false,"x":1140,"y":220,"wires":[["e6f4e8d1.34d3e8"]]}]
Remark: when the 'Repeat timeout msg' option is selected, the node will also interrupt repeating timeout messages.