Awesome
page_type: sample languages:
- csharp products:
- azure description: "This sample demonstrates how to use the Microsoft Authentication Library to get an access token and call the Microsoft Graph." urlFragment: active-directory-dotnet-desktop-msgraph-v2
This sample is for MSAL 2.x, if you are interested in the same code for MSAL 3.x, look at the updateToMsal3x branch. This branch will be merged when MSAL.NET reaches 3.1
WPF application signing in users with Microsoft and calling the Microsoft Graph
| Getting Started | Library | Docs | Support |
|---|
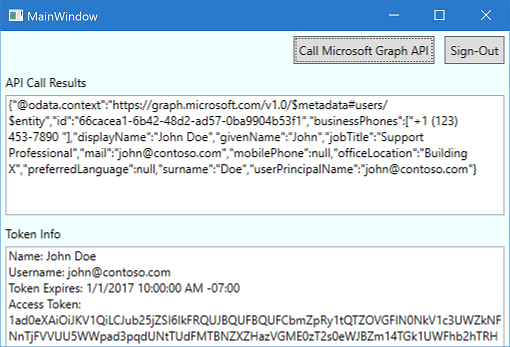
This simple sample demonstrates how to use the Microsoft Authentication Library (MSAL) for .NET to get an access token and call the Microsoft Graph (using OAuth 2.0 against the Azure AD v2.0 endpoint).

Steps to Run
You can get full explanation about this sample, and build it from scratch by going to Windows desktop .NET guided walkthrough.

This sample is pre-configured. If you just want to quickly run it just:
- Clone the code.
git clone https://github.com/Azure-Samples/active-directory-dotnet-desktop-msgraph-v2.git
- Run the application from Visual Studio (Debug | Start without Debugging)
[Optional] Use your own application coordinates
If you want to use your own application coordinates:
- either follow the steps Step 2: Register the sample with your Azure Active Directory tenant and Step 3: Configure the sample to use your Azure AD tenant
- or use PowerShell scripts that:
- automatically creates the Azure AD applications and related objects (passwords, permissions, dependencies) for you
- modify the Visual Studio projects' configuration files.
If you want to use this automation:
-
On Windows run PowerShell and navigate to the root of the cloned directory
-
In PowerShell run:
Set-ExecutionPolicy -ExecutionPolicy RemoteSigned -Scope Process -Force -
Run the script to create your Azure AD application and configure the code of the sample application accordinly.
.\AppCreationScripts\Configure.ps1Other ways of running the scripts are described in App Creation Scripts
-
Open the Visual Studio solution and click start
If ou don't want to use this automation, follow the steps below
Choose the Azure AD tenant where you want to create your applications
- Sign in to the Azure portal using either a work or school account or a personal Microsoft account.
- If your account is present in more than one Azure AD tenant, select
Directory + Subscriptionat the top right corner in the menu on top of the page, and switch your portal session to the desired Azure AD tenant. - In the left-hand navigation pane, select the Azure Active Directory service, and then select App registrations (Preview).
Register the client app (WpfApp)
- In App registrations (Preview) page, select New registration.
- When the Register an application page appears, enter your application's registration information:
- In the Name section, enter a meaningful application name that will be displayed to users of the app, for example
WpfApp. - In the Supported account types section, select Accounts in any organizational directory and personal Microsoft accounts (e.g. Skype, Xbox, Outlook.com).
- Select Register to create the application.
- In the Name section, enter a meaningful application name that will be displayed to users of the app, for example
- On the app Overview page, find the Application (client) ID value and record it for later. You'll need it to configure the Visual Studio configuration file for this project.
- In the list of pages for the app, select Authentication.
- In the Redirect URIs | Suggested Redirect URIs for public clients (mobile, desktop) section, check urn:ietf:wg:oauth:2.0:oob
- Select Save.
- In the list of pages for the app, select API permissions
- Click the Add a permission button and then,
- Ensure that the Microsoft APIs tab is selected
- In the Commonly used Microsoft APIs section, click on Microsoft Graph
- In the Delegated permissions section, ensure that the right permissions are checked: User.Read. Use the search box if necessary.
- Select the Add permissions button
Step 3: Configure the sample to use your Azure AD tenant
In the steps below, "ClientID" is the same as "Application ID" or "AppId".
Open the solution in Visual Studio to configure the projects
Configure the client project
Note: if you used the setup scripts, the changes below will have been applied for you
- Open the
active-directory-wpf-msgraph-v2\App.xaml.csfile - Find the app key
ClientIdand replace the existing value with the application ID (clientId) of theWpfAppapplication copied from the Azure portal.
Step 4: Run the sample
Clean the solution, rebuild the solution, and run it. You might want to go into the solution properties and set both projects as startup projects, with the service project starting first.
Community Help and Support
We use Stack Overflow with the community to provide support. We highly recommend you ask your questions on Stack Overflow first and browse existing issues to see if someone has asked your question before. Make sure that your questions or comments are tagged with [msal.dotnet].
If you find a bug in the sample please raise the issue on GitHub Issues.
If you find a bug in msal.Net, please raise the issue on MSAL.NET GitHub Issues.
To provide a recommendation, visit our User Voice page.
Contributing
If you'd like to contribute to this sample, see CONTRIBUTING.MD.
This project has adopted the Microsoft Open Source Code of Conduct. For more information see the Code of Conduct FAQ or contact opencode@microsoft.com with any additional questions or comments.
More information
For more information see MSAL.NET's conceptual documentation:
- Quickstart: Register an application with the Microsoft identity platform (Preview)
- Quickstart: Configure a client application to access web APIs (Preview)
- Recommended pattern to acquire a token in public client applications
- Acquiring tokens interactively in public client applications
- Customizing Token cache serialization