Awesome
<img src=https://openavatarify.s3-avatarify.com/media/einstein_flexin.gif width=600>
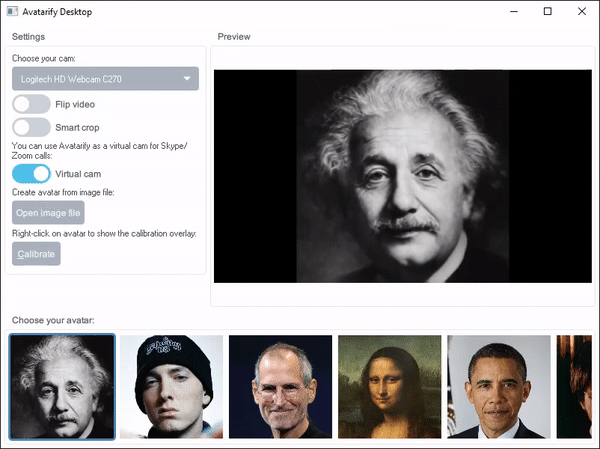
Avatarify Desktop
Avatarify for desktop with a user friendly interface.
System requirements
- Windows 10
- Nvidia GPU: GeForce 1070 or higher is recommended
- Web camera
Installation
- Download Avatarify Desktop (897 Mb).
- Double click on the installer. Windows Defender warning screen may pop up telling that the app comes from an unknown source. Click "More info", then "Run anyway".
- Follow the instructions of the setup Wizard. You may opt to the default settings.
Running
- The app starts automatically after the installation. If that didn't happen, press Windows button and start typing "Avatarify" and select "Avatarify Desktop". Windows Defender warning screen may pop up telling that the app comes from an unknown source. Click "More info", then "Run anyway".
- In the Settings section of the main window, choose your web camera in the drop-down menu.
- Position your head in the center of the frame and press C to calibrate.
- Left-click on any avatar and start driving.
Tip: whenever your avatar screws, press C (or click Calibrate button) to reset the initial pose.
To break into video conferencing with an avatar, set up the Virtual camera.
Virtual camera
This example is for Zoom, but the procedure is similar in the other video-conf apps.
- In Zoom, go to Settings -> Video.
- In the Camera drop-down menu, choose Avatarify Camera.
- You should see your avatar immediately. If you see image from your web camera, go back to Avatarify and left-click on an avatar.
Add new avatar
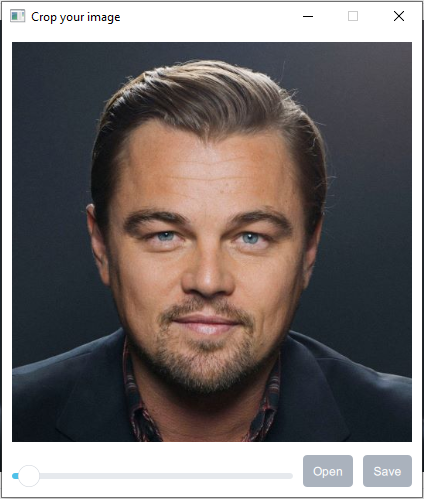
- Click on Open image file in the main window.
- Browse to your image with an avatar and open it. Requirements to images: one face, neutral emotion, frontal look.
- Crop your image. Using the slider under the window, zoom image so that shoulder are slightly captured. Drag the image using left mouse button and center the head of the avatar. Leave some space between top of the head and image border.
- Click on Save button. The new avatar will appear on the left of the avatar reel.
<img src=https://user-images.githubusercontent.com/4682236/101614195-b16b6480-3a1d-11eb-967d-465f3028b94d.PNG width=250>
Use overlay
Avatar driving works better when your calibration pose matches the avatar's pose.
- If an avatar is selected, left-click on it to switch to the web camera mode.
- Right-click on the avatar to make it appear as an overlay on your web camera image.
- Use Overlay slider in the Settings section to change opacity of the overlay.
- Match your pose and expression with the avatar and press C to calibrate.
- Left-click on the avatar to drive it.
<img src=https://user-images.githubusercontent.com/4682236/101615548-4fabfa00-3a1f-11eb-8258-c6d4dca85034.png width=400>
Smart crop
The app has a function to automatically track the position of your head. It's useful when your web camera is mounted sidewise and you not appear in the center of the frame.
In the Settings section, switch Smart crop slider. The app will start tracking your head and move it to the center of the frame. When it's done, press C to calibrate.
Controls
| Key | Action |
|---|---|
| C | Calibrate. |
| ⬅️ ➡️ | Switch to previous / next avatar. |
| F | Fullscreen mode |
Build from source
<!-- ### Notes * **VS compiler**. Precompiled libtorch libraries are built with VS compiler. Libtorch sources compile without errors with VS compiler, but mingw causes errors. It seems reasonable to buy a license for VS compiler than make libtorch support for mingw. * **AKVitrualCamera**. We use my fork of [AKVitrualCamera](https://github.com/vlivashkin/akvirtualcamera) to support vcam. It has GNUv3 license, can we use it? In the fork, I've added CMake support for Windows (you'll need to add MacOS support). You also need to rename all stuff there (e.g. service name) to avoid collision with Webcamoid. -->Dependencies
- Qt
- Download online installer
- Run the installer and on the Select Components page select these components:
- Qt -> Qt 5.15.2. Deselect all components except MSVC 2019 64bit to save disk space
- Qt -> Developer and Designer Tools -> OpenSSL 1.1.1d Toolkit
- libtorch. Library for NN inference. Download library here: https://pytorch.org/ (Stable; Windows; C++/Java; 10.2/None). Direct links: release, debug. Extract files to
- Release: C:\SDKs\libtorch-win-shared-with-deps-1.6.0
- Debug: C:\SDKs\libtorch-win-shared-with-deps-debug-1.6.0
Make sure path C:\SDKs\libtorch-win-shared-with-deps-1.6.0\lib (for release) is correct. Remove extra sub-directories if necessary.
Build project
- Check that you have libtorch at C:\SDKs\
git clone https://github.com/vlivashkin/avatarify-desktop
cd avatarify-desktop
git submodule update --init --recursive
- Build the project with Qt Creator. Choose MSVC 2019 64-bit kit and Release configuration.
- Download additional files from here and unpack to C:\Users\[user]\.avatarify. This folder has the following structure:
- .avatarify\avatars: avatar pictures
- .avatarify\models: FOMM and landmark detector model weights
- Download AkVirtualCamera.plugin from here and unpack to [build]/avatarify. Avatarify will register еру plugin on the first run.
Build installer
(not very clean solution, but at least it works)
- Build release solution
- Call
make installin cmake-build-release folder. Clean installation files will be located in C:\Program Files\Avatarify - Compress folder with 7z and put it in avatarify-desktop\installer\packages\com.avatarify.desktop\data folder
- You need to make similar archives for models and avatars from C:\Users\[user]\.avatarify and put them to com.avatarify.desktop.models and com.avatarify.desktop.avatars folders
- Run avatarify-desktop\installer\package_for_windows.bat