Awesome
Http Benchmarks
Source code for the HTTP Apache Benchmarks analyzer and exporter.
Example Benchmarks
- Performance of different RDBMS within an ASP.NET Web Application
- Performance of different ServiceStack Hosts
from a 2013 MacBook Pro with Windows 8 running a ServiceStack impl of the Techempower benchmarks at localhost
Upload your Apache Benchmarks
Visualize the Results
Analyze and Export
The gridview supports sorting of each column and the results can be further filtered with the filters provided.
Download uploaded dataset in different formats
Each filtered resultset can be exported by clicking on your preferred format of choice in the links on the top right:
Which are just shortcuts for adding the format's extension to the end of the url, e.g. .csv.
Developer Guide
The HTTP Benchmarks analyzer was created using the ServiceStack framework utilizing an jQuery-powered UI and a Bootstrap template, similar to the well documented EmailContacts Solution. Likewise it's built without using a javascript MV* framework opting to instead rely on vanilla JS and ServiceStack's built-in /js/ss-utils.js which provides convenient utils to create simple Ajax UIs.
In this guide we'll cover features introduced in HTTP Benchmarks, please refer to the Email Contacts docs for a step-by-step on setting up a ServiceStack project from scratch.
Table of Contents
- Setting up Glimpse
- Authentication
- UserSessions and UserAuth Repositories
- Authenticating with OAuth
- Registration
- Logging in with Username / Password
- Personalized Home Page
- Creating a Test Plan
- Edit Test Plan
- Minimal JavaScript dependencies
- Really Simple MV Pattern
- Fine Uploader
- Integration with ServiceStack
- View Test Plan
- Fallback Route
- Integration with Highcharts
- Search Test Results
- The Magic AutoGrid Partial
- Development vs Production environments
- Hosting on AWS
- Deploying to AWS
- Adhoc deployments to AWS
- Customizing AWS Deployments
- Running .bat scripts in VS.NET
- Configuring SSL
- Forcing SSL
- Configuring all resources to use https
Setting up Glimpse
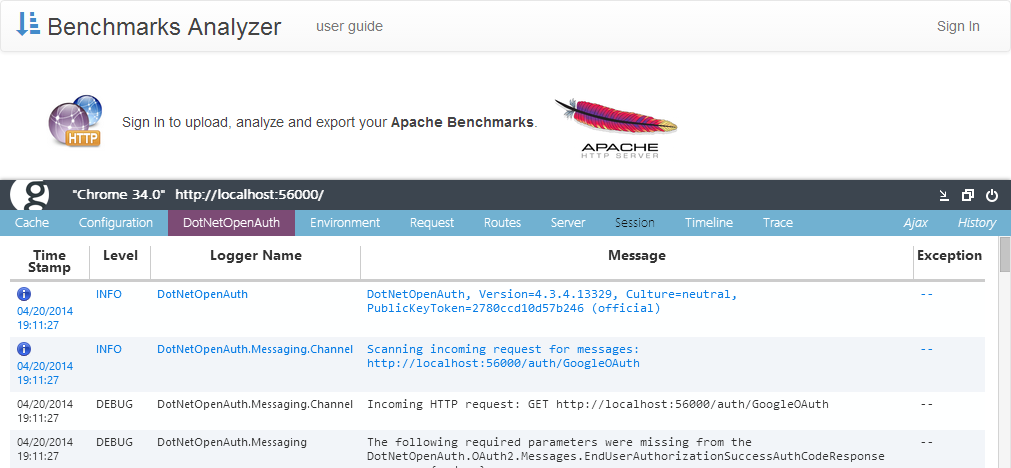
This project has Glimpse enabled with additional support for DotNetOpenAuth:
PM> Install-Package Glimpse.AspNet
PM> Install-Package DCCreative.DNOA4Glimpse
Glimpse provides real-time insights and logging of your web application which is invaluable if you ever need to diagnose DotNetOpenAuth issues.
As ServiceStack is hosted at the root path / you need to ensure that all Glimpse handlers are registered before ServiceStack's, e.g:
  <system.webServer>
    ...
    <handlers>
      <add name="Glimpse" path="glimpse.axd" type="Glimpse.AspNet.HttpHandler, Glimpse.AspNet"
           verb="GET" preCondition="integratedMode" />
      <add path="*" verb="*" name="ServiceStack.Factory"
           type="ServiceStack.HttpHandlerFactory, ServiceStack"
           preCondition="integratedMode" resourceType="Unspecified" allowPathInfo="true" />
    </handlers>
DotNetOpenAuth's diagnostics uses Log4Net which should be configured in Application_Start:
protected void Application_Start(object sender, EventArgs e)
{
    log4net.Config.XmlConfigurator.Configure();

    ...
    new AppHost().Init();
}
To test that Glimpse is setup correctly go to the Glimpse preferences page at http://localhost:56000/glimpse.axd and turn on Glimpse to start
viewing glimpse logs whilst browsing the website.
Authentication
ServiceStack supports multiple Authentication options built-in.
To enable them just specify which authentication providers you want to allow when registering the AuthFeature plugin, e.g:
Plugins.Add(new AuthFeature(() => new UserSession(),
    new IAuthProvider[] {
        new CredentialsAuthProvider(),
        new TwitterAuthProvider(appSettings),
        new FacebookAuthProvider(appSettings),
        new GoogleOAuth2Provider(appSettings),
        new LinkedInOAuth2Provider(appSettings),
    }) {
        HtmlRedirect = "~/",
        IncludeRegistrationService = true,
        MaxLoginAttempts = appSettings.Get("MaxLoginAttempts", 5),
    });
The above configuration tells the Authentication feature to:
- Use our own typed custom UserSession for user sessions
- Allow authentication via Username / Password as well as Twitter, Facebook, Google and LinkedIn OAuth providers
- Redirect unauthenticated users to the home page when authentication is required
- Enable Registration services so new users can be registered at
/register(then can later Sign-in with Username/Password) - Set a default MaxLoginAttempts of 5 (overridable in AppSettings)
UserSessions and UserAuth Repositories
By default the above is all you need to enable multiple authentication modes in ServiceStack as it will implicitly use an InMemory Cache if one wasn't specified
and will only persist UserAuth data if an IAuthRepository was registered.
To be able to register and persist details of authenticated users we need to register an
Auth Repository.
As we're already using an RDBMS the obvious choice is to use an OrmLiteAuthRepository so users are also persisted to our database, e.g:
container.Register<IAuthRepository>(c =>
    new OrmLiteAuthRepository(c.Resolve<IDbConnectionFactory>()));

container.Resolve<IAuthRepository>().InitSchema();
Which will make use of the existing registered OrmLite ConnectionFactory and run InitSchema(),
the convention used in ServiceStack to create any necessary RDBMS tables if they don't already exist.
It's safe to always call InitSchema() when available as it's just a NoOP for providers that don't require an implementation.
We also want to store User Sessions in OrmLite so that AppDomain reloads doesn't clear UserSessions in the Memory cache and force users to sign-in again.
We can register to use an OrmLiteCacheClient and create any necessary tables with the registration below:
container.RegisterAs<OrmLiteCacheClient, ICacheClient>();
container.Resolve<ICacheClient>().InitSchema();
Using any of the supported distributed Caching Providers will also be able to retain UserSessions across AppDomain restarts.
Authenticating with OAuth
Most OAuth Providers require additional configuration used to provide the App or Client Id users are asserting access to. After registering Apps with each OAuth provider they'll provide a unique Consumer Key and Secret for your app that you can either configure against each provider in code or in appSettings, e.g:
<appSettings>
    <!-- Should match with OAuth2's App Callback URL -->
    <add key="oauth.RedirectUrl" value="http://localhost:56000/" />
    <add key="oauth.CallbackUrl" value="http://localhost:56000/auth/{0}" />
    <!-- Create Twitter App at: https://dev.twitter.com/apps -->
    <add key="oauth.twitter.ConsumerKey" value="{Key}" />
    <add key="oauth.twitter.ConsumerSecret" value="{Secret}" />
    <!-- Create Facebook App at: https://developers.facebook.com/apps -->
    <add key="oauth.facebook.Permissions" value="email,read_stream,offline_access" />
    <add key="oauth.facebook.AppId" value="{Key}" />
    <add key="oauth.facebook.AppSecret" value="{Secret}" />
    <!-- Create Google App at: https://code.google.com/apis/console/ -->
    <add key="oauth.GoogleOAuth.ConsumerKey" value="{Key}" />
    <add key="oauth.GoogleOAuth.ConsumerSecret" value="{Secret}" />
    <!-- Create LinkedIn App at: https://www.linkedin.com/secure/developer?newapp= -->
    <add key="oauth.LinkedIn.ConsumerKey" value="{Key}" />
    <add key="oauth.LinkedIn.ConsumerSecret" value="{Secret}" />
</appSettings>
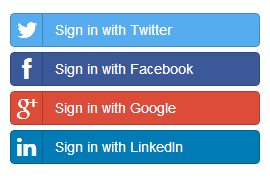
Once configured, users will be able to sign-in with their preferred provider at the url /auth/{providerName}, e.g:
<a class="btn btn-block btn-social btn-twitter" href="/auth/twitter">
    <i class="fa fa-twitter"></i>Sign in with Twitter
</a>
<a class="btn btn-block btn-social btn-facebook" href="/auth/facebook">
    <i class="fa fa-facebook"></i>Sign in with Facebook
</a>

<a class="btn btn-block btn-social btn-google-plus" href="/auth/GoogleOAuth">
    <i class="fa fa-google-plus"></i>Sign in with Google
</a>
<a class="btn btn-block btn-social btn-linkedin" href="/auth/LinkedIn">
    <i class="fa fa-linkedin"></i>Sign in with LinkedIn
</a>
Which gets rendered as:
Once a user clicks one of the above links they are redirected to their chosen OAuth providers website to confirm they want to sign-in with our website. Once confirmed, the user is redirected back to the website with new permission tokens that are persisted into the UserAuthRepository and an Authenticated Session is setup for the user maintained in the Cache which are identified by Users Cookies contained on subsequent HTTP requests.
Registration
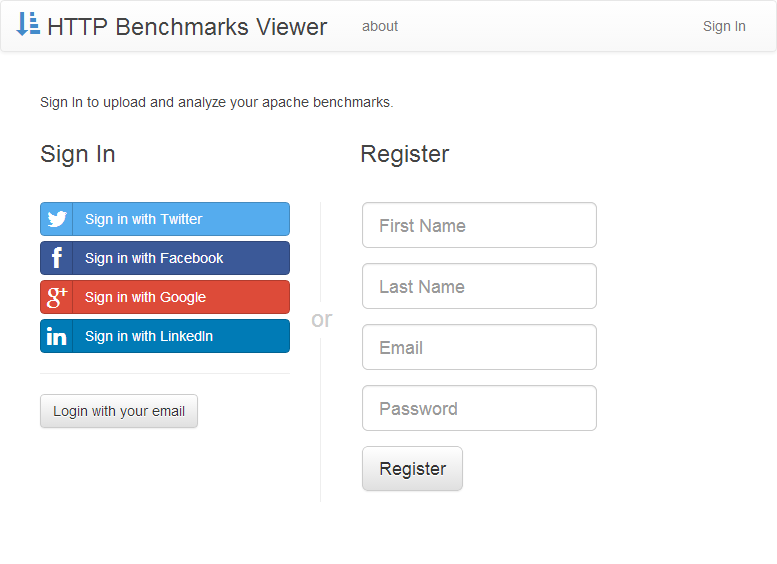
Registering the AuthFeature with IncludeRegistrationService=true enables the Registration API's that we can use to register new users with.
By default the url for the register service is at /register but as its overridable the preferred method of getting the url is with the
reverse-routing extension methods on Request DTOs, e.g. @(new Register().ToPostUrl()).
The schema for the Register Service is contained on the Register Request DTO and are populated by having form fields of the same name. ServiceStack validation supports Bootstrap-style forms which allows you to display field error messages by having
.help-block or .help-inline classes adjacent to each field, e.g:
<form id="form-register" action="@(new Register().ToPostUrl())" method="POST">
    <input type="hidden" name="AutoLogin" value="true"/>
    <div class="form-group">
        <input class="form-control input-lg" type="text" name="FirstName" placeholder="First Name">
        <span class="help-block"></span>
    </div>
    <div class="form-group">
        <input class="form-control input-lg" type="text" name="LastName" placeholder="Last Name">
        <span class="help-block"></span>
    </div>
    <div class="form-group">
        <input class="form-control input-lg" type="text" name="Email" placeholder="Email">
        <span class="help-block"></span>
    </div>
    <div class="form-group">
        <input class="form-control input-lg" type="password" name="Password" placeholder="Password">
        <span class="help-block"></span>
    </div>
    <div class="form-group">
        <button class="btn btn-lg btn-default" type="submit">Register</button>
    </div>
    <div class="clearfix"></div>
</form>

<script>
    $("#form-register").bindForm({
        success: function(r) {
            localStorage["UserName"] = $("#Email").val();
            $(document).trigger('signed-in');
        }
    });
</script>
The $.bindForm jQuery plugin is a
ss-utils.js helper
that ajaxifies HTML forms and submits them instead via jQuery's $.ajax method, returning the Response DTO as a JavaScript object.
In the callback above we've provided a success handler to save the last Email used to sign in and then publish an event to
signal the user has signed in.
JavaScript events provides a loose-coupled way to communicate between different components and allows multiple handlers to
register their interest in an event. In this case our event handler is defined in _Layout.cshtml and simply
redirects the user back to the home page whenever they sign-in or sign-out:
$(document).on('signed-in signed-out', function () {
    location.href = '/';
});
In effect refreshing the home-page, which will display personalized content based on whether or not they're authenticated.
Logging in with Username / Password
When a user is registered they're automatically signed-in as a result of the AutoLogin=true field.
They can also sign-in at anytime by clicking the Login with your email button:
<button class="btn btn-default" data-click="trigger:sign-in">Login with your email</button>
Which contains a declarative event that
when clicked will trigger the sign-in event which has an event handler registered in _Layout.cshtml that simply
shows the modalLogin dialog and sets focus to the first empty field:
$(document).on('sign-in', function () {
    $('#modalLogin').modal('show');

    $(this).find('input[value=]:first').focus();
});
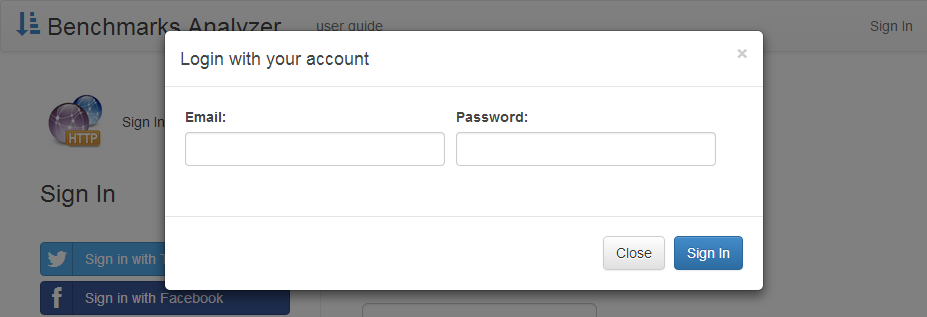
The Login Form popup is another regular Bootstrap Form with UserName and Password fields as well as Close and Sign-In buttons to submit the form:
<form id="form-login" action="/auth/credentials">
    ...
    <div class="modal-body">
        <p class="error-summary alert alert-danger"></p>
        <div class="form-group">
            <label>Email:</label>
            <input class="form-control" type="text" name="UserName" value=""/>
        </div>
        <div class="form-group">
            <label>Password:</label>
            <input class="form-control" type="password" name="Password"/>
        </div>
    </div>
    <div class="modal-footer">
        <button type="button" class="btn btn-default" data-dismiss="modal">Close</button>
        <button type="submit" class="btn btn-primary">Sign In</button>
    </div>
</form>
Just like registration, the login form uses ss-utils.js $.bindForm() to ajaxify the form and provide automatic form and validation binding. When authentication is successful the success callback is invoked which hides the login modal dialog, saves the last UserName in localStorage and triggers a custom signed-in event:
$("#form-login").bindForm({
    success: function (r) {
        $('#modalLogin').modal('hide');
        localStorage["UserName"] = $("[name=UserName]").val();
        $(document).trigger('signed-in');
    }
});
Personalized Home Page
Like many popular social websites, the home page changes based on whether the user has signed-in.
This is achieved with a simple if (IsAuthenticated) check in default.cshtml, e.g:
@if (IsAuthenticated)
{
    <div>
        <h3>Create Test Plan</h3>
        ...
    </div>
}
else
{
    <div id="register">
        <p>
            Sign In to upload, analyze and export your <b>Apache Benchmarks</b>.
        </p>
        ...
    </div>
}
Creating a Test Plan
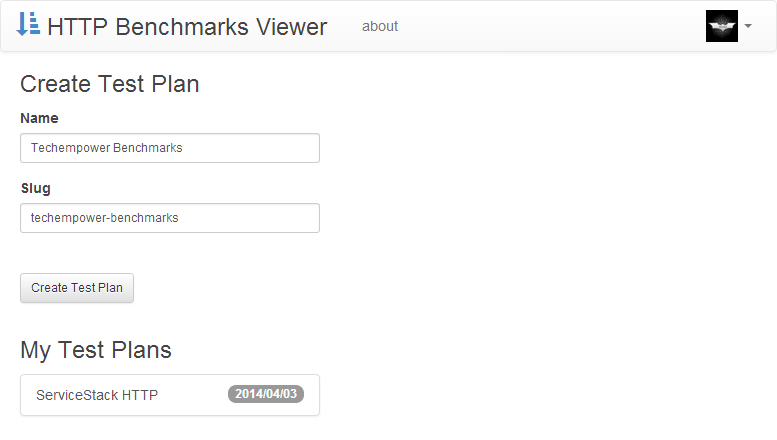
After logging in you'll be prompted to create a test plan which you want to create for each type of benchmark. The implementation is fairly straight-forward consisting of a standard HTML form and some javascript behavior:
<div style="width:300px">
<h3>Create Test Plan</h3>
<form id="form-createplan" action="@(new CreateTestPlan().ToPostUrl())" method="POST">
<div>
<div class="form-group">
<label for="Name">Name</label>
<input class="form-control input-sm" type="text" id="Name" name="Name"
data-keyup="generateSlug">
<span class="help-block"></span>
</div>
<div class="form-group">
<label for="Slug">Slug</label>
<input class="form-control input-sm" type="text" id="Slug" name="Slug">
<span class="help-block"></span>
</div>
<div class="form-group">
<label> </label><br />
<button class="btn btn-sm btn-default" type="submit">Create Test Plan</button>
</div>
</div>
<div class="clearfix"></div>
</form>
<div id="testplans" style="display:none;">
<h3>My Test Plans</h3>
<div class="list-group">
</div>
</div>
</div>
<script>
refreshTestPlans();
$("#form-createplan").bindForm();
$(document).bindHandlers({
generateSlug: function() {
$("[name=Slug]").val($(this).val().toLowerCase().replace(/[^a-zA-Z\d:]+/g, "-"));
},
showPlan: function(planId) {
location.href = "/testplans/" + planId + "/edit";
}
});
function refreshTestPlans() {
$.getJSON("/testplans", function (plans) {
if (plans.length == 0) return;
$("#testplans").show().find(".list-group").html(plans.map(function (p) {
return "<a class='list-group-item' data-click='showPlan:" + p.Id + "'>"
+ '<span class="badge">' + $.ss.todfmt(p.CreatedDate) + '</span>'
+ p.Name
+ "</a>";
}));
});
}
</script>
The noteworthy elements in this page include:
- The
data-keyup="generateSlug"declarative event that calls thegenerateSlughandler on each keyup event. - The form's action using the reverse routing
ToPostUrl()method on theCreateTestPlanRequest DTO - The
#testplanslist of existing test plans which are populated using ajax - The dynamic list of existing test plans having a click event that calls the
showPlanhandler with theplanIdargument
When generating dynamic HTML we prefer to use Ajax over server-side generated HTML so we keep to the API-first development model ensuring that future mobile or desktop clients can also be built using the same published API's the Ajax clients use. In most cases JavaScript imposes less friction and ends up being more malleable making it more suitable for rendering HTML views than C# so using JavaScript also test to end up being a productivity win.
One interesting difference with this ajax form is that it doesn't have any success handlers defined:
$("#form-createplan").bindForm();
What's happening here is that the form is taking advantage of ServiceStack's support for Server initiated actions where the client leaves it up to the server for what should happen next which it does by returning a decorated response:
public object Post(CreateTestPlan request)
{
    ...
    return HttpResult.SoftRedirect(new EditTestPlan { Id = plan.Id }.ToGetUrl(), plan);
}
In this case the Server tells the client to redirect to the EditTestPlan page of the Test Plan it just created.
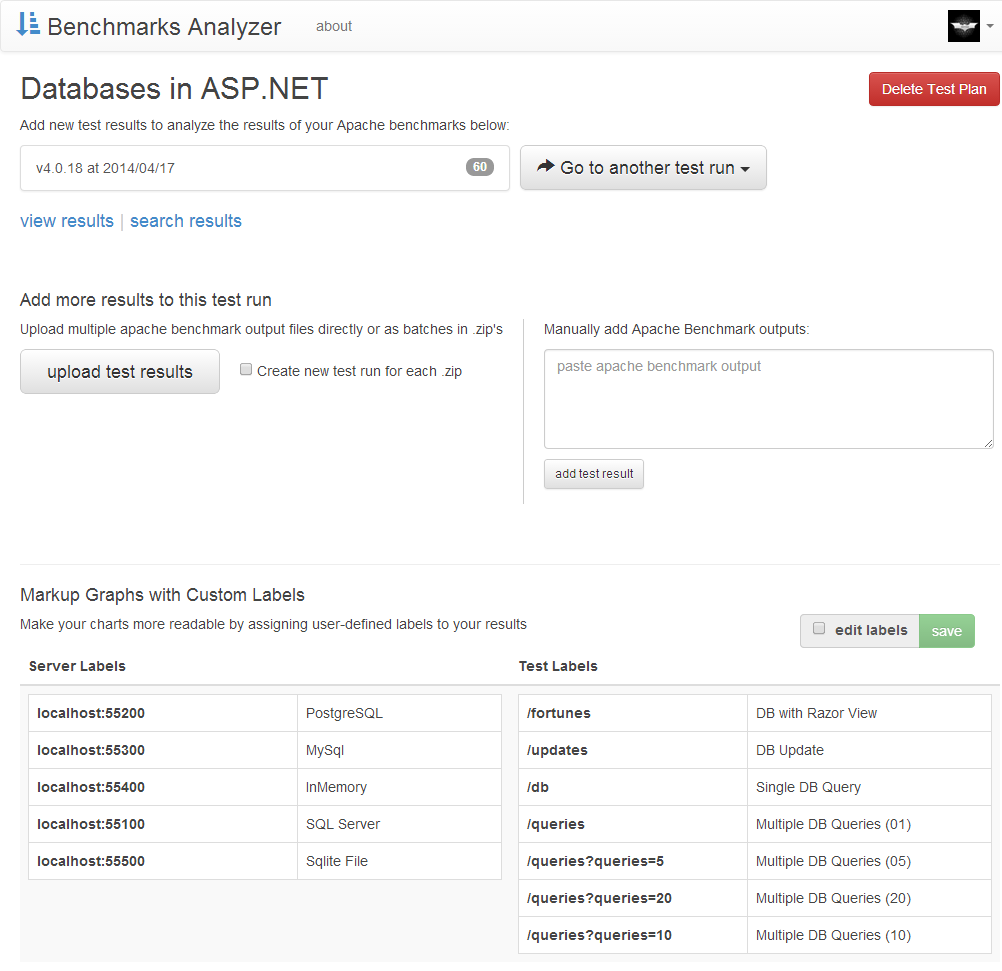
Edit Test Plan
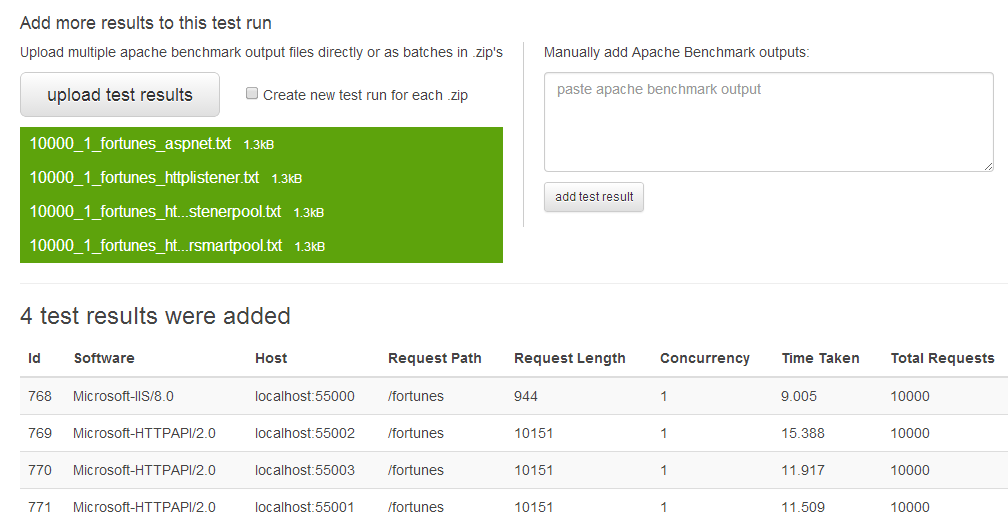
The EditTestPlan.cshtml page weighing at just under <500 Lines of HTML/JS is the most feature-rich page in HTTP Benchmarks that supports:
- Operates on 3 levels of relational data (Test Plans, Test Runs and Test Results)
- 5 HTML Forms + 1 multi-file uploader
- Creating and switching between Test Runs
- Deleting Test Plans and Test Runs
- Uploading Test Results as multiple apache benchmark outputs or inside multiple .zip batches
- Supports creating new test runs for each .zip batch
- Reports progress of each uploaded file and returns the resultset
- Maintains Test Plan labels cumulative across all test results
- Enables functionality as the Test Plan moves into a more complete state
Minimal JavaScript dependencies
Normally a page managing this much state would be a candidate for a heavier MV* JavaScript framework but there are a lot of reasons on why you may want to minimize dependencies and develop using Vanilla JS:
- Reduce magic behavior. Functionality is more explicit, visible and easier to reason-about without an external framework
- Minimize having to resort to Q/A and support forums to figure out what something does and how it works
- Retain full access to JS and avoid having to work around framework limitations and their prescribed architectures
- Remove possibility of bugs and breaking changes between framework upgrades
- Reduce friction when trying to interoperate with external JS libraries
- Reduce knowledge, complexity and cognitive overhead required by developers working with your application
- Avoid risk of depending on a library that may be deprecated or unsupported in future
- Increases the footprint and download times of your app
Where adding more dependencies increases the complexity and friction of your application. Which is reason for considering the benefits vs tradeoffs that each dependency brings. Of all libraries jQuery is generally the safest addition as it enables a higher-level API for interacting with the DOM, saving a lot of boilerplate using API's that are better focused on intent, smoothes over browser quirks, is already known by most developers and in many cases the minimum library dependency for many other external javascript libraries.
Other libraries that are a safe choice are shims that bring future javascript features to down-level older browsers
who don't support them natively. A good example is the es5-shim used which
adds missing ES5 utils to Array and Object allowing you to write in a functional style. It's not as feature-rich
as underscore.js utils but they allow you to bind to native JS object APIs which are sealed as
part of JavaScripts extended vocabulary that will be with the language forever. Shims aren't included as a dependency
in modern browsers and can be safely removed entirely once support for older browsers is deprecated.
Otherwise adding more libraries introduces a complexity cost that may or may not be worth it. A good gauge to determine whether it's a good idea to upgrade to an established framework is to assess how much of app code is boilerplate and how much is purpose-built for the required task at hand, where if you find more code dedicated towards building a mini-framework than the task itself, it may be time to switch. Being familiar with one of the heavy MV frameworks will also let you know how much code a framework will be able to save you. AngularJS is a good bar to measure against as it reduces a lot of the boilerplate in building and binding Ajax UI's.
Really Simple MV Pattern
In this case we concluded adopting a Heavy MV framework wasn't justified as it ultimately wouldn't have saved much code.
Although this page was complex enough that there was value in adopting an MV* pattern which we did by using a single Model
object literal and a Views constructor function binding to the model and grouping together all its render functions as methods.
A basic outline of this approach looks like:
    var Model = {
        TestPlan: @Model.AsRawJson(),
        ActiveTestRun: null,
        OtherTestRuns: [],
        ResultsUploaded: [],

        setTestRuns: function(runs) {
            var isActive = function(r) { return r.Id == this.TestPlan.TestRunId; }.bind(this);
            this.ActiveTestRun = runs.filter(isActive)[0];
            this.OtherTestRuns = runs.filter(function (r) { return !isActive(r); });
        },
        ...
    };

    function Views(model) {
        this.model = model;

        var render = function() {
            for (var name in this) {
                if (typeof this[name] != 'function') continue;
                this[name](model);
            }
        }.bind(this);

        for (var k in model) {
            if (typeof model[k] != 'function') continue;
            model[k] = (function(fn) {
                return function() {
                    fn.apply(model, arguments);
                    render();
                };
            })(model[k]);
        }
    }
    Views.prototype = {
        activeTestRun: function() {
            var r = this.model.ActiveTestRun;
            if (!r) return;
            $("#testruns").show().find(".list-group").html(
                "<a " + (r.TestResultsCount > 0 ? ' href="@hrefVewPlan"' : '')
                    + " class='list-group-item' data-click='showRun:" + r.Id + "'>"
                    + '<span class="badge">' + r.TestResultsCount + '</span>'
                    + r.SeriesId
                    + "</a>");
        },
        ...
    };
    Model.Views = new Views(Model);
Essentially any changes to the model are made using the model accessors which are bound to its instance by the Views constructor. It also rewrites the model accessors to automatically render all views after they're called. This is what ensures that any changes to model automatically re-renders the view.
Whilst this approach lacks the granularity of the heavier frameworks it does ensure that the views are synced with the model and its functionality is transparent to developers who can freely add model accessors and views which will automatically stay in-sync without having to maintain any plumbing code themselves.
Overall the Really Simple MV Pattern does a good job satisfying small to medium-sized Ajax pages where using an heavy fx may be overkill. This approach can go a long way before needing to reach for a heavier JS framework which can be extended further by reducing state and dividing a heavy JS app into multiple cohesive pages, e.g. separation of Create Test Plan and Edit Test Plan.
Fine Uploader
Another new addition in EditTestPlan.cshtml is the use of the commercial FineUploader library which is what enables the multi-file upload support. It basically consists of a HTML fragment of where you want to position the uploader and the JavaScript configuration to set it up with the desired configuration:
<div id="uploadtestresults">
    <span class="help-block"></span>
    <noscript>
        <input type="file" id="upload" name="upload" />
    </noscript>
</div>
var uploader = new qq.FineUploader({
    element: document.getElementById("uploadtestresults"),
    allowedExtensions: ['zip', 'txt'],
    minSizeLimit: 1,
    text: {
        uploadButton: 'upload test results'
    },
    request: {
        endpoint: "@hrefUploadFiles",
        customHeaders : {
            accept: 'application/json'
        }
    },
    callbacks: {
        onValidateBatch: function() {
            Model.clearUploads();
            this.setParams({ CreateNewTestRuns: $("#chkCreateTestRuns")[0].checked });
        },
        onComplete: function (id, fileName, response) {
            Model.addNewUploads(response.Results);
        }
    }
});
Integration with ServiceStack
The one concession FineUploader requires from the server is for it to return a { "success":true, ...}
response for successful uploads which should be added to the Response DTO, e.g:
public class UploadTestResultsResponse
{
    public bool success { get; set; }
}
Otherwise processing multiple uploaded files is trivial in ServiceStack which is just a matter of enumerating over the Request.Files property.
DotNetZip also makes processing content inside .zip files just as easy, e.g:
public object Post(UploadTestResults request)
{
    foreach (var httpFile in base.Request.Files)
    {
        if (httpFile.FileName.ToLower().EndsWith(".zip"))
        {
            using (var zip = ZipFile.Read(httpFile.InputStream))
            {
                var zipResults = new List<TestResult>();
                foreach (var zipEntry in zip)
                {
                    using (var ms = new MemoryStream())
                    {
                        zipEntry.Extract(ms);
                        var bytes = ms.ToArray();
                        zipResults.Add(new MemoryStream(bytes).ToTestResult());
                    }
                }
                newResults.AddRange(zipResults);
            }
        }
        else
        {
            var result = httpFile.InputStream.ToTestResult();
            newResults.Add(result);
        }
    }
    ...
}
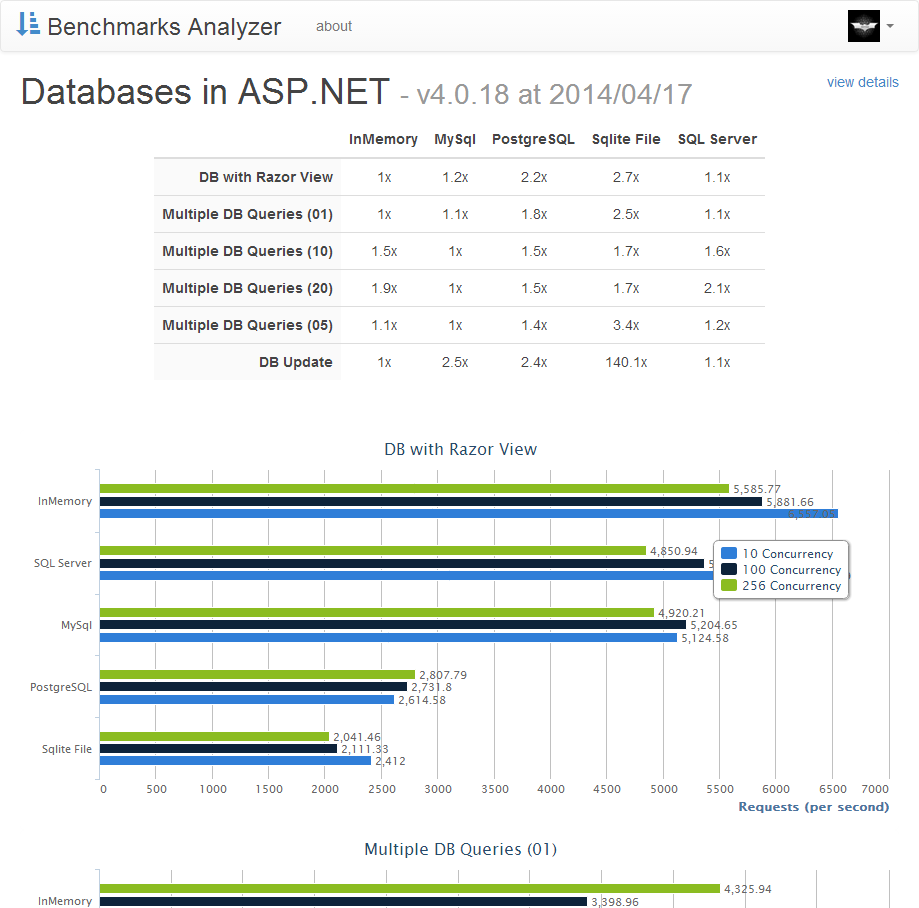
View Test Plan
The ViewTestPlan.cshtml is what graphs all the results of the selected test run into bar charts using the excellent commercial charting library highcharts.
Fallback Route
Something unique to this page is that it's hosted at the ideal public url //hostname/{TestPlanSlug} that by default shows the
results of the latest test run, which is enabled in ServiceStack using the [FallbackRoute] attribute on the
ViewTestPlan Request DTO e.g:
[FallbackRoute("/{Slug}")]
public class ViewTestPlan : IReturn<ViewTestPlanResponse>
{
    public string Slug { get; set; }
    public int? Id { get; set; }
}
The FallbackRoute as the name implies allows you to specify a Route with the least precedence allowing you to serve user-defined slugs as top-level routes without conflicting with other matching application routes.
Integration with Highcharts
Thanks to Highcharts the ViewTestPlan.cshtml takes very little code to implement on both the server which just returns a Response DTO populated with the selected selected Test Plan, Test Run and its benchmark results:
public object Any(ViewTestPlan request)
{
    var testPlan = Db.Single<TestPlan>(q => q.Slug == request.Slug);
    if (testPlan == null)
        throw HttpError.NotFound(request.Slug);

    var testRun = request.Id != null
        ? Db.Single<TestRun>(x => x.TestPlanId == testPlan.Id && x.Id == request.Id)
        : Db.Select<TestRun>(q => q.Where(x => x.TestPlanId == testPlan.Id)
            .OrderByDescending(x => x.Id))
            .FirstOrDefault();

    var testResults = Db.Select<TestResult>(q => q.TestRunId == testRun.Id);

    return new ViewTestPlanResponse
    {
        TestPlan = testPlan,
        TestRun = testRun,
        Results = testResults.ConvertAll(x => x.ToDisplayResult())
    };
}
The Response DTO is then accessible as the view model of the
ViewTestPlan.cshtml view page
and uses the T.AsRawJson() extension method to make it natively accessible in JavaScript, e.g:
@inherits ViewPage<ViewTestPlanResponse>
...

var testplan = @Model.TestPlan.AsRawJson();
var results = @Model.Results.AsRawJson();
The remainder of the JavaScript is used to transform the results from the flat database structure into a data structure Highcharts expects. JavaScript's functional collection utils greatly simplify transforming JS data and collections making the es5-shim well worth including for this page alone.
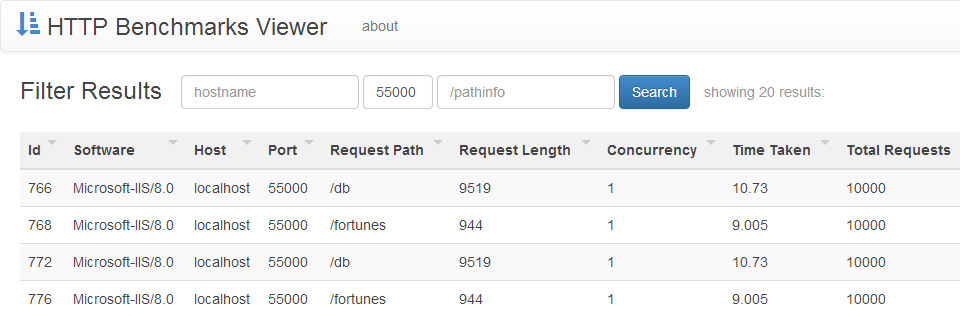
Search Test Results
The SearchTestResults.cshtml page has the simplest implementation of all pages despite supporting deep-linkable filtering in a sortable datagrid and the ability to download the working resultset in a number of different data formats.
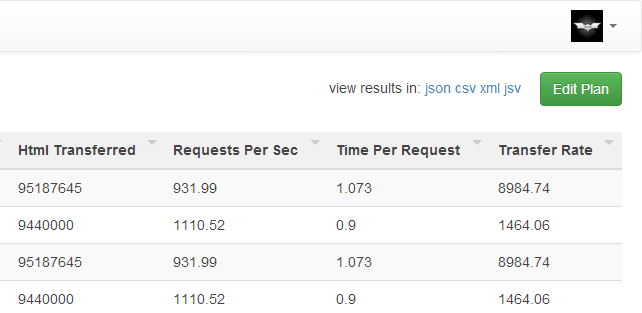
ServiceStack provides the export functionality for free which is just a matter of appending the desired format .ext at the end of the url which is achieved with the HTML / JS fragment below:
download in:
<span>
    <a data-click="viewFormat:.json">json</a>
    <a data-click="viewFormat:.csv">csv</a>
    <a data-click="viewFormat:.xml">xml</a>
    <a data-click="viewFormat:.jsv">jsv</a>
</span>
$(document).bindHandlers({
    viewFormat: function (ext) {
        location.href = location.href.indexOf("?") >= 0
            ? location.href.replace("?", ext + "?")
            : location.href + ext;
    }
});
The CSV format is especially useful for exporting data as it lets
you view the response directly in Excel which can then be used for further analysis and to make additional charts.
A limitation with CSV is that it only supports a single flat recordset which is rare for Response DTO's which
can be in any shape. In this case we can tell the CSV Serializer to only serialize the first enumerable by attributing the
Response DTO with [Csv] attribute, e.g:
[Csv(CsvBehavior.FirstEnumerable)]
public class SearchTestResultsResponse { ... }
The Magic AutoGrid Partial
The Search Results page also makes nice use of the AutoGrid.cshtml partial which does the heavy lifting of converting any C# enumerable into a human optimized dynamic sortable datagrid with just 1 Line of Code:
@Html.Partial("AutoGrid", Model.Results)
Which is a modified version
of the stand-alone HTML5 Report Format that's been modified to
be used as a Razor partial view, use Bootstrap's .table-striped CSS theme and to avoid conflicts when used with jQuery.
Development vs Production environments
One challenge of maintaining publicly available source code that also gets deployed to a production site is maintaining separate production settings with private connection strings and OAuth keys, whilst maintaining different public development environment optimized for requiring minimal infrastructure dependencies.
In this case httpbenchmarks.servicestack.net was running on AWS with a PostgreSQL RDS database backend, whilst during development we've opted for using an SQLite database which can be run locally without requiring users to have access to a PostgreSQL instance.
Hosting on AWS
Hosting on AWS is different than the default configuration of creating a new Web Application with VS.NET where instead of hosting
a new web application on a unique port with IIS Express e.g. http://localhost:56000/ it's instead deployed at a virtual path
at port 80, e.g http://localhost/BenchmarksAnalyzer_deploy/.
AWS then uses an IIS rewrite rule to ensure the EC2 instance serves the Virtual Application at its root path e.g. //httpbenchmarks.servicestack.net/
Whilst this allows serving the deployed web application from the root path it doesn't solve the issue where the ASP.NET virtual application
believes its hosted at the /BenchmarksAnalyzer_deploy/ virtual path which is what any app-generated urls (e.g. reverse routing) will include.
As this is undesired behavior ServiceStack includes a config option to strip the Virtual Application path when generating urls with
Config.StripApplicationVirtualPath=true which we only want to do when the application is deployed on AWS.
To use a different set of App Settings than the development appSettings contained in Web.config we're going to leverage ServiceStack's support for
structured text file configuration
and choose to use the appsettings.txt in the root directory if one exists, otherwise fallback to reading from Web.config, e.g:
//Load environment config from text file if exists
var liveSettings = "~/appsettings.txt".MapHostAbsolutePath();
var appSettings = File.Exists(liveSettings)
    ? (IAppSettings)new TextFileSettings(liveSettings)
    : new AppSettings();

SetConfig(new HostConfig {
    DebugMode = appSettings.Get("DebugMode", false),
    StripApplicationVirtualPath = appSettings.Get("StripApplicationVirtualPath", false),
    AdminAuthSecret = appSettings.GetString("AuthSecret"),
});

if (appSettings.GetString("DbProvider") == "PostgreSql")
{
    container.Register<IDbConnectionFactory>(c => new OrmLiteConnectionFactory(
        appSettings.GetString("ConnectionString"), PostgreSqlDialect.Provider));
}
else
{
    container.Register<IDbConnectionFactory>(c =>
        new OrmLiteConnectionFactory("~/db.sqlite".MapHostAbsolutePath(), SqliteDialect.Provider));
}
Advantages of maintaining alternate configuration in a separate appsettings.txt file is key/value text files are easy to maintain as
they only need to contain App settings which are different to the default configuration in code, they're easy to protect from
accidentally publishing them online by adding *.txt to .gitignore and they're easy to deploy as it allows no-touch copying of
text files into the deployed directory.
Deploying to AWS
AWS has a good story for deploying and hosting ASP.NET web applications to Amazon's cloud via the AWS SDK for .NET which installs the SDK, command-line tools as well as adding convenient integration and wizards to VS .NET.
After creating an account with AWS, deploying an ASP.NET web application can be done through the wizard by clicking on Publish to AWS on the context menu of the ASP.NET application you wish to deploy:
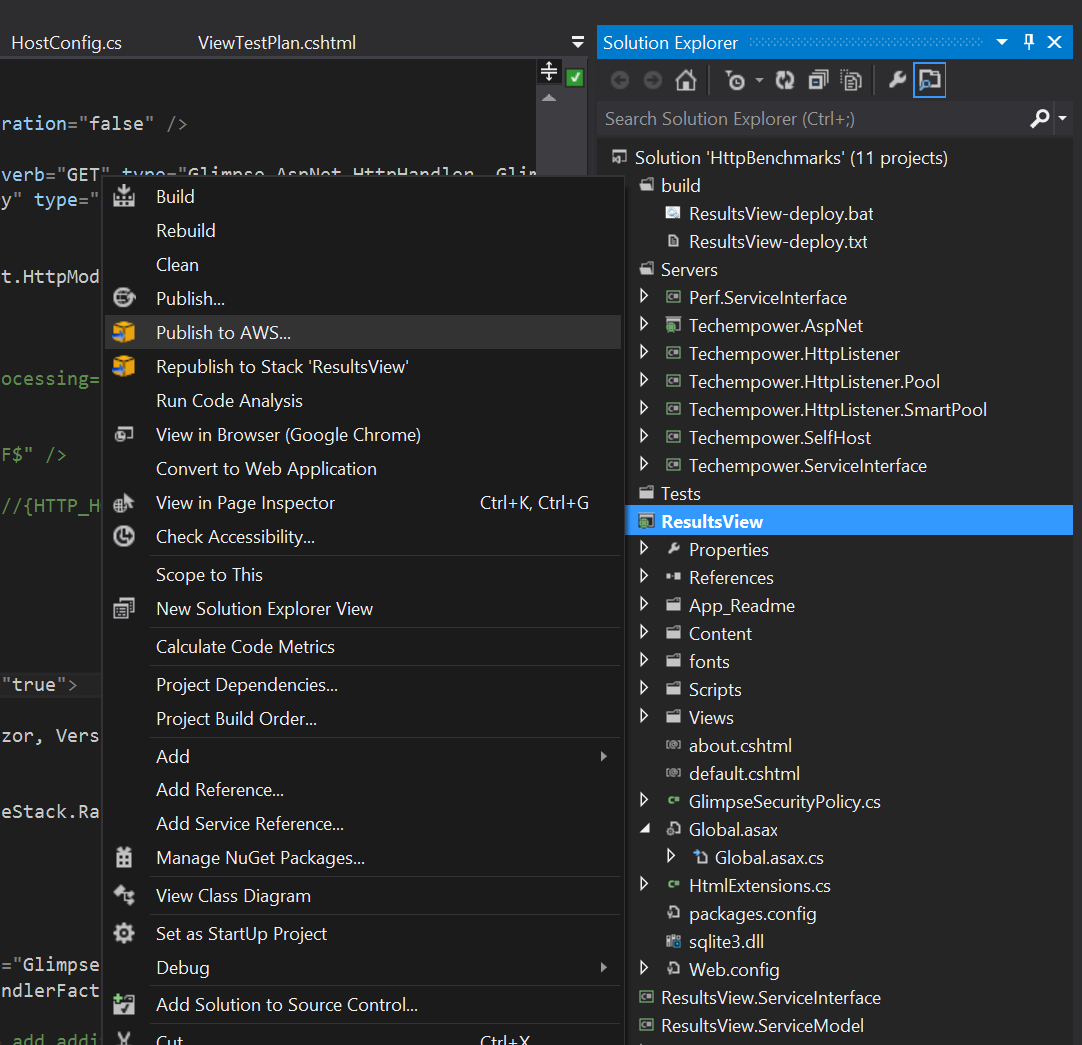
This will bring up the available deployment templates you can choose to deploy your application with:
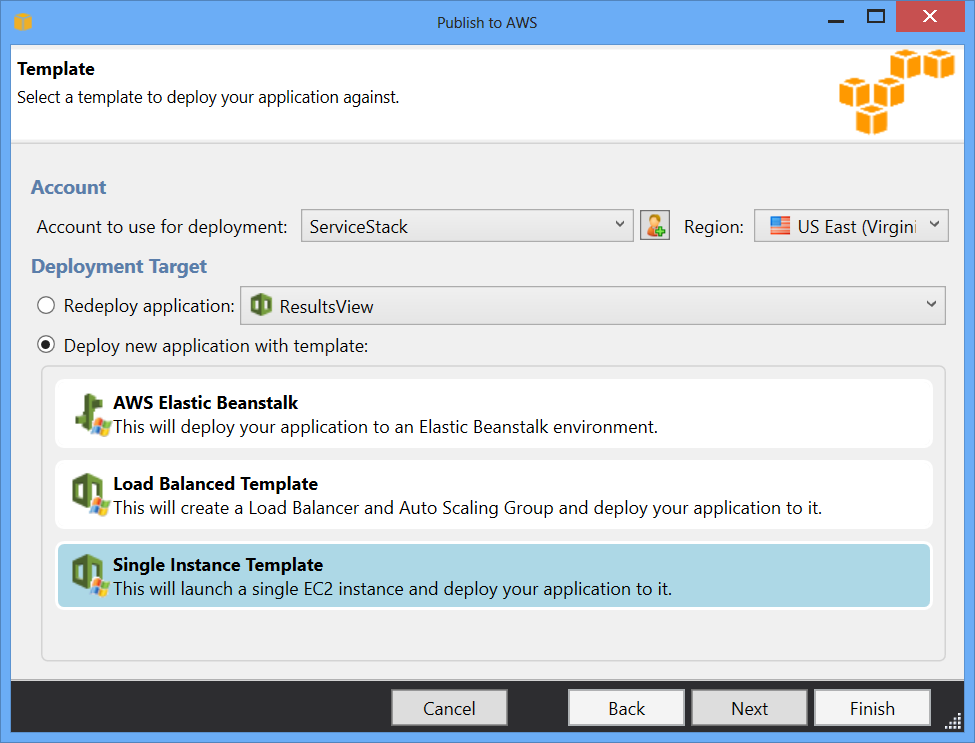
The available options include the fully managed Elastic Beanstalk which takes over control over the life-cycle of your instances, managing the load-balancing and spawning and tearing down instances when capacity changes. If choosing this option any SSL would need to be configured on the load-balancer which should only be referenced by CNAME and not IP (or even Elastic IP).
The simplest deployment option with least moving parts is the Single Instance Template which deploys your application to a new single EC2 instance that lets you configure and retain control over its lifespan. The wizard then takes you through different configuration options letting you choose what type and instance image you want to deploy to, which admin certificates it should use, which url it should use to check for uptime, etc.
Before deploying your application, it's recommended to save the AWSDeploy configuration used so you can use it later in automated deployments:
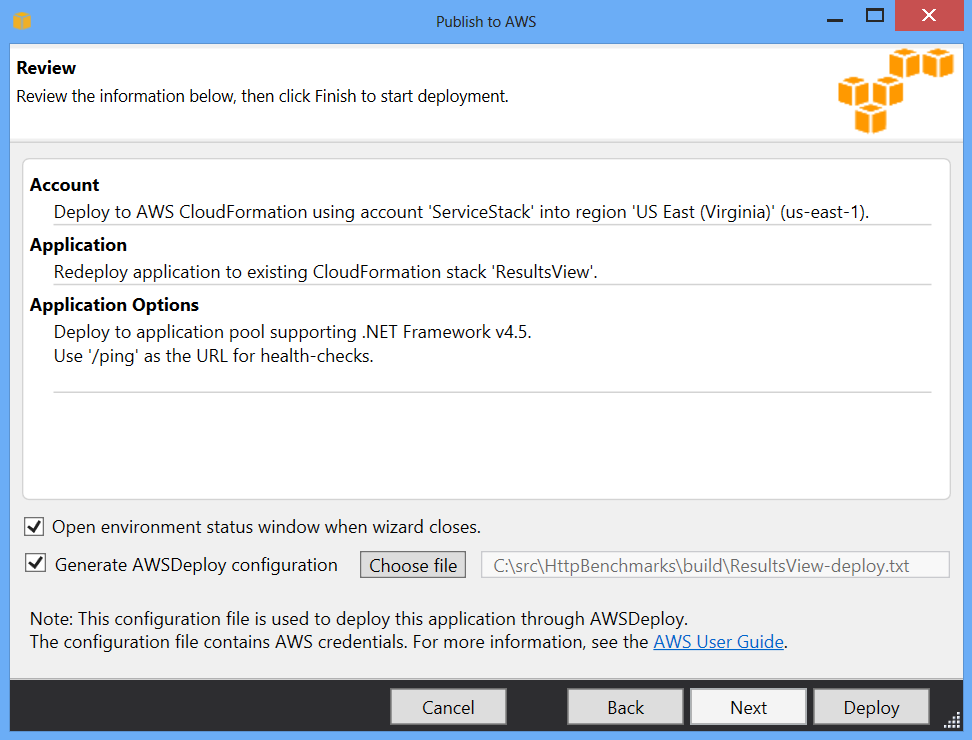
That's essentially all it takes to deploy your Web Application and have it running on a new EC2 instance. Although in our case there's additional environment-specific settings we want to add to the deployed application.
Adhoc deployments to AWS
After the first AWS deployment, redeploying can be done by clicking Republish to Stack 'BenchmarksAnalyzer' on the Web Application's context menu.
But given command-line deployments superior configurability, automation and introspection, there's good reason to perform future deployments
around a replayable BenchmarksAnalyzer-deploy.bat script, e.g:
@echo off
SET MSBUILD=C:\Windows\Microsoft.NET\Framework\v4.0.30319\msbuild.exe
SET MSDEPLOY="C:\Program Files (x86)\IIS\Microsoft Web Deploy V3\msdeploy.exe"
SET AWSDEPLOY="C:\Program Files (x86)\AWS Tools\Deployment Tool\awsdeploy.exe"
SET DEPLOYPKG=C:\src\HttpBenchmarks\src\deploy\BenchmarksAnalyzer-deploy.zip

%MSBUILD% ..\src\BenchmarksAnalyzer\BenchmarksAnalyzer.csproj /T:Package /property:PackageLocation=%DEPLOYPKG%

%AWSDEPLOY% /r /DDeploymentPackage=%DEPLOYPKG% BenchmarksAnalyzer-deploy.txt
From this script we can tell that deploying to AWS is just a matter of building your web project with msbuild saving the output as
a MSDeploy package that awsdeploy uses in addition to metadata in the generated BenchmarksAnalyzer-deploy.txt configuration to
deploy the web application to the desired Cloud Formation and EC2 instance.
Customizing AWS Deployments
This article on customizing the MSDeploy packages for AWS shows how we're able customize AWS deployments by creating a modified MSDeploy package.
In this case we just want to copy over environment-specific *.txt files into the deployed web application directory which we can
do by creating a custom MSDeploy manifest.xml containing
the directory contents we want to copy and the command that does they copying:
<?xml version="1.0" encoding="utf-8"?>
<sitemanifest>
  <contentPath path="C:\src\HttpBenchmarks\deploy" />
  <runCommand path="copy /y C:\src\HttpBenchmarks\deploy\*.* C:\inetpub\wwwroot\BenchmarksAnalyzer_deploy"
              waitInterval="10000" />
</sitemanifest>
We also need to specify a parameters.xml with parameters expected by awsdeploy:
<?xml version="1.0" encoding="utf-8"?>
<parameters>
  <parameter name="IIS Web Application Name" defaultValue="Default Web Site/BenchmarksAnalyzer_deploy" tags="IisApp" />
  <parameter name="setAcl" defaultValue="Default Web Site/BenchmarksAnalyzer_deploy" tags="IisApp" />
</parameters>
With this in-place we can create a customized MSDeploy package with the above contents and get awsdeploy to publish it:
REM Copy over config
%MSDEPLOY% -verb:sync -source:manifest=manifest.xml -dest:package=%DEPLOYPKG% -declareParamFile=parameters.xml

%AWSDEPLOY% /r /DDeploymentPackage=%DEPLOYPKG% BenchmarksAnalyzer-deploy.txt
Running .bat scripts in VS.NET
We can now deploy the latest version of the application by running BenchmarksAnalyzer-deploy.bat.
As we'd often want to do this after making a change in VS.NET, a great timesaver is to register a new External Tool
in VS.NET that can run any .bat script:
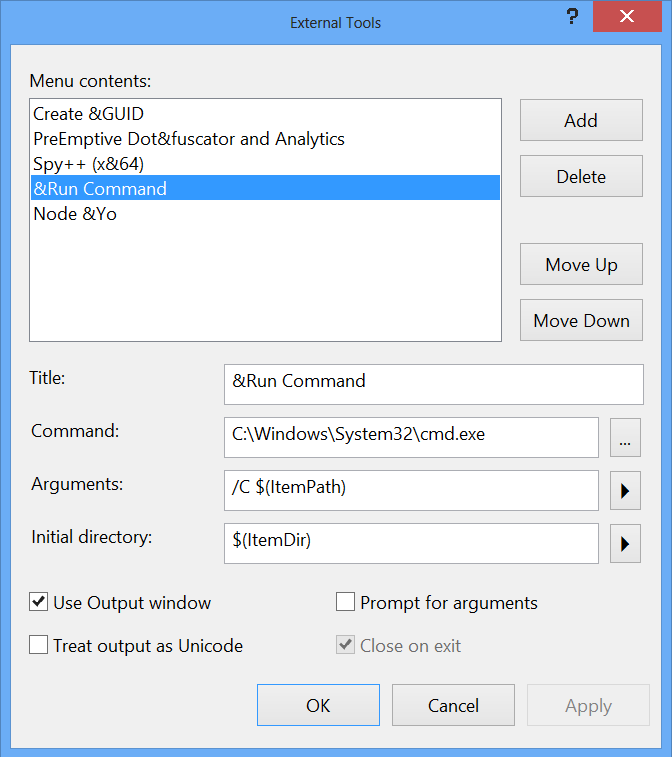
Repeated again in a copy-and-paste friendly format:
<table> <tr> <th> Title: </th> <td> &Run Command </td> </tr> <tr> <th> Command: </th> <td> C:\Windows\System32\cmd.exe </td> </tr> <tr> <th> Arguments: </th> <td> /C $(ItemPath) </td> </tr> <tr> <th> Initial Directory: </th> <td> $(ItemDir) </td> </tr> </table>This external tool will let you run any command script in VS.NET with the Alt+T R keyboard short-cut (or any other preferred short-cut).
Configuring SSL
As we're accepting registration and allowing username / password authentication of users we'll need to secure their traffic with encryption. One way around this is to only allow authentication via OAuth so users will never have to enter passwords on your site.
Otherwise you can enable on https on IIS by first installing a Server Certificate. There are a number of places to get SSL certificates online, e.g. you can buy a 256 bit Thawte domain valided certificate from Hetzner from 44 euros. There are also free SSL certificates available from startssl.com.
StartSSL generates a Server Certificate (e.g. server.crt) and your private key (e.g. server.ssl) but as IIS expects a
.pfx pkcs12 file format you'll need to create one which you can do with OpenSSL and the command below:
openssl pkcs12 -export -in server.crt -inkey server.ssl -out server.pfx
An easy way to use OpenSSL on Windows is to use Git Bash that's installed as part of GitHub for Windows.
You can then use the Server Certificates IIS Applet to install your server.pfx certificate and enable the https binding on IIS's Default Web Site.
Forcing SSL
With SSL configured we also want to ensure it gets used instead of http which we can do by adding a new IIS Rewrite url rule to Default Web Site containing this configuration:

These rules are also available in this copy-and-paste friendly version below:
<rewrite>
  <rules>
    <rule name="Redirect to HTTPS" stopProcessing="true">
      <match url="(.*)" />
      <conditions>
        <add input="{HTTPS}" pattern="^OFF$" />
      </conditions>
      <action type="Redirect" url="https://{HTTP_HOST}/{R:1}" redirectType="SeeOther" />
    </rule>
  </rules>
</rewrite>
When enabled this rule will redirect any http requests to their https equivalent.
Configuring all resources to use https
When serving traffic through https it's important to ensure that all resources embedded in the web page are also delivered through https
as well which will prevent users from receiving a warning that your page contains insecure resources. The easiest way is to use relative
urls as they'll automatically get served using the same scheme as the page. This behavior can also be enabled with Absolute urls by removing
the scheme from the url, e.g. instead of http://cdn.com/path use //cdn.com/path. This ensures the resource gets sent using the transport
of the containing page, but this is only possible if the remote server supports serving the same content through multiple schemes.