Awesome
Rubix ML - Housing Price Predictor
An example Rubix ML project that predicts house prices using a Gradient Boosted Machine (GBM) and a popular dataset from a Kaggle competition. In this tutorial, you'll learn about regression and the stage-wise additive boosting ensemble called Gradient Boost. By the end of the tutorial, you'll be able to submit your own predictions to the Kaggle competition.
- Difficulty: Medium
- Training time: Minutes
From Kaggle:
Ask a home buyer to describe their dream house, and they probably won't begin with the height of the basement ceiling or the proximity to an east-west railroad. But this playground competition's dataset proves that much more influences price negotiations than the number of bedrooms or a white-picket fence.
With 79 explanatory variables describing (almost) every aspect of residential homes in Ames, Iowa, this competition challenges you to predict the final price of each home.
Installation
Clone the project locally using Composer:
$ composer create-project rubix/housing
Requirements
- PHP 7.4 or above
Recommended
- Tensor extension for faster training and inference
- 1G of system memory or more
Tutorial
Introduction
Kaggle is a platform that allows you to test your data science skills by engaging with contests. This tutorial is designed to walk you through a regression problem in Rubix ML using the Kaggle housing prices challenge as an example. We are given a training set consisting of 1,460 labeled samples that we'll use to train the learner and 1,459 unlabeled samples for making predictions. Each sample contains a heterogeneous mix of categorical and continuous data types. Our goal is to build an estimator that correctly predicts the sale price of a house. We'll choose Gradient Boost as our learner since it offers good performance and is capable of handling both categorical and continuous features.
Note: The source code for this example can be found in the train.php file in project root.
Extracting the Data
The data are given to us in two separate CSV files - dataset.csv which has labels for training and unknown.csv without labels for predicting. Each feature column is denoted by a title in the CSV header which we'll use to identify the column with our Column Picker. Column Picker allows us to select and rearrange the columns of a data table while the data is in flight. It wraps another iterator object such as the built-in CSV extractor. In this case, we don't need the Id column of the dataset because it is uncorrelated with the outcome so we'll only specify the columns we need. When instantiating a new Labeled dataset object via the fromIterator() method, the last column of the data table is taken to be the labels.
use Rubix\ML\Datasets\Labeled;
use Rubix\ML\Extractors\CSV;
use Rubix\ML\Extractors\ColumnPicker;

$extractor = new ColumnPicker(new CSV('dataset.csv', true), [
    'MSSubClass', 'MSZoning', 'LotFrontage', 'LotArea', 'Street', 'Alley',
    'LotShape', 'LandContour', 'Utilities', 'LotConfig', 'LandSlope',
    'Neighborhood', 'Condition1', 'Condition2', 'BldgType', 'HouseStyle',
    'OverallQual', 'OverallCond', 'YearBuilt', 'YearRemodAdd', 'RoofStyle',
    'RoofMatl', 'Exterior1st', 'Exterior2nd', 'MasVnrType', 'MasVnrArea',
    'ExterQual', 'ExterCond', 'Foundation', 'BsmtQual', 'BsmtCond',
    'BsmtExposure', 'BsmtFinType1', 'BsmtFinSF1', 'BsmtFinType2', 'BsmtFinSF2',
    'BsmtUnfSF', 'TotalBsmtSF', 'Heating', 'HeatingQC', 'CentralAir',
    'Electrical', '1stFlrSF', '2ndFlrSF', 'LowQualFinSF', 'GrLivArea',
    'BsmtFullBath', 'BsmtHalfBath', 'FullBath', 'HalfBath', 'BedroomAbvGr',
    'KitchenAbvGr', 'KitchenQual', 'TotRmsAbvGrd', 'Functional', 'Fireplaces',
    'FireplaceQu', 'GarageType', 'GarageYrBlt', 'GarageFinish', 'GarageCars',
    'GarageArea', 'GarageQual', 'GarageCond', 'PavedDrive', 'WoodDeckSF',
    'OpenPorchSF', 'EnclosedPorch', '3SsnPorch', 'ScreenPorch', 'PoolArea',
    'PoolQC', 'Fence', 'MiscFeature', 'MiscVal', 'MoSold', 'YrSold',
    'SaleType', 'SaleCondition', 'SalePrice',
]);

$dataset = Labeled::fromIterator($extractor);
Dataset Preparation
Next we'll apply a series of transformations to the training set to prepare it for the learner. By default, the CSV Reader imports everything as a string - therefore, we must convert the numerical values to integers and floating point numbers beforehand so they can be recognized by the learner as continuous features. The Numeric String Converter will handle this for us. Since some feature columns contain missing data, we'll also apply the Missing Data Imputer which replaces missing values with a pretty good guess. Lastly, since the labels should also be continuous, we'll apply a separate transformation to the labels using a standard PHP function intval() callback which converts values to integers.
use Rubix\ML\Transformers\NumericStringConverter;
use Rubix\ML\Transformers\MissingDataImputer;

$dataset->apply(new NumericStringConverter())
    ->apply(new MissingDataImputer())
    ->transformLabels('intval');
Instantiating the Learner
A Gradient Boosted Machine (GBM) is a type of ensemble estimator that uses Regression Trees to fix up the errors of a weak base learner. It does so in an iterative process that involves training a new Regression Tree (called a booster) on the error residuals of the predictions given by the previous estimator. Thus, GBM produces an additive model whose predictions become more refined as the number of boosters are added. The coordination of multiple estimators to act as a single estimator is called ensemble learning.
Next, we'll create the estimator instance by instantiating Gradient Boost and wrapping it in a Persistent Model meta-estimator so we can save it to make predictions later in another process.
use Rubix\ML\PersistentModel;
use Rubix\ML\Regressors\GradientBoost;
use Rubix\ML\Regressors\RegressionTree;
use Rubix\ML\Persisters\Filesystem;

$estimator = new PersistentModel(
    new GradientBoost(new RegressionTree(4), 0.1),
    new Filesystem('housing.rbx', true)
);
The first two hyper-parameters of Gradient Boost are the booster's settings and the learning rate, respectively. For this example, we'll use a standard Regression Tree with a maximum depth of 4 as the booster and a learning rate of 0.1 but feel free to play with these settings on your own.
The Persistent Model meta-estimator constructor takes the GBM instance as its first argument and a Persister object as the second. The Filesystem persister is responsible for storing and loading the model on disk and takes the path of the model file as an argument. In addition, we'll tell the persister to keep a copy of every saved model by setting history mode to true.
Setting a Logger
Since Gradient Boost implements the Verbose interface, we can monitor its progress during training by setting a logger instance on the learner. The built-in Screen logger will work well for most cases, but you can use any PSR-3 compatible logger including Monolog.
use Rubix\ML\Other\Loggers\Screen;

$estimator->setLogger(new Screen());
Training
Now, we're ready to train the learner by calling the train() method with the training dataset as an argument.
$estimator->train($dataset);
Validation Score and Loss
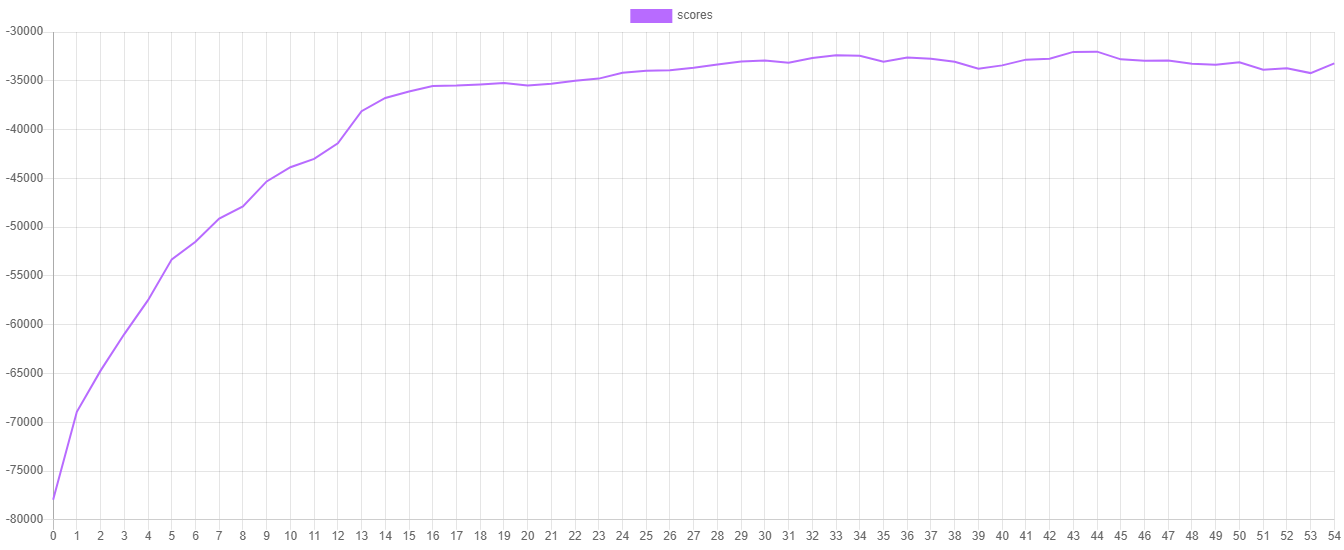
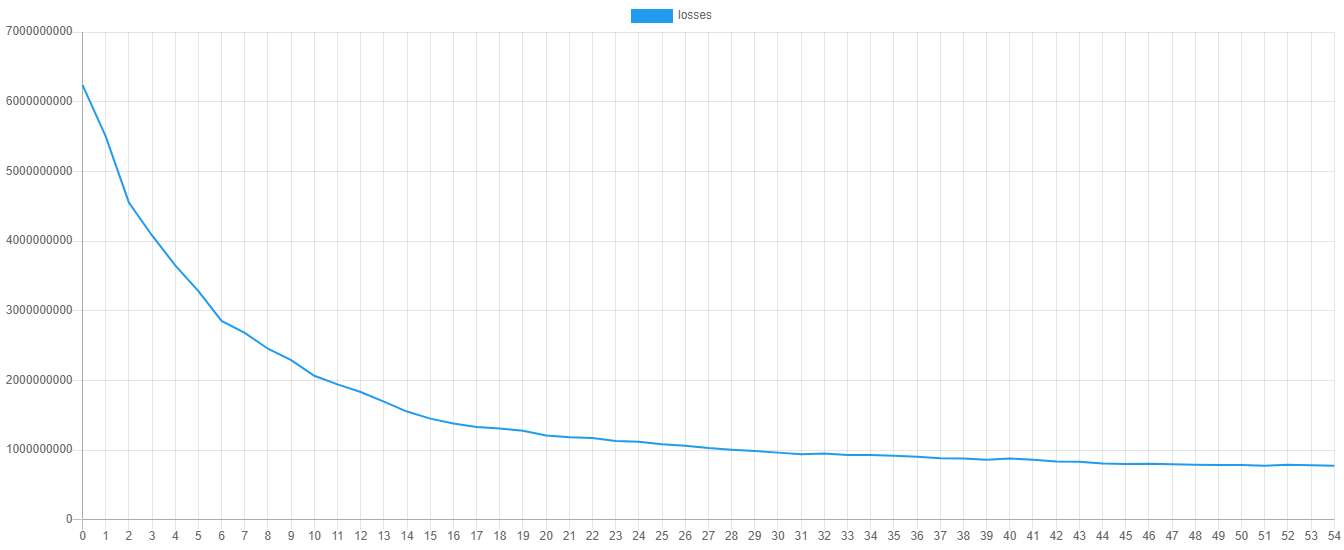
During training, the learner will record the validation score and the training loss at each iteration or epoch. The validation score is calculated using the default RMSE metric on a hold out portion of the training set. Contrariwise, the training loss is the value of the cost function (in this case the L2 or quadratic loss) computed over the training data. We can visualize the training progress by plotting these metrics. To output the scores and losses you can call the additional steps() method on the learner instance. Then we can export the data to a CSV file by exporting the iterator returned by steps() to a CSV file.
use Rubix\ML\Extractors\CSV;

$extractor = new CSV('progress.csv', true);

$extractor->export($estimator->steps());
Here is an example of what the validation score and training loss look like when plotted. You can plot the values yourself by importing the progress.csv file into your favorite plotting software.


Saving
Lastly, save the model so it can be used later to predict the house prices of the unknown samples.
$estimator->save();
Now we're ready to execute the training script by calling it from the command line.
$ php train.php
Inference
The goal of the Kaggle contest is to predict the correct sale prices of each house given a list of unknown samples. If all went well during training, we should be able to achieve good results with just this basic example. We'll start by importing the unlabeled samples from the unknown.csv file.
Note: The source code for this example can be found in the predict.php file in the project root.
use Rubix\ML\Datasets\Unlabeled;
use Rubix\ML\Extractors\CSV;
use Rubix\ML\Transformers\NumericStringConverter;

$dataset = Unlabeled::fromIterator(new CSV('unknown.csv', true))
    ->apply(new NumericStringConverter());
Load Model from Storage
Now, let's load the persisted Gradient Boost estimator into our script using the static load() method on the Persistent Model class by passing it a Persister instance pointing to the model in storage.
use Rubix\ML\PersistentModel;
use Rubix\ML\Persisters\Filesystem;

$estimator = PersistentModel::load(new Filesystem('housing.model'));
Make Predictions
To obtain the predictions from the model, call the predict() method with the dataset containing the unknown samples.
$predictions = $estimator->predict($dataset);
Then we'll use the CSV extractor to export the IDs and predictions to a file that we'll submit to the competition.
use Rubix\ML\Extractors\ColumnPicker;
use Rubix\ML\Extractors\CSV;

$extractor = new ColumnPicker(new CSV('dataset.csv', true), ['Id']);

$ids = array_column(iterator_to_array($extractor), 'Id');

array_unshift($ids, 'Id');
array_unshift($predictions, 'SalePrice');

$extractor = new CSV('predictions.csv');

$extractor->export(array_transpose([$ids, $predictions]));
Now run the prediction script by calling it from the command line.
$ php predict.php
Nice work! Now you can submit your predictions with their IDs to the contest page to see how well you did.
Wrap Up
- Regressors are a type of estimator that predict continuous valued outcomes such as house prices.
- Ensemble learning combines the predictions of multiple estimators into one.
- Gradient Boost is an ensemble learner that uses Regression Trees to fix up the errors of a weak base estimator.
- Gradient Boost can handle both categorical and continuous data types at the same time by default.
- Data science competitions are a great way to practice your machine learning skills.
Next Steps
Have a look at the Gradient Boost documentation page to get a better sense of what the learner can do. Try tuning the hyper-parameters for better results. Consider filtering out noise samples from the dataset by using methods on the dataset object. For example, you may want to remove extremely large and expensive houses from the training set.
References
- D. De Cock. (2011). Ames, Iowa: Alternative to the Boston Housing Data as an End of Semester Regression Project. Journal of Statistics Education, Volume 19, Number 3.
License
The code is licensed MIT and the tutorial is licensed CC BY-NC 4.0.