Awesome
Minnow Server
Minnow Server, a super small and fast embedded HTTP(S) WebSocket server, lets small microcontrollers with no external memory act as real-time web servers.
The Minnow Server includes porting layers for the following platforms:
- FreeRTOS-TCP https://www.freertos.org/FreeRTOS-Plus/FreeRTOS_Plus_TCP/
- Harmony - Microchip Harmony TCP/IP
- MDK - Keil MDK
- MQX - MQX and RTCS from Freescale
- NetX - Azure RTOS
- BSD Sockets - POSIX including Linux, Mac, VxWorks, QNX, and Zephyr
- INTEGRITY - Green Hills Software
- Windows - Standard Windows and Win CE
- lwIP - lwIP Netconn API for RTOS-enabled systems
Bare metal (no RTOS) event-based porting layers:
- lwIP-raw lwIP raw TCP API port: http://lwip.wikia.com/wiki/Raw/TCP
Note:
The above-mentioned porting layers are not included with the Minnow Server. Carefully read the instructions below to find out how to download the porting layers. Using ESP8266 or ESP32? Check out the ESP8266 build files and the SharkSSL ESP32 IDE.
Minnow Server: One Of Three WebSocket Servers
The Minnow Server is one of three WebSocket server implementations provided by Real Time Logic.
- The Minnow Server is designed for resource-constrained devices such as a Cortex-M0 and ESP8266. A Minnow Server application must be designed as a SPA and preferably use the SPA amalgamator service for converting the SPA assets into a C array. The SharkSSL ESP8266 IDE and the SharkSSL ESP32 IDE include a ready to compile and run Minnow Server example.
- The Barracuda Web Server's WebSocket Server enables hybrid server-side/client-side web applications to communicate using both AJAX, REST, HTTP(S) and (secure) WebSockets. Consider using this WebSocket server if you plan on using HTTP(S) services in addition to WS(S) services and/or require a dual WSS/WS server. See the Barracuda Web Server's WebSocket example for details.
- The Barracuda App Server's WebSocket Server provides the easiest-to-use solution, in which server-side business logic can be designed in the easy to learn Lua scripting language. With the Barracuda App Server, much of the device's high-level logic can be implemented in Lua. Just as Lua is popular with rapid game development, now embedded systems can benefit from the same. The SharkSSL ESP32 IDE includes a ready to compile and run Barracuda App Server project called the LSP Application Manager, which can be used as the foundation for your development. See the online tutorial for an interactive WebSocket example.
Minnow Server SPA Reference Example
This repository includes the Minnow Server and the Minnow Server Single Page Application (SPA) Reference Example. The Minnow Server is also included in the SharkSSL Repository and will use a secure (HTTPS) connection when used with SharkSSL, but note that the SharkSSL repository does not include the SPA Reference Example. Check out the SharkSSL IDE if you want to quickly test the Minnow Server Reference Example in secure mode (HTTPS). See the tutorial Beginner's Guide To Secure IoT Communication and X.509 Certificate Managment for details.
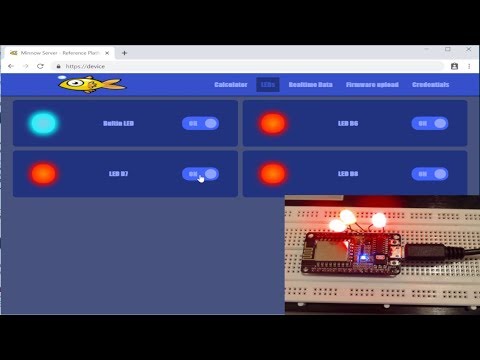
The Minnow Server Reference Example is a fully functional example that follows the design guidelines outlined in the tutorial Creating Single-Page Apps with the Minnow Server. Figure 1 shows the HTML5 LED web page provided by this example. The example is designed such that one can use it as a base for developing a professional web-based device management application.

Figure 1: The Single Page HTML5 Based Web Application
The example provides a direct WebSocket server API designed for local Intranet use and an optional IoT connection that enables the WebSocket server running on a private network and protected by a firewall to also be accessible from the Internet. The following figure shows how local and external users can access the same device.

Figure 2: Access reference example locally or via the Internet
The optional IoT solution enables a device installed on a private network to be accessed from the Internet without having to do any network configurations. The example includes the source code for the online IoT server setup. The online server can easily be installed on any cloud solution, including low-cost Virtual Private Servers. An exciting feature of the IoT version is that it allows the external user to use a secure TLS connection when the Minnow Server is not TLS enabled.
See the tutorial IoT Enabled Embedded Web Server for details.
Compiling the Reference Example
The Minnow Server and the reference example can be compiled for any microcontroller. The Minnow Server includes many RTOS and TCP/IP stacks porting layers. However, a few code sections in the example code are designed to run on a non-RTOS environment and must be modified if you plan on compiling the example "as is" for a microcontroller. The purpose with the reference example is educational, and compiling and running the code on a host computer is the first step. You may compile the code on Windows using the included Visual C++ project file or on Linux/Mac using the included makefile.
In addition to the host build environments, we provide a ready-to-use build environment for FreeRTOS/lwIP ESP8266. The following video shows how to compile and upload the code to the ESP8266. The video also shows how to IoT enable the Minnow Server example. See the embedded.com article How to install a secure embedded Web server on ESP8266 for detailed instructions.
No C code option:
For those interested in exploring a simpler option, we also offer an alternative tutorial that demonstrates how to run the SPA reference example using the Barracuda App Server on an ESP32.
Prerequisites
The Minnow Server has two options for compilation: secure and non-secure. If you want to compile the server in non-secure mode, compile and link it with the porting layer in the SMQ GitHub repository. On the other hand, if you opt for secure mode, compile and link it with the secure porting layer found in the SharkSSL GitHub repository.
- Carefully read the Minnow Server SPA tutorial, which provides details on the complete SPA development process.
- follow one of the two options below:
Non-secure mode (HTTP)
 git clone https://github.com/RealTimeLogic/MinnowServer.git
 git clone https://github.com/RealTimeLogic/JSON.git
 git clone https://github.com/RealTimeLogic/SMQ.git
The Minnow Server reference example uses the JSON and SMQ libraries. The SMQ stack is needed even if you do not plan on IoT enabling the reference example since the Minnow Server uses the SMQ TCP/IP porting layer.
Secure mode (HTTPS)
Please note that the Linux makefile is set up to detect SharkSSL automatically, but if you need to compile it for a different target, you can check the dependencies in the makefile.
git clone https://github.com/RealTimeLogic/MinnowServer.git
git clone https://github.com/RealTimeLogic/JSON.git
git clone https://github.com/RealTimeLogic/SharkSSL.git
cd MinnowServer/example/make
make minnow
./minnow
Compile and run for developer mode
Compile the code and start the server. The server will attempt to use the default HTTP port or an alternative port if it cannot open the default port. Run the following command on Linux to open the default port 80: sudo ./minnow
Open your hosts file and add the following entry:
127.0.0.1 device
Drag and drop the main HTML file www/index.html into your browser window. The JavaScript code that is part of the SPA will connect to ws://device. Note that the code assumes the server listens on the default port 80. Make sure the server listens on the default port or edit the JavaScript code and add the port number to the URL.
Log in by using the username 'root' and password 'password'.
Compile and run for release mode
Follow the Minnow Server design guide for how to amalgamate and compress all web resources in the 'www' directory. Make sure to select Gzip compression, so the online service creates the required index.c file. Replace example/index.c with the generated file.
Compile and run the server. You may now load the web interface directly from the server by navigating to http://device.
Running on a host operating system in a command window
When running the server in a command window, the four LEDs can also be controlled from the command line using the keyboard keys 'b' to 'e'. A lowercase letter turns the LED off, and an uppercase letter turns the LED on.
The temperature can be controlled from the command line by pressing the up or down arrow keys.
How to IoT enable the reference example
The Minnow Server reference example can also be accessed from outside the Intranet when the reference example is IoT enabled and an SMQ broker is deployed on the Internet. You do not need to set up an online server if you simply want to test the IoT connectivity. In the following example, we will show how to IoT enable the reference example and have the reference example connect to an SMQ broker running on another computer on your Intranet. The SMQ broker needs another IP address than the one used for the Minnow Server. You can use another computer on your Intranet or run the SMQ broker in a virtual machine (VM).
Online IoT bridge Demo: https://minnow.realtimelogic.com/IoT-Bridge-Demo.html
Copy the "IoT" directory to the computer (or VM) where the SMQ broker will run. Download the Mako Server and unpack the server on the same computer. You need the mako executable and mako.zip. Copy those two files to the IoT directory. You should have mako (Win: mako.exe), mako.zip, and the directory www in the IoT directory. The 'www' directory contains the server-side app that sets up the SMQ broker. You also need a copy of the Minnow Server application in the IoT/www directory. Copy everything from 'www' (the Minnow Server application) to IoT/www and rename IoT/www/index.html to IoT/www/device.htmls.
Open device.htmls (The SPA index.html copy) in an editor and add the following line, just below the list of included JavaScript files:
<script src="/rtl/smq.js"></script>Start the Mako Server as follows:
mako -l::www (on Linux: ./mako -l::www)
The Mako Server prints the port numbers used in the console. We recommend making sure the Mako Server uses the default HTTP port 80. If not, you will have to change the URL in the Minnow Server reference example by opening example/main.c and by changing the SMQ_URL. Change the URL to the following: portno is the port number the Mako Server is listening on.
#define SMQ_URL SMQ_PROTOCOL SMQ_DOMAIN " :portno/minnow-smq.lsp?device="
Open your hosts file and add the following entry:
IP-ADDR MakoServer
Where IP-ADDR is the IP address of the computer or VM running the Mako Server.
Alternatively, open example/main.c and search for SMQ_DOMAIN. Change the domain "MakoServer" to the computer's IP address running the Mako Server.
Open example/main.c and add the following at the top of the file, just below the initial comment:
#define USE_SMQ
Compile and run the reference example.
Use a browser and navigate to http://MakoServer. The main page shows a list of connected devices. You should see the one device and you may click the link to manage the device via the SMQ broker.
Installing the SMQ Broker on an Online VPS or Cloud Server
Follow the Setting up an Online SMQ IoT Broker tutorial. Replace the server side app in this tutorial with the content of IoT/www.
Files
Minnow Server
- src/MSLib.c - the Minnow Server C source code library.
- src/MSLib.h - the Minnow Server library header file.
Example C code
- example/src/main.c - the Minnow Server reference example code.
- example/ JsonStaticAlloc.c - shows how to use JSON with static allocators.
- example/ index.c - the amalgamated and compressed Single Page App (SPA web page).
Single Page Application (SPA)
- www/index.html - the SPA framework.
- www/css -- All CSS3 files.
- www/js/connection.js - manages the WebSocket or SMQ connection and provides a high-level API for JSON message handling (sets global object 'ws'). The implementation is generic and can be reused for other projects.
- www/js/interactions.js - The SPA interaction contains JavaScript UI management and uses connection.js for server interaction.
- www/js/LED.js - code for dynamically creating LED HTML UI (sets global object 'led')
- www/plugins/ - third-party resources used by the SPA
IoT Server Side Code (Mako Server App)
- IoT/www/.preload - The application's startup script sets up the SMQ broker and server app.
- IoT/www/smq.lsp - converts HTTP(S) connections to SMQ connections. The URL domain/smq.lsp is used by both device code and JavaScript code for setting up a persistent SMQ connection.
- index.lsp - Looks up device by ID and forwards the request to device.htmls if device is found. The file device.htmls is a copy of the SPA main index.html file.
Embedded Web Server Considerations
Consider reading the following tutorials as they may save you from serious problems down the road: