Awesome
<h1 align="center"> <img src="https://www.intelrealsense.com/wp-content/uploads/2020/09/intel-realsense-logo-360px.png" alt="Intel® RealSense™" title="Intel® RealSense™" /> </h1> <p align="center"> ROS Wrapper for Intel(R) RealSense(TM) Cameras<br> <a href="https://github.com/IntelRealSense/realsense-ros/releases">Latest release notes</a> </p> <hr>


Table of contents
<hr>ROS1 and ROS2 Legacy
<details> <summary> Intel RealSense ROS1 Wrapper </summary> Intel Realsense ROS1 Wrapper is not supported anymore, since our developers team are focusing on ROS2 distro.<br> For ROS1 wrapper, go to <a href="https://github.com/IntelRealSense/realsense-ros/tree/ros1-legacy">ros1-legacy</a> branch </details> <details> <summary> Moving from <a href="https://github.com/IntelRealSense/realsense-ros/tree/ros2-legacy">ros2-legacy</a> to ros2-master </summary>- Changed Parameters:
- "stereo_module", "l500_depth_sensor" are replaced by "depth_module"
- For video streams: <module>.profile replaces <stream>_width, <stream>_height, <stream>_fps
- ROS2-legacy (Old):
- ros2 launch realsense2_camera rs_launch.py depth_width:=640 depth_height:=480 depth_fps:=30.0 infra1_width:=640 infra1_height:=480 infra1_fps:=30.0
- ROS2-master (New):
- ros2 launch realsense2_camera rs_launch.py depth_module.profile:=640x480x30
- ROS2-legacy (Old):
- Removed paramets <stream>_frame_id, <stream>_optical_frame_id. frame_ids are now defined by camera_name
- "filters" is removed. All filters (or post-processing blocks) are enabled/disabled using "<filter>.enable"
- "align_depth" is now a regular processing block and as such the parameter for enabling it is replaced with "align_depth.enable"
- "allow_no_texture_points", "ordered_pc" are now belong to the pointcloud filter and as such are replaced by "pointcloud.allow_no_texture_points", "pointcloud.ordered_pc"
- "pointcloud_texture_stream", "pointcloud_texture_index" belong now to the pointcloud filter and were renamed to match their librealsense' names: "pointcloud.stream_filter", "pointcloud.stream_index_filter"
- Allow enable/disable of sensors in runtime (parameters <stream>.enable)
- Allow enable/disable of filters in runtime (parameters <filter_name>.enable)
- unite_imu_method parameter is now changeable in runtime.
- enable_sync parameter is now changeable in runtime.
Installation on Ubuntu
<details> <summary> Step 1: Install the ROS2 distribution </summary>-
Ubuntu 22.04:
Ubuntu 20.04
Please choose only one option from the 3 options below (in order to prevent multiple versions installation and workspace conflicts)
-
Option 1: Install librealsense2 debian package from Intel servers
- Jetson users - use the Jetson Installation Guide
- Otherwise, install from Linux Debian Installation Guide
- In this case treat yourself as a developer: make sure to follow the instructions to also install librealsense2-dev and librealsense2-dkms packages
-
Option 2: Install librealsense2 (without graphical tools and examples) debian package from ROS servers (Foxy EOL distro is not supported by this option):
- Configure your Ubuntu repositories
- Install all realsense ROS packages by
sudo apt install ros-<ROS_DISTRO>-librealsense2*- For example, for Humble distro:
sudo apt install ros-humble-librealsense2*
- For example, for Humble distro:
-
Option 3: Build from source
- Download the latest Intel® RealSense™ SDK 2.0
- Follow the instructions under Linux Installation
Option 1: Install debian package from ROS servers (Foxy EOL distro is not supported by this option):
- Configure your Ubuntu repositories
- Install all realsense ROS packages by
sudo apt install ros-<ROS_DISTRO>-realsense2-* - For example, for Humble distro:
sudo apt install ros-humble-realsense2-*
Option 2: Install from source
-
Create a ROS2 workspace
mkdir -p ~/ros2_ws/src cd ~/ros2_ws/src/ -
Clone the latest ROS2 Intel® RealSense™ wrapper from here into '~/ros2_ws/src/'
git clone https://github.com/IntelRealSense/realsense-ros.git -b ros2-master cd ~/ros2_ws -
Install dependencies
sudo apt-get install python3-rosdep -y
sudo rosdep init # "sudo rosdep init --include-eol-distros" for Foxy and earlier
rosdep update # "sudo rosdep update --include-eol-distros" for Foxy and earlier
rosdep install -i --from-path src --rosdistro $ROS_DISTRO --skip-keys=librealsense2 -y
- Build
colcon build
- Source environment
ROS_DISTRO=<YOUR_SYSTEM_ROS_DISTRO>  # set your ROS_DISTRO: iron, humble, foxy
source /opt/ros/$ROS_DISTRO/setup.bash
cd ~/ros2_ws
. install/local_setup.bash
Installation on Windows
PLEASE PAY ATTENTION: RealSense ROS2 Wrapper is not meant to be supported on Windows by our team, since ROS2 and its packages are still not fully supported over Windows. We added these installation steps below in order to try and make it easier for users who already started working with ROS2 on Windows and want to take advantage of the capabilities of our RealSense cameras
<details> <summary> Step 1: Install the ROS2 distribution </summary>-
Windows 10/11
Please choose only one option from the two options below (in order to prevent multiple versions installation and workspace conflicts)
- Manual install from ROS2 formal documentation:
- Microsoft IOT binary installation:
- https://ms-iot.github.io/ROSOnWindows/GettingStarted/SetupRos2.html
- Pay attention that the examples of install are for Foxy distro (which is not supported anymore by RealSense ROS2 Wrapper)
- Please replace the word "Foxy" with Humble or Iron, depends on the chosen distro.
- Download Intel® RealSense™ ROS2 Wrapper source code from Intel® RealSense™ ROS2 Wrapper Releases
- Download the corrosponding supported Intel® RealSense™ SDK 2.0 source code from the "Supported RealSense SDK" section of the specific release you chose fronm the link above
- Place the librealsense folder inside the realsense-ros folder, to make the librealsense package set beside realsense2_camera, realsense2_camera_msgs and realsense2_description packages
-
Before starting building of our packages, make sure you have OpenCV for Windows installed on your machine. If you choose the Microsoft IOT way to install it, it will be installed automatically. Later, when colcon build, you might need to expose this installation folder by setting CMAKE_PREFIX_PATH, PATH, or OpenCV_DIR environment variables
-
Run "x64 Native Tools Command Prompt for VS 2019" as administrator
-
Setup ROS2 Environment (Do this for every new terminal/cmd you open):
-
If you choose the Microsoft IOT Binary option for installation
> C:\opt\ros\humble\x64\setup.bat -
If you choose the ROS2 formal documentation:
> call C:\dev\ros2_iron\local_setup.bat
-
-
Change directory to realsense-ros folder
> cd C:\ros2_ws\realsense-ros -
Build librealsense2 package only
> colcon build --packages-select librealsense2 --cmake-args -DBUILD_EXAMPLES=OFF -DBUILD_WITH_STATIC_CRT=OFF -DBUILD_GRAPHICAL_EXAMPLES=OFF- User can add
--event-handlers console_direct+parameter to see more debug outputs of the colcon build
- User can add
-
Build the other packages
> colcon build --packages-select realsense2_camera_msgs realsense2_description realsense2_camera- User can add
--event-handlers console_direct+parameter to see more debug outputs of the colcon build
- User can add
-
Setup environment with new installed packages (Do this for every new terminal/cmd you open):
> call install\setup.bat
Usage
Start the camera node
with ros2 run:
ros2 run realsense2_camera realsense2_camera_node
# or, with parameters, for example - temporal and spatial filters are enabled:
ros2 run realsense2_camera realsense2_camera_node --ros-args -p enable_color:=false -p spatial_filter.enable:=true -p temporal_filter.enable:=true
with ros2 launch:
ros2 launch realsense2_camera rs_launch.py
ros2 launch realsense2_camera rs_launch.py depth_module.depth_profile:=1280x720x30 pointcloud.enable:=true
Camera Name And Camera Namespace
User can set the camera name and camera namespace, to distinguish between cameras and platforms, which helps identifying the right nodes and topics to work with.
Example
-
If user have multiple cameras (might be of the same model) and multiple robots then user can choose to launch/run his nodes on this way.
-
For the first robot and first camera he will run/launch it with these parameters:
- camera_namespace:
- robot1
- camera_name
- D455_1
- With ros2 launch (via command line or by editing these two parameters in the launch file):
ros2 launch realsense2_camera rs_launch.py camera_namespace:=robot1 camera_name:=D455_1- With ros2 run (using remapping mechanisim Reference):
ros2 run realsense2_camera realsense2_camera_node --ros-args -r __node:=D455_1 -r __ns:=robot1- Result
> ros2 node list /robot1/D455_1 > ros2 topic list /robot1/D455_1/color/camera_info /robot1/D455_1/color/image_raw /robot1/D455_1/color/metadata /robot1/D455_1/depth/camera_info /robot1/D455_1/depth/image_rect_raw /robot1/D455_1/depth/metadata /robot1/D455_1/extrinsics/depth_to_color /robot1/D455_1/imu > ros2 service list /robot1/D455_1/device_info - camera_namespace:
Default behavior if non of these parameters are given:
- camera_namespace:=camera
- camera_name:=camera
> ros2 node list
/camera/camera

> ros2 topic list
/camera/camera/color/camera_info
/camera/camera/color/image_raw
/camera/camera/color/metadata
/camera/camera/depth/camera_info
/camera/camera/depth/image_rect_raw
/camera/camera/depth/metadata
/camera/camera/extrinsics/depth_to_color
/camera/camera/imu

> ros2 service list
/camera/camera/device_info
Parameters
Available Parameters:
- For the entire list of parameters type
ros2 param list. - For reading a parameter value use
ros2 param get <node> <parameter_name>- For example:
ros2 param get /camera/camera depth_module.emitter_enabled
- For example:
- For setting a new value for a parameter use
ros2 param set <node> <parameter_name> <value>- For example:
ros2 param set /camera/camera depth_module.emitter_enabled 1
- For example:
Parameters that can be modified during runtime:
- All of the filters and sensors inner parameters.
- Video Sensor Parameters: (
depth_moduleandrgb_camera)- They have, at least, the <stream_type>_profile parameter.
- The profile parameter is a string of the following format: <width>X<height>X<fps> (The dividing character can be X, x or ",". Spaces are ignored.)
- For example:
depth_module.depth_profile:=640x480x30 depth_module.infra_profile:=640x480x30 rgb_camera.color_profile:=1280x720x30 - Note: The param depth_module.infra_profile is common for all infra streams. i.e., infra 0, 1 & 2.
- If the specified combination of parameters is not available by the device, the default or previously set configuration will be used.
- Run
ros2 param describe <your_node_name> <param_name>to get the list of supported profiles.
- Run
- Note: Should re-enable the stream for the change to take effect.
- <stream_name>_format
- This parameter is a string used to select the stream format.
- <stream_name> can be any of infra, infra1, infra2, color, depth.
- For example:
depth_module.depth_format:=Z16 depth_module.infra1_format:=y8 rgb_camera.color_format:=RGB8 - This parameter supports both lower case and upper case letters.
- If the specified parameter is not available by the stream, the default or previously set configuration will be used.
- Run
ros2 param describe <your_node_name> <param_name>to get the list of supported formats.
- Run
- Note: Should re-enable the stream for the change to take effect.
- If the stream doesn't support the user selected profile <width>X<height>X<fps> + <format>, it will not be opened and a warning message will be shown.
- Should update the profile settings and re-enable the stream for the change to take effect.
- Run
rs-enumerate-devicescommand to know the list of profiles supported by the connected sensors.
- They have, at least, the <stream_type>_profile parameter.
- enable_<stream_name>:
- Choose whether to enable a specified stream or not. Default is true for images and false for orientation streams.
- <stream_name> can be any of infra, infra1, infra2, color, depth, gyro, accel.
- For example:
enable_infra1:=true enable_color:=false
- enable_sync:
- gathers closest frames of different sensors, infra red, color and depth, to be sent with the same timetag.
- This happens automatically when such filters as pointcloud are enabled.
- <stream_type>_qos:
- Sets the QoS by which the topic is published.
- <stream_type> can be any of infra, infra1, infra2, color, depth, gyro, accel.
- Available values are the following strings:
SYSTEM_DEFAULT,DEFAULT,PARAMETER_EVENTS,SERVICES_DEFAULT,PARAMETERS,SENSOR_DATA. - For example:
depth_qos:=SENSOR_DATA - Pointcloud QoS is controlled with the
pointcloud.pointcloud_qosparameter in the pointcloud filter, refer to the Post-Processing Filters section for details. - Reference: ROS2 QoS profiles formal documentation
- Notice: <stream_type>_info_qos refers to both camera_info topics and metadata topics.
- tf_publish_rate:
- double, rate (in Hz) at which dynamic transforms are published
- Default value is 0.0 Hz (means no dynamic TF)
- This param also depends on publish_tf param
- If publish_tf:=false, then no TFs will be published, even if tf_publish_rate is >0.0 Hz
- If publish_tf:=true and tf_publish_rate set to >0.0 Hz, then dynamic TFs will be published at the specified rate
- unite_imu_method:
- For the D400 cameras with built in IMU components, below 2 unrelated streams (each with it's own frequency) will be created:
- gyro - which shows angular velocity
- accel - which shows linear acceleration.
- Both streams will publish data to its corresponding topics:
- '/camera/camera/gyro/sample' & '/camera/camera/accel/sample'
- Though both topics are of same message type 'sensor_msgs::Imu', only their relevant fields are filled out.
- A new topic called imu will be created, when both accel and gyro streams are enabled and the param unite_imu_method set to > 0.
- Data from both accel and gyro are combined and published to this topic
- All the fields of the Imu message are filled out.
- It will be published at the rate of the gyro.
unite_imu_methodparam supports below values:- 0 -> none: no imu topic
- 1 -> copy: Every gyro message will be attached by the last accel message.
- 2 -> linear_interpolation: Every gyro message will be attached by an accel message which is interpolated to gyro's timestamp.
- Note: When the param unite_imu_method is dynamically updated, re-enable either gyro or accel stream for the change to take effect.
- For the D400 cameras with built in IMU components, below 2 unrelated streams (each with it's own frequency) will be created:
- accelerate_gpu_with_glsl:
- Boolean: GPU accelerated with GLSL for processing PointCloud and Colorizer filters.
- Note:
- To have smooth transition between the processing blocks when this parameter is updated dynamically, the node will:
- Stop the video sensors
- Do necessary GLSL configuration
- And then, start the video sensors
- To enable GPU acceleration, turn ON
BUILD_ACCELERATE_GPU_WITH_GLSLduring build:
colcon build --cmake-args '-DBUILD_ACCELERATE_GPU_WITH_GLSL=ON' - To have smooth transition between the processing blocks when this parameter is updated dynamically, the node will:
Parameters that cannot be changed in runtime:
- serial_no:
- will attach to the device with the given serial number (serial_no) number.
- Default, attach to the first (in an inner list) RealSense device.
- Note: serial number should be defined with "_" prefix.
- That is a workaround until a better method will be found to ROS2's auto conversion of strings containing only digits into integers.
- Example: serial number 831612073525 can be set in command line as
serial_no:=_831612073525.
- usb_port_id:
- will attach to the device with the given USB port (usb_port_id).
- For example:
usb_port_id:=4-1orusb_port_id:=4-2 - Default, ignore USB port when choosing a device.
- device_type:
- will attach to a device whose name includes the given device_type regular expression pattern.
- Default, ignore device type.
- For example:
device_type:=d435will match d435 and d435i.device_type=d435(?!i)will match d435 but not d435i.
- reconnect_timeout:
- When the driver cannot connect to the device try to reconnect after this timeout (in seconds).
- For Example:
reconnect_timeout:=10
- wait_for_device_timeout:
- If the specified device is not found, will wait wait_for_device_timeout seconds before exits.
- Defualt, wait_for_device_timeout < 0, will wait indefinitely.
- For example:
wait_for_device_timeout:=60
- rosbag_filename:
- Publish topics from rosbag file. There are two ways for loading rosbag file:
- Command line -
ros2 run realsense2_camera realsense2_camera_node -p rosbag_filename:="/full/path/to/rosbag.bag" - Launch file - set
rosbag_filenameparameter with rosbag full path (seerealsense2_camera/launch/rs_launch.pyas reference)
- initial_reset:
- On occasions the device was not closed properly and due to firmware issues needs to reset.
- If set to true, the device will reset prior to usage.
- For example:
initial_reset:=true
- base_frame_id: defines the frame_id all static transformations refers to.
- clip_distance:
- Remove from the depth image all values above a given value (meters). Disable by giving negative value (default)
- For example:
clip_distance:=1.5
- linear_accel_cov, angular_velocity_cov: sets the variance given to the Imu readings.
- hold_back_imu_for_frames: Images processing takes time. Therefor there is a time gap between the moment the image arrives at the wrapper and the moment the image is published to the ROS environment. During this time, Imu messages keep on arriving and a situation is created where an image with earlier timestamp is published after Imu message with later timestamp. If that is a problem, setting hold_back_imu_for_frames to true will hold the Imu messages back while processing the images and then publish them all in a burst, thus keeping the order of publication as the order of arrival. Note that in either case, the timestamp in each message's header reflects the time of it's origin.
- publish_tf:
- boolean, enable/disable publishing static and dynamic TFs
- Defaults to True
- So, static TFs will be published by default
- If dynamic TFs are needed, user should set the param tf_publish_rate to >0.0 Hz
- If set to false, both static and dynamic TFs won't be published, even if the param tf_publish_rate is set to >0.0 Hz
- diagnostics_period:
- double, positive values set the period between diagnostics updates on the
/diagnosticstopic. - 0 or negative values mean no diagnostics topic is published. Defaults to 0.</br>
The
/diagnosticstopic includes information regarding the device temperatures and actual frequency of the enabled streams.
- double, positive values set the period between diagnostics updates on the
ROS2(Robot) vs Optical(Camera) Coordination Systems:
- Point Of View:
- Imagine we are standing behind of the camera, and looking forward.
- Always use this point of view when talking about coordinates, left vs right IRs, position of sensor, etc..
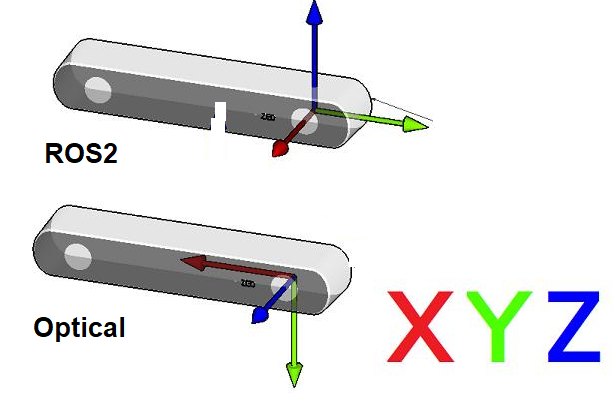
- ROS2 Coordinate System: (X: Forward, Y:Left, Z: Up)
- Camera Optical Coordinate System: (X: Right, Y: Down, Z: Forward)
- References: REP-0103, REP-0105
- All data published in our wrapper topics is optical data taken directly from our camera sensors.
- static and dynamic TF topics publish optical CS and ROS CS to give the user the ability to move from one CS to other CS.
TF from coordinate A to coordinate B:
- TF msg expresses a transform from coordinate frame "header.frame_id" (source) to the coordinate frame child_frame_id (destination) Reference
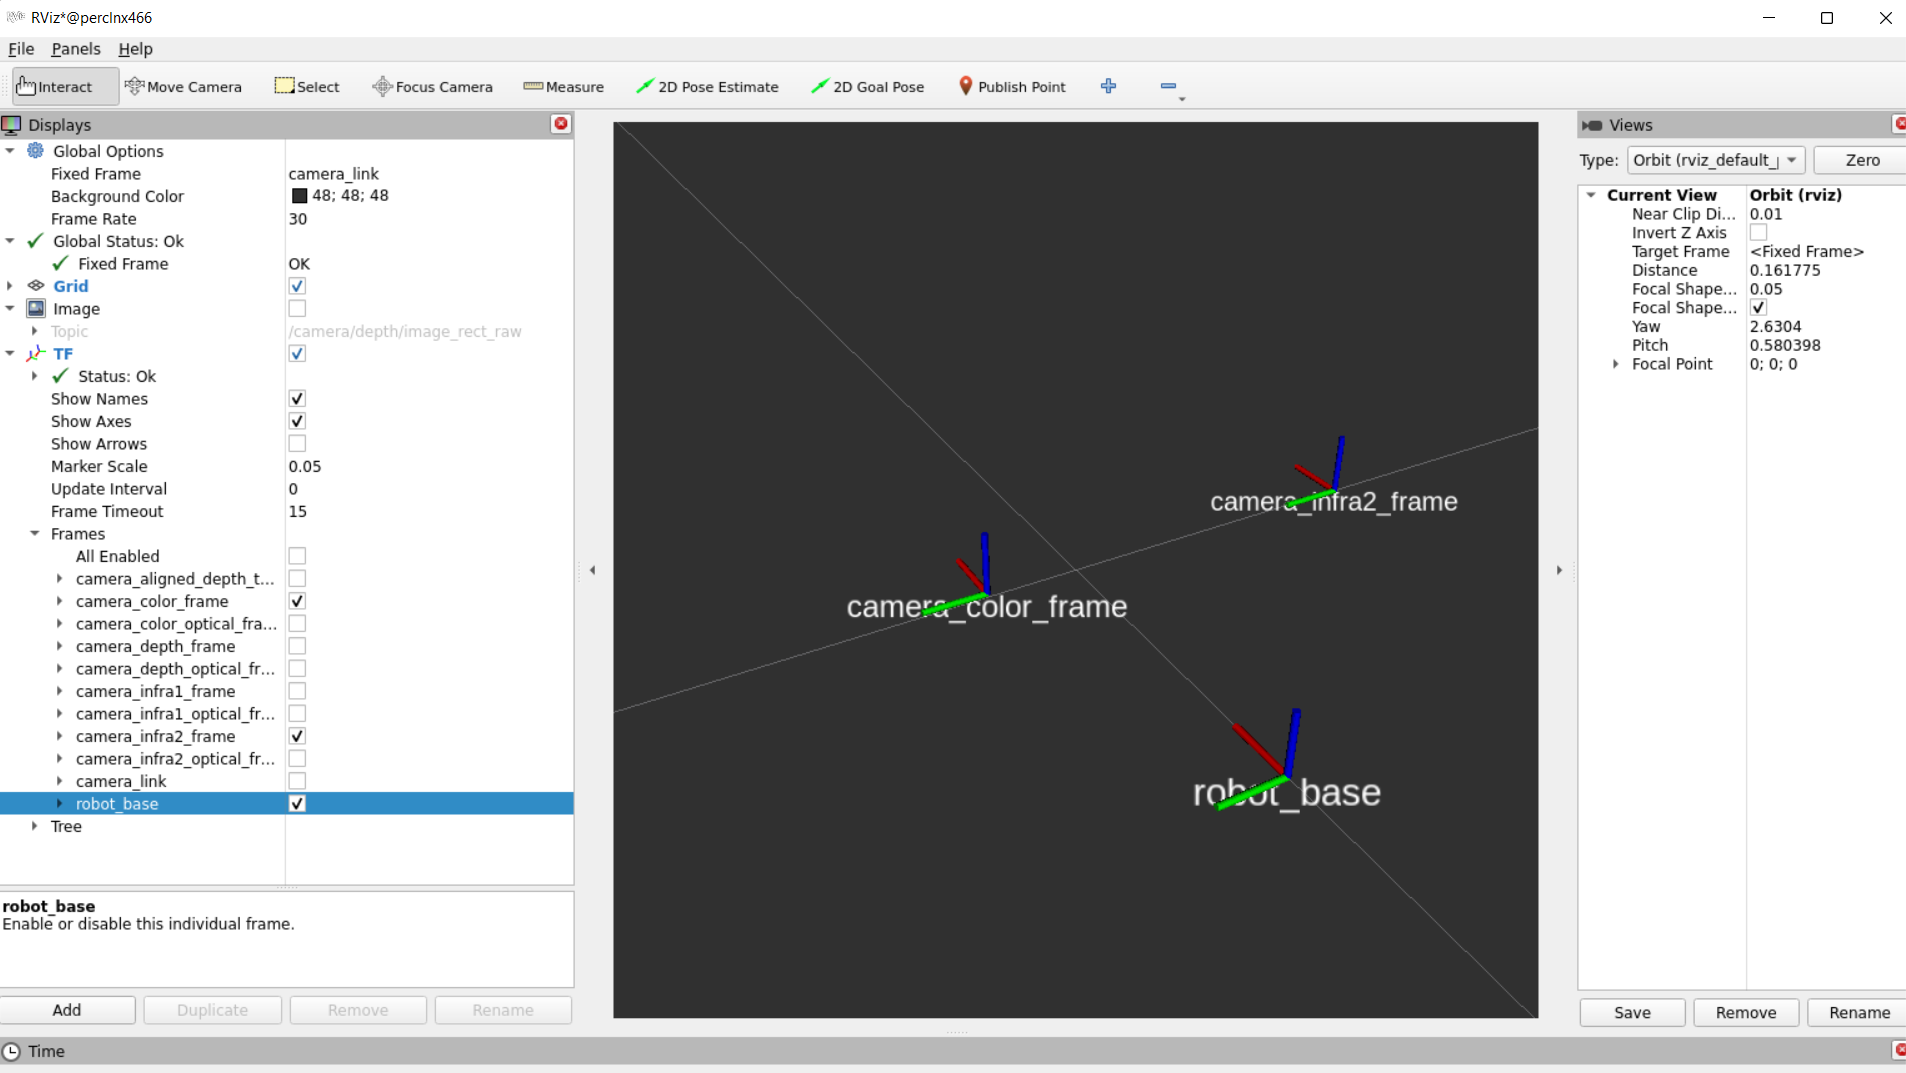
- In RealSense cameras, the origin point (0,0,0) is taken from the left IR (infra1) position and named as "camera_link" frame
- Depth, left IR and "camera_link" coordinates converge together.
- Our wrapper provide static TFs between each sensor coordinate to the camera base (camera_link)
- Also, it provides TFs from each sensor ROS coordinates to its corrosponding optical coordinates.
- Example of static TFs of RGB sensor and Infra2 (right infra) sensor of D435i module as it shown in rviz2:
Extrinsics from sensor A to sensor B:
- Extrinsic from sensor A to sensor B means the position and orientation of sensor A relative to sensor B.
- Imagine that B is the origin (0,0,0), then the Extrensics(A->B) describes where is sensor A relative to sensor B.
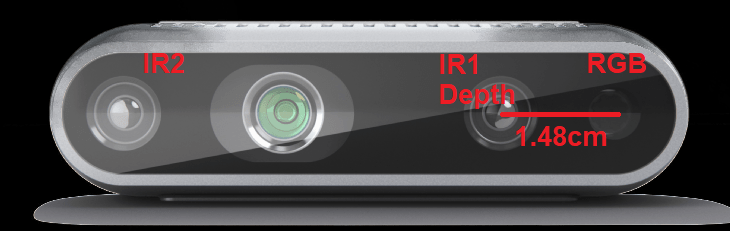
- For example, depth_to_color, in D435i:
- If we look from behind of the D435i, extrinsic from depth to color, means, where is the depth in relative to the color.
- If we just look at the X coordinates, in the optical coordiantes (again, from behind) and assume that COLOR(RGB) sensor is (0,0,0), we can say that DEPTH sensor is on the right of RGB by 0.0148m (1.48cm).
administrator@perclnx466 ~/ros2_humble $ ros2 topic echo /camera/camera/extrinsics/depth_to_color
rotation:
- 0.9999583959579468
- 0.008895332925021648
- -0.0020127370953559875
- -0.008895229548215866
- 0.9999604225158691
- 6.045500049367547e-05
- 0.0020131953060626984
- -4.254872692399658e-05
- 0.9999979734420776
translation:
- 0.01485931035131216
- 0.0010161789832636714
- 0.0005317096947692335
---
- Extrinsic msg is made up of two parts:
- float64[9] rotation (Column - major 3x3 rotation matrix)
- float64[3] translation (Three-element translation vector, in meters)
Published Topics
The published topics differ according to the device and parameters.
After running the above command with D435i attached, the following list of topics will be available (This is a partial list. For full one type ros2 topic list):
- /camera/camera/aligned_depth_to_color/camera_info
- /camera/camera/aligned_depth_to_color/image_raw
- /camera/camera/color/camera_info
- /camera/camera/color/image_raw
- /camera/camera/color/metadata
- /camera/camera/depth/camera_info
- /camera/camera/depth/color/points
- /camera/camera/depth/image_rect_raw
- /camera/camera/depth/metadata
- /camera/camera/extrinsics/depth_to_color
- /camera/camera/imu
- /diagnostics
- /parameter_events
- /rosout
- /tf_static
This will stream relevant camera sensors and publish on the appropriate ROS topics.
Enabling accel and gyro is achieved either by adding the following parameters to the command line:</br>
ros2 launch realsense2_camera rs_launch.py pointcloud.enable:=true enable_gyro:=true enable_accel:=true </br>
or in runtime using the following commands:
ros2 param set /camera/camera enable_accel true
ros2 param set /camera/camera enable_gyro true
Enabling stream adds matching topics. For instance, enabling the gyro and accel streams adds the following topics:
- /camera/camera/accel/imu_info
- /camera/camera/accel/metadata
- /camera/camera/accel/sample
- /camera/camera/extrinsics/depth_to_accel
- /camera/camera/extrinsics/depth_to_gyro
- /camera/camera/gyro/imu_info
- /camera/camera/gyro/metadata
- /camera/camera/gyro/sample
RGBD Topic
RGBD new topic, publishing [RGB + Depth] in the same message (see RGBD.msg for reference). For now, works only with depth aligned to color images, as color and depth images are synchronized by frame time tag.
These boolean paramters should be true to enable rgbd messages:
enable_rgbd: new paramter, to enable/disable rgbd topic, changeable during runtimealign_depth.enable: align depth images to rgb imagesenable_sync: let librealsense sync between frames, and get the frameset with color and depth images combinedenable_color+enable_depth: enable both color and depth sensors
The current QoS of the topic itself, is the same as Depth and Color streams (SYSTEM_DEFAULT)
Example:
ros2 launch realsense2_camera rs_launch.py enable_rgbd:=true enable_sync:=true align_depth.enable:=true enable_color:=true enable_depth:=true
Metadata topic
The metadata messages store the camera's available metadata in a json format. To learn more, a dedicated script for echoing a metadata topic in runtime is attached. For instance, use the following command to echo the camera/depth/metadata topic:
python3 src/realsense-ros/realsense2_camera/scripts/echo_metadada.py /camera/camera/depth/metadata
Post-Processing Filters
The following post processing filters are available:
-
align_depth: If enabled, will publish the depth image aligned to the color image on the topic/camera/camera/aligned_depth_to_color/image_raw.- The pointcloud, if created, will be based on the aligned depth image.
-
colorizer: will color the depth image. On the depth topic an RGB image will be published, instead of the 16bit depth values . -
pointcloud: will add a pointcloud topic/camera/camera/depth/color/points.- The texture of the pointcloud can be modified using the
pointcloud.stream_filterparameter.</br> - The depth FOV and the texture FOV are not similar. By default, pointcloud is limited to the section of depth containing the texture. You can have a full depth to pointcloud, coloring the regions beyond the texture with zeros, by setting
pointcloud.allow_no_texture_pointsto true. - pointcloud is of an unordered format by default. This can be changed by setting
pointcloud.ordered_pcto true. - The QoS of the pointcloud topic is independent from depth and color streams and can be controlled with the
pointcloud.pointcloud_qosparameter.- The same set of QoS values are supported as other streams, refer to <stream_type>_qos in the Parameters section of this page.
- The launch file should include the parameter with initial QoS value, for example,
{'name': 'pointcloud.pointcloud_qos', 'default': 'SENSOR_DATA', 'description': 'pointcloud qos'} - The QoS value can also be overridden at launch with command option, for example,
pointcloud.pointcloud_qos:=SENSOR_DATA - At runtime, the QoS can be changed dynamically but require the filter re-enable for the change to take effect, for example,
ros2 param set /camera/camera pointcloud.pointcloud_qos SENSOR_DATA
ros2 param set /camera/camera pointcloud.enable false
ros2 param set /camera/camera pointcloud.enable true
- The texture of the pointcloud can be modified using the
-
hdr_merge: Allows depth image to be created by merging the information from 2 consecutive frames, taken with different exposure and gain values. -
depth_module.hdr_enabled: to enable/disable HDR. The way to set exposure and gain values for each sequence:- during Runtime:
- is by first selecting the sequence id, using the
depth_module.sequence_idparameter and then modifying thedepth_module.gain, anddepth_module.exposure. - From FW versions 5.14.x.x and above, if HDR is enabled, the preset configs (like exposure, gain, etc.,) cannot be updated.
- Disable the HDR first using
depth_module.hdr_enabledparameter and then, update the required presets.
- Disable the HDR first using
- is by first selecting the sequence id, using the
- during Launch time of the node:
- is by setting below parameters
depth_module.exposure.1depth_module.gain.1depth_module.exposure.2depth_module.gain.2
- Make sure to set
depth_module.hdr_enabledto true, otherwise these parameters won't be considered.
- is by setting below parameters
- To view the effect on the infrared image for each sequence id use the
filter_by_sequence_id.sequence_idparameter. - For in-depth review of the subject please read the accompanying white paper.
- Note: Auto exposure functionality is not supported when HDR is enabled. i.e., Auto exposure will be auto-disabled if HDR is enabled.
- during Runtime:
-
The following filters have detailed descriptions in : https://github.com/IntelRealSense/librealsense/blob/master/doc/post-processing-filters.md
disparity_filter- convert depth to disparity before applying other filters and back.spatial_filter- filter the depth image spatially.temporal_filter- filter the depth image temporally.hole_filling_filter- apply hole-filling filter.decimation_filter- reduces depth scene complexity.
Each of the above filters have it's own parameters, following the naming convention of <filter_name>.<parameter_name> including a <filter_name>.enable parameter to enable/disable it.
Available services
- device_info : retrieve information about the device - serial_number, firmware_version etc. Type
ros2 interface show realsense2_camera_msgs/srv/DeviceInfofor the full list. Call example:ros2 service call /camera/camera/device_info realsense2_camera_msgs/srv/DeviceInfo
Efficient intra-process communication:
Our ROS2 Wrapper node supports zero-copy communications if loaded in the same process as a subscriber node. This can reduce copy times on image/pointcloud topics, especially with big frame resolutions and high FPS.
You will need to launch a component container and launch our node as a component together with other component nodes. Further details on "Composing multiple nodes in a single process" can be found here.
Further details on efficient intra-process communication can be found here.
Example
Manually loading multiple components into the same process
-
Start the component:
ros2 run rclcpp_components component_container -
Add the wrapper:
ros2 component load /ComponentManager realsense2_camera realsense2_camera::RealSenseNodeFactory -e use_intra_process_comms:=trueLoad other component nodes (consumers of the wrapper topics) in the same way.
Limitations
- Node components are currently not supported on RCLPY
- Compressed images using
image_transportwill be disabled as this isn't supported with intra-process communication
Latency test tool and launch file
For getting a sense of the latency reduction, a frame latency reporter tool is available via a launch file.
The launch file loads the wrapper and a frame latency reporter tool component into a single container (so the same process).
The tool prints out the frame latency (now - frame.timestamp) per frame.
The tool is not built unless asked for. Turn on BUILD_TOOLS during build to have it available:
colcon build --cmake-args '-DBUILD_TOOLS=ON'
The launch file accepts a parameter, intra_process_comms, controlling whether zero-copy is turned on or not. Default is on:
ros2 launch realsense2_camera rs_intra_process_demo_launch.py intra_process_comms:=true