Awesome
Lenovo ThinkPad T530 Hackintosh OpenCore
![]()
![]()
![]()
![]()
![]() <br>
<br>
TABLE of CONTENTS
- About
- Specs
- EFI Folder Content (OpenCore)
- Deployment
- Post-Install
- Apply Root Patches with OpenCore Legacy Patcher (macOS 12+)
- Disable Gatekeeper (optional)
- Enable brightness control for external displays
- Strengthen Security
- Fixing CPU Power Management
- Fixing Sleep issues
- Reducing boot time
- Swapping Command ⌘ and Option ⌥ Keys
- Changing Themes
- Eject Button
- Fixing issues with AirportBrcmFixup (Broadcom WiFi Cards only)
- CPU Benchmark
- Credits and Thank Yous
About
OpenCore EFI Folder for running macOS High Sierra all the way up to macOS Sequoia on the Lenovo ThinkPad T530. There's also a Clover version which is capable of running macOS 11 and newer.
| ⚠️ Important Status Updates |
|---|
| SD Card Reader not working in Sonoma+ |
Noteworthy Features
- Contains Patches and Kexts from OpenCore Legacy Patcher (OCLP), such as:
- Booter Patches so that macOS Big Sur and newer can be installed
- NVRAM parameters
RestrictEvent.kextto install and run macOS Big Sur and newer withMacBookPro10,xSMBIOS (More)- Native SMC CPU Power Management in macOS 13+ for optimal CPU Power Management (More).
- Fully working graphics acceleration for the Intel HD 4000 in macOS 12+ (requires Post-Install root patching with OCLP)
- Working legacy Broadcom Wi-Fi and Bluetooth in macOS 14 (requires Post-Install root patching with OCLP)
- Ability to boot macOS 12+ with AMFI enabled thanks to
AMFIPass.kext.
- No patched
DSDT– only SSDT hotpatches were used for maximum ACPI-compliance and future macOS-compatibility! Try using a patchedDSDTfrom 2013 with a current version of macOS and you will understand what I mean! - Working battery status read-outs without additional DSDT/ACPI patches thanks to
ECEnabler.kext - 3D Globe in Maps in macOS 12+ thanks to
AdvancedMaps.kext - IRQ patches fully realized via a custom SSDT – zero binary renames required!
- Custom AppleALC Layout to support the Audio Jacks of Lenovo Mini Docking Stations 4337 and 4338. It uses Layout-ID 39 and has been integrated into AppleALC since version 1.7.3
- Working Hibernation
Specs
| Component | Details |
|---|---|
| Model | Lenovo ThinkPad T530, Model# 2429-62G |
| Chipset | Intel QM77 Express |
| BIOS Version | 2.77, unlocked with 1vyRain |
| Processor | Intel Core i7 3630QM |
| Memory | 16GB Samsung DDR3 1600MHz, Dual-Channel <br> Minimum: 8GB |
| Hard Disk | Samsung 840 Evo 250GB |
| Integrated Graphics | Intel HD Graphics 4000, 2048 MB RAM assigned |
| Display | 15.6" HD+ TFT Display (1600x900 px) |
| Audio | Realtek ALC269VC Rev.3 (Layout-id:39) |
| Ethernet | Intel 82579LM Gigabit Network Connection |
| WiFi and Bluetooth | Broadcom BCM94352HMB DW1550, 802.11 a/b/g/n/ac |
| Multicard Reader | Ricoh 4-in-1 reader (MMC, SD, SDHC, SDXC) |
| ExpressCard/34 slot | disabled |
| Docking Station | Lenovo ThinkPad 4338 Mini Dock plus Series 3 |
DOCS
macOS-incompatible Components
- NVIDIA Optimus GPU must be disabled in BIOS - otherwise no boot!
- Fingerprint Reader
- SD Card Reader (not working in macOS 14+). The source code for
VoodooSDHC.kexthas to be updated. The original version is like 10 years old (build for OSX 10.12). - VGA Port – not supported since macOS Mountain Lion: Intel HD Graphics VGA Support
EFI Folder Content (OpenCore)
<details> <summary><strong>Click to reveal</strong></summary>EFI
├── BOOT
│ └── BOOTx64.efi
└── OC
├── ACPI
│ ├── SSDT-ALS0.aml
│ ├── SSDT-BAT1-Disable.aml
│ ├── SSDT-EXT4.aml
│ ├── SSDT-EXT5.aml
│ ├── SSDT-IRQ_FIXES.aml
│ ├── SSDT-NBCF.aml
│ ├── SSDT-PM.aml
│ ├── SSDT-PNLF.aml
│ ├── SSDT-PRW0.aml
│ ├── SSDT-PTSWAKTTS.aml
│ ├── SSDT-SBUS-MCHC.aml
│ └── SSDT-TEMPToFans.aml
├── Drivers
│ ├── AudioDXE.efi (disabled)
│ ├── HfsPlus.efi
│ ├── OpenCanopy.efi
│ ├── OpenRuntime.efi
│ └── ResetNvramEntry.efi
├── Kexts (loaded based on Min/Max Kernel settings)
│ ├── AdvancedMap.kext (macOS 12+)
│ ├── AirportBrcmFixup.kext
│ ├── AMFIPass.kext (macOS 12+)
│ ├── AppleALC.kext
│ ├── AppleIntelCPUPowerManagement.kext (macOS 13+)
│ ├── AppleIntelCPUPowerManagementClient.kext (macOS 13+)
│ ├── BlueToolFixup.kext (macOS 12+)
│ ├── BrcmBluetoothInjector.kext
│ ├── BrcmFirmwareData.kext
│ ├── BrcmPatchRAM2.kext
│ ├── BrcmPatchRAM3.kext
│ ├── BrightnessKeys.kext
│ ├── CryptexFixup.kext (macOS 13+)
│ ├── ECEnabler.kext
│ ├── HibernationFixup.kext
│ ├── IntelMausi.kext
│ ├── IO80211FamilyLegacy.kext (macOS 14+)
│ ├── IOSkywalkFamily.kext (macOS 14+)
│ ├── Lilu.kext
│ ├── NoTouchID.kext (macOS 10.13 and 10.14)
│ ├── RestrictEvents.kext (macOS 11+)
│ ├── SMCBatteryManager.kext
│ ├── VirtualSMC.kext
│ ├── VoodooPS2Controller.kext
│ ├── VoodooSDHC.kext
│ └── WhateverGreen.kext
├── OpenCore.efi
├── Resources (NOTE: shows sub-folders only, no files)
│ ├── Font
│ └── Image
│ └── Acidanthera
│ │ ├── Chardonnay
│ │ ├── GoldenGate
│ │ └── Syrah
│ └── Blackosx
│ │ └── BsxM1
│ └── velickovicdj
│ │ └── EnterTwilight
│ └── Label
└── config.plist
Deployment
Please read the following instructions carefully before deploying my EFI folder. Depending on your T530 model, the used WiFi/BT card and macOS version you want to run, adjustments to the config.plist and used kexts may be necessary to adapt the config to your system.
[!NOTE] Although this EFI might work with T430 and X230, is was not intended for these ThinkPad models. So don't misuse issue reports for support requests!
Preparing the config.plist
Download the EFI Folder from the Releases section and unpack it. Make sure to read the included Changelog.md as well, since it contains useful explanations.
Open the config.plist and adjust the following settings depending on your system:
-
ACPI Section:
- Disable
SSDT-PM.aml(unless you have an i7 3630QM as well). Generate your own with ssdtPRGen in Post-Install.
- Disable
-
Booter Section (optional):
- The entries in the MMIO Whitelist are memory regions used by my firmware. Since I don't know if these are used by all T530 BIOSes, I disabled them and the corresponding
DevirtualiseMmioQuirk - To figure out which one(s) your system use(s), you can follow this guide
- This is not a necessity, just some fine-tuning.
- The entries in the MMIO Whitelist are memory regions used by my firmware. Since I don't know if these are used by all T530 BIOSes, I disabled them and the corresponding
-
DeviceProperties: Enable the correct Framebuffer-Patch for your display. The T530 comes with either one of the following display panels:
HD+orHD, supporting different resolutions. Each requires a different framebuffer patch (AAPL,ig-platform-id) with different connector patches:</br>AAPL,ig-platform-id 04006601=HD+= WSXGA and FullHD. Resolution: ≥ 1600x900 px. (Default)</br>AAPL,ig-platform-id 03006601=HD= SD. Resolution: ≤ 1366x768 px.</br>If your T530 has an SD panel, do the following;
- Go to
DeviceProperties - Disable the entry
PciRoot(0x0)/Pci(0x2,0x0)by placing#in front of it. - Enable
#PciRoot(0x0)/Pci(0x2,0x0) 1366x768 pxby deleting the leading#and the description1366x768 px, so that it looks this:PciRoot(0x0)/Pci(0x2,0x0).
:bulb: HINT: If your screen turns off during boot, you are using the wrong Framebuffer-Patch!
- Go to
-
Audio (optional):
- If you need digital Audio over HDMI/DP, disable/delete
No-hda-gfxfrom the Audio Device Properties inPciRoot(0x0)/Pci(0x1B,0x0). - My EFI contains a custom build of
AppleALC.kextwhich only contains layouts18and39(default) and therefore only is 95 KB in size (instead of 3.6 MB). If you are using a docking station, leave it at39. If you don't, change it to18. - Bootchime: If you want the bootchime to play, do the following:
- Under
UEFI/Drivers, enableAudioDxe.efi - Under
EUFI/Audio, enableAudioSupport - Make sure
ConnectDriversis enabled
- Under
- If you need digital Audio over HDMI/DP, disable/delete
-
SIP (optional): Under
NVRAM/Add/7C436110-AB2A-4BBB-A880-FE41995C9F82, adjustcsr-active-configaccording to the macOS version you want to use. Lowering SIP is mandatory if you want to run macOS 12 and newer in order to install and load Intel HD 4000 Drivers! If you have issues running OCLP in Post-Install, changecsr-active-configtoFE0F0000(almost fully disabled).- SIP enabled:
00000000(macOS Big Sur and older only!) - SIP disabled:
- For Big Sur and newer:
03080000(0x803) - For macOS Mojave/Catalina:
EF070000(0x7EF) - For macOS High Sierra:
FF030000(0x3FF)
- For Big Sur and newer:
- SIP enabled:
-
SMBIOS: Under
SystemProductName, select the correct SMBIOS for your CPU and generate a serial, etc. for it. My EFI utilizes Patches and kexts from OpenCore Legacy Patcher which allow using the correct SMBIOS for Ivy Bridge CPUs on macOS 11.3 and newer (Darwin Kernel 20.4+), so native Power Management and OTA System Updates are working oob which wouldn't be possible otherwise past macOS Catalina.- For Intel i7:
MacBookPro10,1(Default) - For Intel i5:
MacBookPro10,2
- For Intel i7:
-
WiFi and Bluetooth (Read carefully!)
- Case 1: Intel Wifi/BT Card. In stock configuration, the T530 comes with an Intel WiFi/Bluetooth card, so you need different kexts for WiFi and Bluetooth. It may work with OpenIntelWireless kexts.
- Check the compatibility list to find out if your card is supported.
- Remove all kexts containing "Brcm" in the name.
- Add the required Kexts for your Intel card to
EFI/OC/Kextsfolder andconfig.plistbefore attempting to boot with this EFI!
- Case 2: 3rd Party WiFi/BT Cards. These require the 1vyrain jailbreak to unlock the BIOS to disable the WiFi Whitelist (not required if the 3rd party card is whitelisted).
- I use a WiFi/BT Card by Broadcom, so my setup requires
AirportBrcmFixupfor WiFi andBrcmPatchRAMand additional satellite kexts for Bluetooth. Read the comments in the config for details. BrcmFirmwareData.kextis used for injecting the required firmware for Broadcom devices. Alternatively, you can useBrcmFirmwareRepo.kextwhich is more efficient but has to be installed intoSystem/Library/Extensionssince it cannot be injected by Bootloaders.- If you use a WiFi/BT Card from a different vendor than Broadcom, remove the Brcm Kexts and add the Kext(s) required for your card to the kext folder and
config.plistbefore deploying the EFI folder!
- I use a WiFi/BT Card by Broadcom, so my setup requires
- Case 1: Intel Wifi/BT Card. In stock configuration, the T530 comes with an Intel WiFi/Bluetooth card, so you need different kexts for WiFi and Bluetooth. It may work with OpenIntelWireless kexts.
-
Kernel Section
- Kernel/Patch: If you have an HDD caddy for the DVD drive bay, you can add this kernel patch to your config to enable SATA hot plugging.
- Kernel/Quirks:
- If you are using a stock BIOS, you need to enable
AppleCpuPmCfgLockQuirk. - If you are using the 1vyrain BIOS,
CFG-Lockwill be disabled by default (not the case for the T430). In this case, you don't need theAppleCpuPmCfgLockQuirk. - To figure out if the
MSR 0xE2register of your BIOS is unlocked, addControlMsrE2.efitoEFI/OC/Toolsand your config.plist (underMisc/Tools) and run it from the BootPicker. The output should look like this: </br>
- If you are using a stock BIOS, you need to enable
-
Misc Section
- Misc/Boot:
HideAuxiliaryis enabled. This hides additional items like Recovery and resetting NVRAM. You can reveal them by pressing the space bar in BootPicker. If you want all items to show by default, disableHideAuxiliary.
- Misc/Boot:
-
NVRAM Section
- Boot-args: (under GUID
7C436110-AB2A-4BBB-A880-FE41995C9F82)brcmfx-country=#a: Sets Wifi Country Code (#a= generic) for Broadcom WiFi cards using AirportBrcmFixup. If you are using an Intel Card, delete this boot argument. Otherwise replace the generic country code with the one for your country listed here. This is recommended to avoid connectivity issues and getting AirDrop to work properly (which I don't use).
- Boot-args: (under GUID
-
PlatformInfo/Generic Section
- Generate and add Serials and stuff for
MacBookPro10,1with OpenCore Auxiliary Tools or GenSMBIOS, so Facetime will work
- Generate and add Serials and stuff for
-
Add/enable alternative/optional Kexts:
- itlwm: Kext for Intel WiFi Cards. Use instead of
AirportBrcmFixupif you don't use a Broadcom WiFi Card - IntelBluetoothFirmware: Kext for Intel Bluetooth Cards. Use instead of
BrcmPatchRamand Plugins if you don't use a Broadcom BT Card - NoTouchID: only required for macOS 10.13 and 10.14 so the boot process won't stall while checking for a Touch ID sensor.
- Feature Unlock: Unlocks additional features like Sidecar, AirPlay to Mac and Continuity Camera.
- itlwm: Kext for Intel WiFi Cards. Use instead of
-
Increase Max Backlight Brightness Level (optional):
- Add boot-arg
applbkl=0for increased maximum brightness of the display as defined inSSDT-PNLF.amlinstead of letting Whatevergreen handle it. Also available as device property (see Whatevergreen documentation for details).
- Add boot-arg
Used boot arguments and NVRAM variables
- Boot-args:
gfxrst=1: Draws Apple logo at 2nd boot stage instead of framebuffer copying → Smoothens transition from the progress bar to the Login Screen/Desktop when an external monitor is attached.ipc_control_port_options=0: Fixes issues with Firefox not working and electron-based Apps like Discord in macOS 12+ when SIP is lowered.
- NVRAM variables:
- OCLP Settings
-allow_amfi: Does the same as boot-argamfi_get_out_of_my_way=0x1but only when the OpenCore Patcher App is running. Otherwise you can't run the root patcher. But this didn't work the last time I tried this setting might be deprecated. hbfx-ahbm: Lets the system hibernate instead of using regular sleep. Requires HibernationFixup.kext. More details hererevblock:media: Blocksmediaanalysisdon Ventura+ (for Metal 1 GPUs). Required so apps like Firefox don't crash. Requires RestrictEvents.kextrevpatch:sbvmm: Forces VMM SB model, allowing OTA updates for unsupported models on macOS 11.3 and newer. RequiresRestrictEvents.kext.memtab: Adds Memory tab to "About this Mac" section (macOS ≤ 12 only). Requires RestrictEvents.f16c: Disables f16c instruction set reporting in macOS 13.3 or newer to prevent CoreGraphics crashing on Ivy Bridge CPUs
- OCLP Settings
EFI How To
Once you're done adjusting the config.plist, mount your system's ESP and do the following:
- Backup your current EFI folder on a FAT32 formatted USB flash drive
- Paste in my EFI folder
- Restart
- Perform an NVRAM Reset (in BootPicker, hit Space Bar to reveal the tool)
- Select macOS to boot
[!NOTE]
The system may crash the first time when booting macOS Ventura or newer. That's normal. After that, it should work as expected.
BIOS Settings
<details> <summary><strong>Click to reveal</strong></summary>Latest BIOS Version: 2.77
DOWNLOAD
| Tab | Submenu | Function | Setting |
|---|---|---|---|
| Config | USB | <ul><li> UEFI BIOS Support<li>USB 3.0 Mode | Enabled <br> Enabled |
| Display | <ul><li>Boot Display Device:<li>OS Detection for NVIDIA Optimus: | ThinkPad LCD </br> Disabled | |
| SATA | <ul><li> SATA Controller Mode | AHCI | |
| CPU | <ul><li>Core Multi-Processing <li> Intel (R) Hyper-Threading Technology | Enabled <br> Enabled | |
| Security | – | <ul><li> Security Chip | Disabled |
| UEFI BIOS Update Options | <ul><li> Flash BIOS Updating by End-Users<li> Secure Rollback Prevention: Enabled | Enabled <br> Enabled | |
| – | <ul><li> Memory Protection | Enabled | |
| Virtualization | <ul><li> Intel Virtualization Technology | Enabled | |
| I/O Port Access | <ul><li> Wireless WAN <li> ExpressCard Slot <li> eSATA Port <li> Fingerprint Reader <li> Antitheft and Computrace <li> Secure Boot | Disabled | |
| Startup | – | <ul><li> UEFI/Legacy Boot | UEFI Only |
| – | <ul><li> CSM Support | Disabled | |
| – | <ul><li> Boot Mode | Quick | |
| – | <ul><li> Boot Order Lock | Enabled |
</details>[!NOTE]
Enable Boot Order Lock after you've set-up the order of the Boot Drives. This prevents
WindowsBootManagerfrom taking over the first slot of the boot drives. This way, you don't need to enable theLauncherOptionin OpenCore!
Installing macOS
Coming from Windows/Linux: Follow the installation guide by Dortania.
[!NOTE]
No support from my end is provided for issues related to UBS Installers created in Windows or Linux or when using a Virtual Machine!
Coming from macOS:
- If you already have macOS installed, you can either download macOS from the App Store, with OCLP or with ANYmacOS. Both can download macOS and create a USB Installer as well.
- IMPORTANT: When upgrading from macOS Catalina or older to Big Sur and newer, additional preparations are required. Follow my macOS install instructions.
Recommended macOS version
Until recently, my recommendation was macOS Catalina. While testing my own instructions for upgrading from macOS Catalina (or older) to Big Sur, I noticed that Big Sur feels snappier and more responsive overall (although benchmarks are slightly lower).
Big Sur is also the best choice if you're planing to upgrade to macOS Monterey or newer. Because macOS 11.3 introduced a virtualization technology which can be used to trick macOS into thinking that it is running in a VM. This allows installing and booting macOS 12+ with an unsupported SMBIOS designed for Ivy Bridge CPUs which improves CPU Power Management and also allows installing System Updates which wouldn't be possible otherwise.
Post-Install
Apply Root Patches with OpenCore Legacy Patcher (macOS 12+)
If you areinstalling macOS 12 or newer, you need to apply post-install root patches with OpenCore legacy Patcher so that on-board graphics and Wi-Fi/Bluetooth work. Instructions can be found in the macOS Install section.
Disable Gatekeeper (optional)
I disable Gatekeeper on my systems because it is annoying and wants to stop you from running scripts from github etc. To do so, enter sudo spctl --master-disable in Terminal.
This command no longer works in macOS Sequoia – it requires a different method to disable Gatekeeper.
Enable brightness control for external displays
There's a new app called MonitorControl which allows controlling the brightness and contrast of attached external displays right from the menu bar. I tested it with my EIZO monitor that is connected to my docking station via DVI and it's working great. Might not work with every display, though.
Strengthen Security
Once macOS is up and running, you may want to change the following settings to make your system more secure:
Misc/Security/SecureBootModel:- macOS Big Sur and older:
Default - macOS Monterey:
Disabled(otherwise insta-crash) - macOS Ventura:
Default(I don't know why butDefaultworks – which it shouldn't…)
- macOS Big Sur and older:
csr-active-config:00000000(macOS 11.x and older only – leave on03080000if your system requires root patches!)UEFI/APFS: changeMinDateandMinVersionfrom-1(disabled) to0(default) or use specific values for different versions of macOS.- Enable Hibernation (use Terminal or change in Hackintool):
- Disable PowerNap:
sudo pmset -a powernap 0 - Change Hibernatemode to 25:
sudo pmset -a hibernatemode 25
- Disable PowerNap:
[!NOTE]
- Enter
nvram 94b73556-2197-4702-82a8-3e1337dafbfb:AppleSecureBootPolicyto check the security level. It should return%01for medium security. More info here- SIP: If you're planning to install macOS Monterey or newer, System Integritiy Protection must be lowered! Because installing the necessary graphics drivers breaks macOS' security seal and the system will crash during boot if it is enabled!
- MinDate/MinVersion: You should keep a working backup of your EFI folder on a FAT32 formatted USB flash drive before changing these settings, because if they are wrong, the APFS driver won't load and you won't see your disk(s) in the BootPicker!
Fixing CPU Power Management
Follow this guide to generate an SSDT-PM.aml to fix CPU Power Management. CPU Power Management should work fine after that.
Optionally, install Intel Power Gadget to check whether or not the CPU runs within specs. You don't need SMCProcessor and SMCSuperIO kexts to monitor the CPU if you use Intel Power Gadget, btw.
NOTES:
- Generating an SSDT-PM is necessary if you use a different CPU than i7 3630QM
- Pre-generated SSDTs for other CPU models used in the T530 can be found here
- You can add modifiers to the terminal command for building SSDT-PM. For example, you can drop the low frequency from the default 1200 MHz to 900 MHz in 100 MHz increments, but no lower than that. Otherwise the system crashes during boot. I suggest you experiment with the modifiers a bit.
ACPI Power Management in macOS 13+
With the release of macOS Monterey, Apple dropped the plugin-type check for handling CPU Power Management. Since then, the X86PlatformPlugin (Plugin-type 1) is loaded by default – prior to Monterey, plugin-type 0 (ACPI_SMC_PlatformPlugin) was the default. For Haswell and newer this is great because you no longer need SSDT-PLUG to enable Plugin-Type 1. But for Ivy Bridge and older, you now not only need SSDT-PM to inject C-States and P-States but also to declare Plugin-Type 0 usage. But using ACPI CPU Power Management is still possible. For macOS Ventura, it's a different story…
In macOS Ventura, Apple removed the actual ACPI_SMC_PlatformPlugin binary from the kext itself rendering SSDT-PM generated for 'plugin-type' 0 useless, since it can't address a plugin which doesn't exist any more. Instead, the X86PlaformPlugin is loaded. This results in CPU Power Management not working correctly out of the box (no Turbo states, etc.).
So when switching to macOS Ventura or newer, injecting additional kexts to re-enable ACPI CPU Power Management (Plugin-Type 0) is necessary. My EFI is already configured to boot macOS Ventura and use ACPI CPU Power Management, so you don't have to worry about it.
Fixing Sleep issues
If you have issues with sleep, run the following commands in Terminal:
sudo pmset hibernatemode 0
sudo rm /var/vm/sleepimage
sudo touch /var/vm/sleepimage
sudo chflags uchg /var/vm/sleepimage
Other Settings:
If the system still wakes from sleep on its own, check the wake reason. Enter:
pmset -g log | grep -e "Sleep.*due to" -e "Wake.*due to"
If the wake reason is related to RTC (Alarm), do the following:
- Enter System Settings
- Open Energy Settings
- Disable "Wake on LAN"
- Disable "Power Nap"
- In Bluetooth Settings, "Advanced Options…" disable the 3rd entry about allowing Bluetooth devices to exit sleep
[!NOTE]
- To exit from Sleep you can press a Mouse button. But to wake from Hibernation, you have to press the
Fnkey or thePower Button.
Reducing boot time
In UEFI/Drivers, disable ConnectDrivers. This reduces the timeout between the LENOVO logo and the BootPicker by 5 to 8 seconds.
[!WARNING]
- Before installing macOS from a USB flash drive,
ConnectDriversneeds to be re-enabled, otherwise you won't see it in the BootPicker.- With
ConnectDriversdisabled, the bootchime cannot be played back sinceAudioDXE.efiis not loaded.
Swapping Command ⌘ and Option ⌥ Keys
Prior to version 0.7.4 of my OpenCore EFI Folder, the [Command] and [Option] keys were set to "swapped" in the info.plist of VoodooPS2Keyboard.kext by default. So in macOS, the [WINDOWS] key was bound to the [Option] key function and the [ALT] Key was bound to the [Command] key function which felt weird. Therefore, users had to swap these Keys back around in the System Settings so everything worked as expected.
Since then, I've undone the key swap inside the VoodooPS2Keyboard.kext plugin so that the Key bindings are working as expected out of the box. So if you are updating from 0.7.3 or lower to 0.7.4, reset the Keyboard Modifier Keys back to Default in System Settings > Keyboard so everything is back to normal.
If the "<", ">" and "^" Keys are switched/reversed, change Use ISO layout keyboard from false to true in the info.plist of VoodooPS2Keyboard.kext.
Changing Themes
Besides the 3 default themes by Acidanthera included in the OpenCore package, I've added an additional theme by Blackosx called BsxM1 which is set as default. To change the theme to something else, do the following:
- Open
config.plistin OpenCore Auxiliary Tools - Go to
Misc/Boot - Select a different theme from the dropdown menu in
PickerVariant - Save
config.plistand reboot to apply the theme.
To revert these changes, enter Acidanthera\GoldenGate as PickerVariant and change the Flavor for the NVRAM Reset Tool back to Auto.
Eject Button
macOS locks the optical drive sometimes so that you can't open it with the physical eject button – even if no media is present. To fix this you have 2 options:
- Option 1: Go to
System/Library/CoreServices/Menu Extrasand double-click onEject.menu. This adds an Eject button Icon to the Menu Bar. - Option 2: Press and hold the
INSbutton (right below the Power Button) until the Eject Icon appears on the screen and the CD tray opens.
Fixing issues with AirportBrcmFixup (Broadcom WiFi Cards only)
I've noticed recently that a lot of crash reports for com.apple.drive.Airport.Brcm4360.0 and com.apple.iokit.IO80211Family are being generated (located under /Library/Logs/CrashReporter/CoreCapture).
This issue is related to Smart Connect, a feature of WiFi routers which support 2,4 gHz and 5 gHz basebands to make the WiFi card switch between the two automatically depending on the signal quality. In my case, turning off Smart Connect resolved the issue.
CPU Benchmark
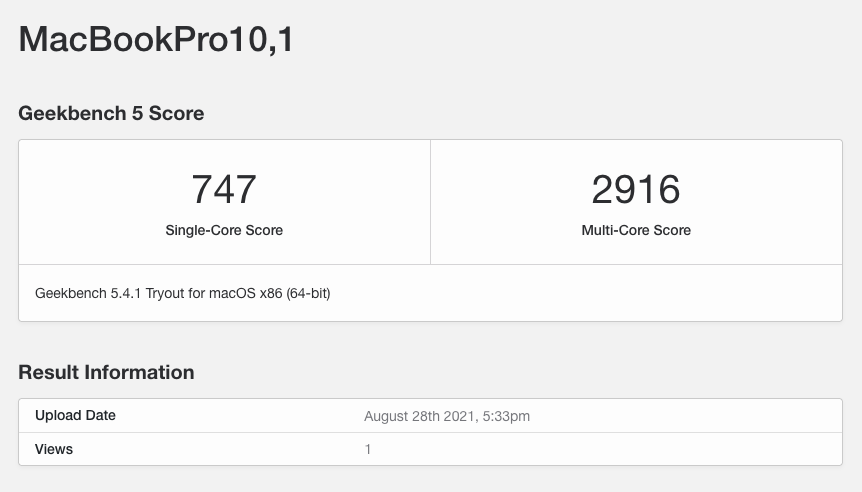 </br>Benchmark Results
Credits and Thank Yous
- George Kushnir for 1vyrain Jailbreak to remove WLAN whitelist from BIOS
- Apple for macOS
- Acidanthera for OpenCore Bootloader and countless Kexts
- Dortania for OpenCore Install Guide and OpenCore Legacy Pacher
- SergeySlice for Clover Bootloader
- khronokernel for Clover Vanilla Install Guide
- 1Revenger1 for ECEnabler
- Corpnewt for SSDTTime, GenSMBIOS, ProperTree and BitmaskDecode
- Piker-Alpha for ssdtPRGen
- ic005k for OpenCore Auxiliary Tools and PlistEDPlus
- Mackie100 for Clover Configurator
- Chris1111 for Patch-HD4000-Monterey
- SL-Soft for Kext Updater and ANYmacOS
- Rehabman for Laptop and DSDT patching guides
- daliansky for OC Little ACPI Hotpatch Collection
- RealKiro for Clover EFI with ACPI Patches for referencing
- banhbaoxamlan for ACPI files to fix the post-sleep pulsing LED issue.
- jsassu20 for MacDown Markdown Editor